To install an AC disconnect box, first turn off the power to the unit at the breaker panel. Then, connect the wires from the AC unit to the disconnect box using appropriate connectors, ensuring the correct polarity.
Finally, mount the disconnect box onto a wall or surface near the AC unit.
Understanding The Purpose And Function Of An Ac Disconnect Box
The role of an Ac disconnect box in your AC system
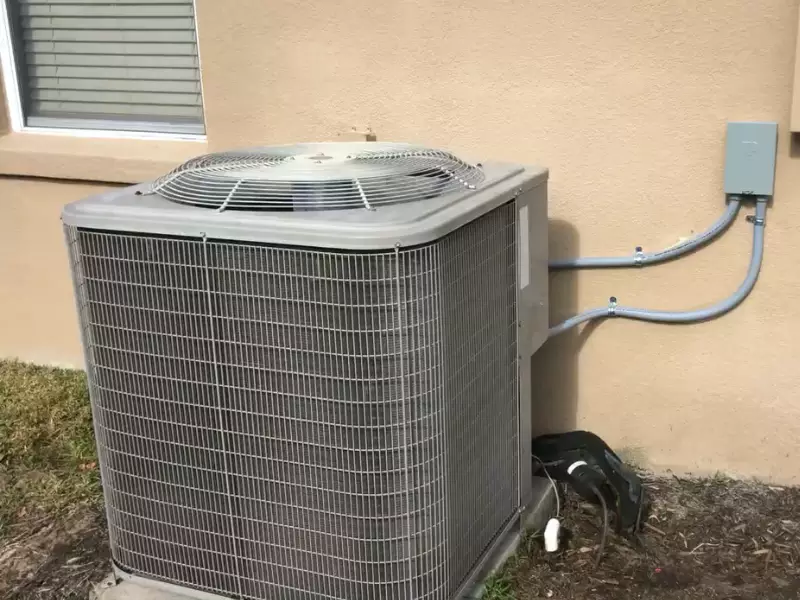
An AC disconnect box, also known as an air conditioner disconnect switch or electrical disconnect, plays a crucial role in the safe and efficient operation of your AC unit. This box is primarily responsible for disconnecting power to the AC unit, allowing you to safely perform maintenance or repairs without the risk of electric shock. Additionally, it serves as an essential component for emergency situations, enabling you to quickly shut down the power supply in case of an electrical malfunction or fire.
Why it is crucial for the safety and efficient operation of your AC unit
The safety and efficient operation of your AC unit are two primary concerns when it comes to installing an AC disconnect box. Without this box in place, any attempt to carry out maintenance work on your AC system could expose you to potentially lethal electrical hazards. By disconnecting the power supply, the disconnect box ensures that you can work on the unit without live wires posing a risk.
Furthermore, the AC disconnect box is vital for the efficient operation of your AC unit. By providing a dedicated point for disconnecting power, it simplifies the process of shutting the system down during maintenance or repairs. This prevents unnecessary wear and tear on the electrical components and ensures that the AC system operates at peak performance, ultimately leading to energy efficiency and a longer lifespan for your unit.
How an AC disconnect box works
An AC disconnect box operates on a straightforward principle. It features a switch that physically disconnects the power supply to your AC unit. The switch is typically housed within a durable weatherproof enclosure to protect it from various environmental conditions.
Inside the box, there are several contact points involved in completing or breaking the electrical circuit. When the disconnect switch is in the “ON” position, these contact points close, allowing electricity to flow to your AC unit. Conversely, moving the switch to the “OFF” position opens these contact points, instantly interrupting the power supply and cutting off electricity to the unit.
This simple yet effective design ensures that the AC disconnect box serves its purpose – disconnecting power when needed – while also providing ease of use for homeowners and technicians. It allows for seamless maintenance, repairs, or emergency shutdowns, promoting both safety and efficiency in your AC system.
Choosing The Right AC Disconnect Box For Your Needs
When it comes to installing an AC disconnect box, choosing the right one for your needs is crucial. An AC disconnect box is an essential component that ensures the safety and functionality of your AC unit. In this section, we will discuss the key factors to consider when selecting an AC disconnect box, how to determine the appropriate electrical specifications and an overview of the different types of disconnect boxes available in the market.
Factors to consider when selecting an AC disconnect box
Before making a purchase, there are a few factors to take into account to ensure you choose the most suitable AC disconnect box for your specific requirements. These factors include:
- Amperage rating: The amperage rating of the disconnect box should match or exceed the maximum amperage of your AC unit. This is crucial to prevent overheating and potential electrical hazards.
- Weather resistance: If the disconnect box will be installed outdoors, it is important to choose a model that is designed to withstand various weather conditions. Look for a disconnect box with a high weather resistance rating to ensure it remains functional and safe in extreme temperatures, rain, or snow.
- Size and dimensions: Consider the available space for installation and ensure the disconnect box dimensions fit your requirements. It’s also important to think about how the box will be mounted and whether it requires additional hardware or accessories.
- Quality and durability: Opt for a disconnect box made from high-quality materials that are durable and long-lasting. Investing in a well-constructed box will provide greater reliability and ensure the safety of your AC unit over the long term.
- UL listing: Look for a disconnect box that is UL-listed, which means it has been tested and approved by the safety certification organization Underwriters Laboratories. This certification ensures the box meets industry standards for safety and performance.
Determining the appropriate electrical specifications
It is crucial to determine the electrical specifications required for your AC disconnect box. These specifications include the voltage and phase requirements of your AC unit. To determine the appropriate electrical specifications, consider the following:
- Voltage: Check the voltage rating of your AC unit and ensure the disconnect box’s voltage rating matches it. Incompatible voltage ratings can lead to malfunctioning or damaged equipment.
- Phase: Determine the phase requirements of your AC unit, which is usually either single-phase or three-phase. Choose a disconnect box that corresponds to the phase requirement of your system. Installing a disconnect box with the wrong phase can disrupt the AC unit’s operation.
Understanding the different types of disconnect boxes available in the market
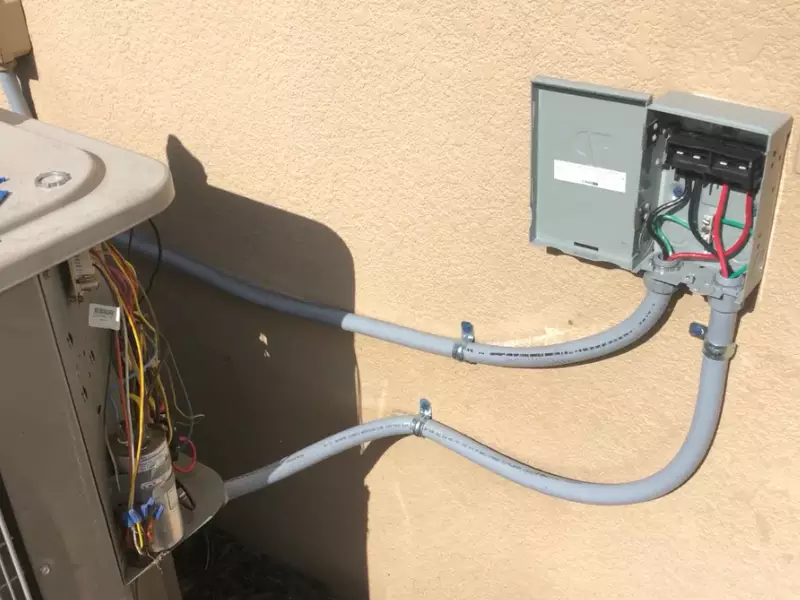
Disconnect boxes come in various types, each serving specific purposes and applications. Understanding the different types can help you make an informed decision. The most common types include:
| Type of Disconnect Box | Description |
|---|---|
| Non-Fused Disconnect Box | This type of disconnect box provides a way to disconnect power from the AC unit but does not have fuses for additional protection. It is commonly used for residential applications. |
| Fused Disconnect Box | A fused disconnect box includes fused switches that provide both disconnection and overload protection. This type is often used in commercial and industrial settings. |
| Pullout Disconnect Box | A pullout disconnect box features a pullout handle to disconnect power. It is designed to prevent accidental reconnection and is commonly used in residential applications. |
Before making a decision, assess your specific needs and consult with professionals if needed to determine the most suitable type of disconnect box for your AC unit.
By considering the key factors mentioned above, determining the appropriate electrical specifications, and understanding the different types of disconnect boxes available in the market, you can confidently choose the right AC disconnect box for your needs. Remember, prioritizing safety and functionality is paramount to ensure optimal performance of your AC system.
Step-By-Step Guide: How To Install Ac Disconnect Box
Are you looking to install an AC disconnect box? It’s a crucial component in any air conditioning system, as it allows for easy disconnect and safe maintenance. In this step-by-step guide, we will walk you through the process of installing an AC disconnect box, ensuring a smooth and hassle-free installation.
Safety Precautions Before Starting the Installation Process
Before you begin installing the AC disconnect box, it is essential to prioritize safety. Follow these safety precautions to ensure you are protected throughout the installation process:
- Turn off the power to the AC unit at the main electrical panel. This step will help prevent any electrical shocks or accidents during the installation process.
- Wear appropriate personal protective equipment (PPE), such as gloves and safety glasses, to protect yourself from any potential hazards.
- Ensure the installation area is clear and free from any obstructions. A clean workspace reduces the risk of accidents and allows for easier installation.
- If you are unsure about any step or lack the necessary skills, it is recommended to hire a professional electrician.
Tools and Materials Required for the Installation
Before diving into the installation process, gather the following tools and materials:
| Tools | Materials |
|---|---|
|
|
Locating the Ideal Position to Mount the AC Disconnect Box
The next step is to identify the best location to mount the AC disconnect box. Follow these guidelines to determine the ideal position:
- Choose a location near the air conditioning unit, ensuring easy accessibility for maintenance and repairs.
- Make sure the location is well-ventilated, as the AC disconnect box can generate heat during operation.
- Ensure the distance between the AC disconnect box and the air conditioning unit meets the local electrical code requirements.
- Consider mounting the box at a height that is convenient for inspection and operation, typically around eye level.
- Attach the AC disconnect box securely to a structurally sound surface using the provided mounting screws.
Following these steps will ensure a safe and efficient installation of your AC disconnect box. Remember to always prioritize safety and consult a professional if needed. Stay tuned for the next steps in our complete guide on how to install an AC disconnect box!
Disconnecting Power To The Ac Unit
Switching off the main electrical supply
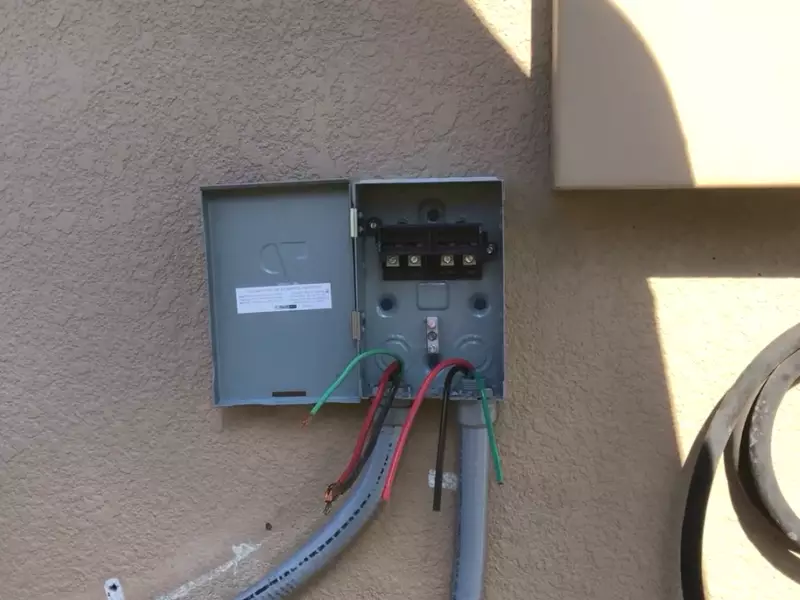
Before you begin the installation process of the AC disconnect box, the first step is to disconnect the power to the AC unit. This is a critical safety measure that must be taken to prevent any accidents or electrical shocks. To switch off the main electrical supply, follow these steps:
- Locate the main electrical panel in your home. This panel is typically found in the basement, garage, or utility room.
- Open the panel door by unscrewing or unlatching it.
- Inside the panel, you will find a row of circuit breakers or fuses. These control the power supply to different areas of your home.
- Locate the circuit breaker that supplies power to the AC unit. It is usually labeled as “AC” or “Air Conditioner”.
- Flip the switch of the AC circuit breaker to the “off” position. This will cut off the power supply to the AC unit.
- Double-check that the AC unit is no longer receiving power by testing it. You can do this by trying to turn on the AC and ensuring it does not start.
Turning off the AC unit’s circuit breaker
In addition to switching off the main electrical supply, it is important to turn off the AC unit’s circuit breaker as an extra precaution. This will ensure that there is no power going directly to the AC unit while you work on the installation. To turn off the AC unit’s circuit breaker, follow these steps:
- Locate the AC unit’s circuit breaker. This is often located near the outdoor compressor unit or in a subpanel specifically dedicated to the AC system.
- Open the circuit breaker box by removing the cover or flipping the latch.
- Look for the circuit breaker labeled specifically for the AC unit. It may be marked as “AC” or “Air Conditioner”.
- Flip the switch of the AC unit’s circuit breaker to the “off” position.
- Ensure that the AC unit does not start or receive power by testing it again, just as you did after switching off the main electrical supply.
By following these steps to disconnect the power to the AC unit, you can proceed with the installation process of the AC disconnect box safely and without any electrical hazards. Remember, safety should always be the top priority when working with electrical components.
Wiring The Ac Disconnect Box
Connecting the electrical wiring to the box
Once you have positioned and mounted your AC disconnect box, it’s time to start connecting the electrical wiring. This step is crucial to ensure that your AC system operates safely and efficiently. Here’s a step-by-step guide on how to properly connect the wiring:
- Before starting any electrical work, make sure that the power supply to the AC unit is turned off. This ensures your safety and prevents any accidents.
- Remove the cover of the AC disconnect box to access the wiring terminals. This cover is typically held in place with screws that can be easily removed with a screwdriver.
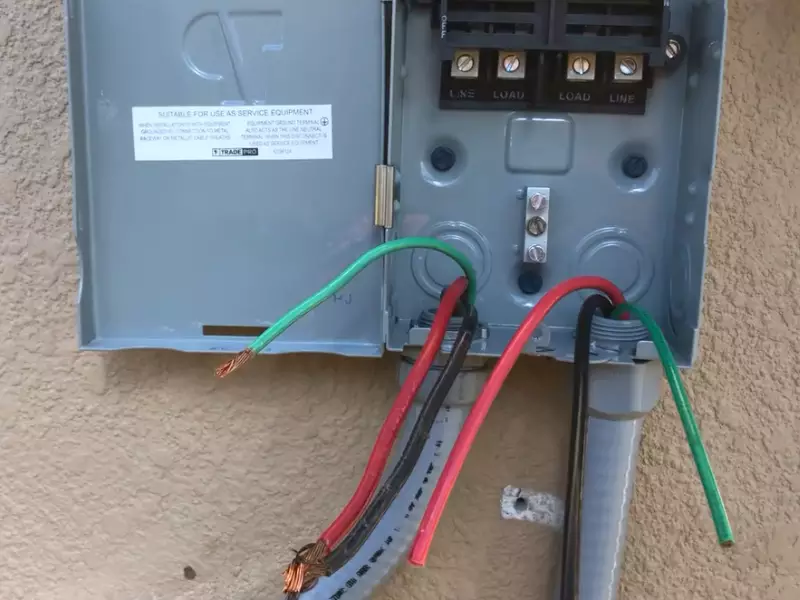
- Identify the different wires that need to be connected. Typically, you will have three wires: the hot wire (black), the neutral wire (white), and the ground wire (green or bare copper).
- Strip the insulation off the ends of the wires, exposing about 1/2 inch of bare wire. This can be done using wire strippers.
- Insert the stripped ends of the wires into the corresponding terminals on the AC disconnect box. The hot wire goes into the terminal labeled “L1” or “Line 1”, the neutral wire goes into the terminal labeled “N” or “Neutral”, and the ground wire goes into the terminal labeled “G” or “Ground”.
- Tighten the screws on each terminal to securely hold the wires in place. Ensure that the connections are tight to prevent any loose connections or potential electrical hazards.
Once you have completed these steps, your electrical wiring should be properly connected to the AC disconnect box. It’s important to double-check all connections before proceeding to the next step.
Properly grounding the Ac disconnect box
Proper grounding is essential for the safe and efficient operation of your AC system. Grounding helps protect against electrical surges, reduces the risk of electrical shock, and ensures that current flows smoothly through the circuit. Here’s how to properly ground your AC disconnect box:
- Locate the grounding lug on the AC disconnect box. This is typically a metal connection point located near the wiring terminals.
- Strip the insulation off the end of the ground wire to expose about 1/2 inch of bare wire.
- Attach one end of the ground wire to the grounding lug on the AC disconnect box.
- Secure the other end of the ground wire to a suitable grounding electrode. This can be a grounding rod driven into the ground or an existing grounding system in your home.
- Ensure that the ground wire is securely connected and tightened at both ends.
By properly grounding the AC disconnect box, you are taking an important step in ensuring the safety and efficiency of your AC system. Grounding provides a path for electrical current to safely flow into the ground, protecting both your equipment and your home.
Securing the wiring and ensuring proper insulation
Once the electrical wiring is connected and the AC disconnect box is properly grounded, it’s important to secure the wiring and ensure proper insulation. This helps protect the wiring from damage, prevents any electrical hazards, and ensures the longevity of your AC system. Follow these steps to secure the wiring and ensure proper insulation:
- Organize the wiring neatly within the AC disconnect box, avoiding any tangled or loose wires.
- Use cable clamps or cable ties to secure the wiring to the walls or base of the AC disconnect box. This prevents the wiring from moving or coming loose.
- Inspect the insulation on all wires to ensure there are no cuts, frays, or exposed conductors. If any damage is found, replace the affected wire.
- Wrap any exposed wiring or connections with electrical tape. This provides an extra layer of insulation and protects against moisture or other external factors.
By securing the wiring and ensuring proper insulation, you are taking necessary precautions to maintain the safety and reliability of your AC system. Regularly inspect and maintain the wiring to prevent any potential issues that may arise in the future.
Mounting And Securing The Ac Disconnect Box
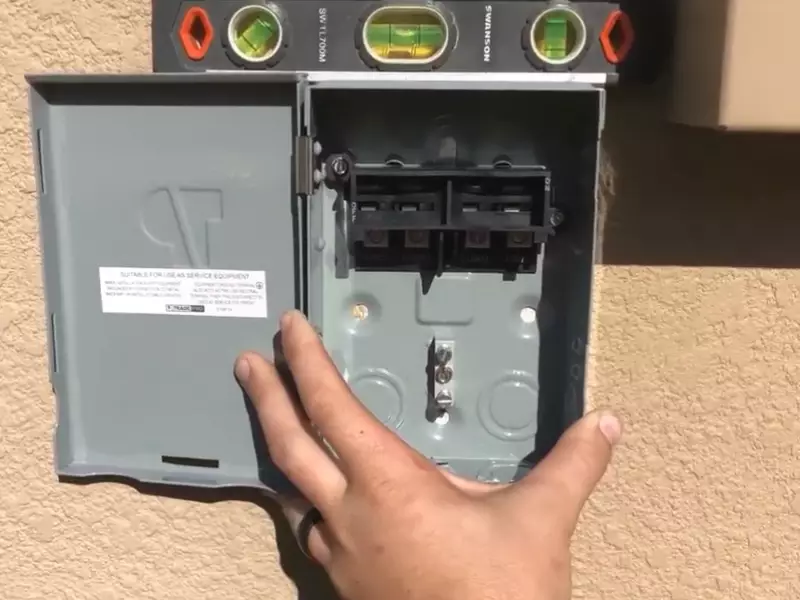
Installing an AC Disconnect Box is an important step in ensuring the safety and functionality of your air conditioning system. Proper mounting and securing of the box is crucial to prevent damage and maintain a stable connection. In this guide, we will walk you through the process of positioning and aligning the box, attaching it to the wall or the AC unit, and ensuring the stability and durability of the installation.
Positioning and Aligning the Box
When it comes to positioning and aligning the AC Disconnect Box, there are a few factors to consider. First, you’ll want to choose a location that is easily accessible, preferably near the AC unit. This will make it convenient for any future maintenance or repairs. Additionally, ensure that the box is positioned away from any obstructions or objects that could interfere with its functionality.
Once you have determined the ideal location, it’s time to align the box properly. Use a level to ensure that the box is perfectly horizontal or vertical, depending on the configuration. This will help prevent any strain on the connections inside the box and ensure optimal performance.
Attaching the Box to the Wall or the AC Unit
Attaching the AC Disconnect Box securely is essential for its stability and longevity. Depending on your installation setup, you may need to attach the box to the wall or directly to the AC unit. Here’s a step-by-step guide for each scenario:
Attaching to the Wall:
- Position the box against the wall in the desired location.
- Using a pencil, mark the mounting holes on the wall through the holes in the back of the box.
- Drill pilot holes at the marked locations to ensure a precise fit.
- Insert the appropriate screws or anchors into the pilot holes and tighten them securely.
- Double-check the alignment of the box before proceeding.
Attaching to the AC Unit:
- Ensure that the AC unit has the necessary mounting brackets or slots for attaching the box.
- Position the box in the desired location on the AC unit.
- Insert the provided screws or bolts through the holes in the box and into the mounting brackets or slots.
- Tighten the screws or bolts securely to ensure a stable connection.
- Verify that the box is aligned correctly with the unit and make any necessary adjustments.
Ensuring Stability and Durability of the Installation
To ensure the stability and durability of the AC Disconnect Box installation, consider the following tips:
- Use high-quality mounting hardware to secure the box firmly in place.
- Check the connections between the box and the AC unit for any signs of looseness or instability.
- Inspect the box regularly to ensure that it remains securely attached.
- Protect the box from exposure to extreme weather conditions by providing a suitable cover or enclosure.
By following these guidelines for positioning, aligning, attaching, and maintaining the AC Disconnect Box, you can ensure a safe and reliable connection for your air conditioning system. Remember to consult the manufacturer’s instructions and seek professional assistance if needed.
Testing The Ac Disconnect Box Installation
Testing is a crucial step after the installation of an AC disconnect box to ensure that it has been done correctly and that the AC unit is functioning efficiently. In this section, we will discuss the important steps involved in testing the AC disconnect box installation. We will cover restoring power to the AC unit, conducting a functionality test, and observing for any potential issues or irregularities.
Restoring power to the AC unit
After completing the installation of the AC disconnect box, it is important to restore power to the AC unit. Follow these steps to safely restore power:
- Locate the main circuit breaker panel in your home.
- Locate the circuit breaker that controls power to the AC unit.
- Ensure that the circuit breaker is in the off position before turning it on.
- Flip the circuit breaker to the on position and wait for a moment.
Note: It is important to wait for a brief moment once the circuit breaker has been turned on to allow the AC unit to properly start up.
Conducting a functionality test
After restoring power to the AC unit, it is now time to conduct a functionality test to ensure that the system is working as intended. Follow these steps to conduct the test:
- Set the thermostat to a lower temperature.
- Listen for the sound of the AC unit starting up.
- Observe the airflow from the vents to ensure that it is cool and consistent.
- Check the AC unit for any unusual noises or vibrations.
- Monitor the thermostat to see if it reaches and maintains the desired temperature.
Note: If there are any issues or irregularities during the functionality test, it is important to address them promptly. Refer to the manufacturer’s manual or seek professional assistance if needed.
Observing for any potential issues or irregularities
During and after the functionality test, it is crucial to observe the AC unit for any potential issues or irregularities. Pay attention to the following:
- Unusual sounds coming from the AC unit or disconnect box
- Abnormal vibrations or shaking
- Foul odors or burning smells
- Leaks or water dripping from the AC unit
Note: If you notice any of the above issues or any other irregularities, it is advisable to seek professional assistance immediately to prevent further damage to the AC unit or safety hazards.
Remember, testing the AC disconnect box installation is an important step to ensure the proper functionality of your AC unit. By following these steps and carefully observing for any potential issues, you can ensure that your AC system operates efficiently and effectively.
Maintenance And Troubleshooting Tips For Ac Disconnect Box
Maintenance and Troubleshooting Tips for Ac Disconnect Box
Regular Inspection and Cleaning of the Disconnect Box
To ensure the smooth operation of your AC system, regular inspection and cleaning of the disconnect box are essential. This component of your air conditioning system plays a crucial role in controlling the power supply to the unit. By inspecting and cleaning it on a regular basis, you can prevent potential issues and ensure that your AC is running efficiently.
Here are a few maintenance tips to keep in mind:
- Turn off the power: Before performing any inspection or cleaning on the disconnect box, make sure to turn off the power supply to the unit. This is crucial for your safety.
- Inspect the wires: Carefully examine the wires inside the disconnect box for any signs of damage. Look out for frayed wires, loose connections, or burnt spots. If you notice any issues, it’s important to address them promptly.
- Clean the contacts: Over time, dust, dirt, and debris can accumulate on the contacts within the disconnect box, hindering the flow of electricity. Use a soft brush to gently clean the contacts and remove any buildup.
- Check for corrosion: Corrosion can impact the performance of the disconnect box and lead to malfunctions. Inspect the terminals and connections for any signs of corrosion. If you spot corrosion, you can use a mild household cleaner to remove it.
- Replace if necessary: If you notice any significant damage or wear during your inspection, it may be time to replace the disconnect box. Consult a professional technician to ensure proper installation.
Signs of a Malfunctioning Disconnect Box
It’s important to familiarize yourself with the signs that indicate a malfunctioning disconnect box. By recognizing these signs early on, you can prevent further damage to your AC system and address the issue in a timely manner.
Look out for the following warning signs:
- Frequent tripping: If your disconnect box is repeatedly tripping, cutting off the power supply to the AC unit, it could be a sign of an underlying problem. This could be due to loose connections, worn-out components, or other electrical issues.
- Burning smell: A noticeable burning smell near the disconnect box is a cause for concern and may indicate overheating or a potential electrical fire hazard. Turn off the power supply immediately and seek professional assistance.
- Inconsistent cooling: If your AC system is struggling to maintain the desired temperature or if there are uneven cooling patterns in different rooms, it could be due to a malfunctioning disconnect box affecting the power supply to the unit.
- Unresponsive unit: If your AC unit is unresponsive even when the power supply is turned on, it could be a result of a faulty disconnect box. In such cases, it is recommended to consult a professional technician for an accurate diagnosis and appropriate repairs.
Common Troubleshooting Techniques and Solutions
When faced with issues related to your AC disconnect box, there are a few common troubleshooting techniques and solutions you can try before seeking professional help. These techniques may help address minor issues and restore the functionality of your disconnect box.
Here are some common troubleshooting techniques:
- Reset the disconnect box: Sometimes, a simple reset can resolve minor issues. Turn off the power supply, wait for a few minutes, and then switch it back on.
- Ensure proper connection: Check the wiring connections within the disconnect box to make sure they are secure and tight. Loose connections can interfere with the power supply.
- Replace fuses or circuit breakers: If the disconnect box uses fuses or circuit breakers, check them for any signs of damage or tripping. Replace them if necessary, following the manufacturer’s instructions.
- Consult a professional: If none of the troubleshooting techniques mentioned above resolve the issue, it’s best to consult a professional HVAC technician. They have the expertise and tools to accurately diagnose and repair the disconnect box.
By following these maintenance and troubleshooting tips, you can ensure the longevity and proper functioning of your AC disconnect box, thus optimizing the performance of your air conditioning system.
Frequently Asked Questions Of How To Install Ac Disconnect Box
Where Do You Put The Hvac Disconnect Box?
The HVAC disconnect box should be placed in a convenient and accessible location near the outdoor unit. It is important to follow local building codes and regulations, as well as manufacturer guidelines. The disconnect box allows for easy shut-off of power to the HVAC system during maintenance or emergencies.
How Do You Replace An Ac Disconnect Box?
To replace an AC disconnect box, follow these steps:
- Turn off the power supply to the AC unit.
- Disconnect the wires from the old box, noting their positions.
- Remove the old box from the wall or panel.
- Install the new disconnect box, ensuring it’s properly secured.
- Reconnect the wires to the new box in the same positions. Remember to consult a professional if you’re unsure of the process.
How High Should An AC Disconnect Be Mounted?
The AC disconnect should be mounted at a height that is convenient for access but high enough to avoid accidental contact. It is recommended to mount it at a height of 5 feet or higher to ensure safety and compliance with electrical codes.
Does An Ac Unit Need A Disconnect Switch?
Yes, an AC unit needs a disconnect switch. It is necessary to have a disconnect switch installed near the AC unit for safety reasons. This allows the unit to be easily and quickly disconnected from its power source during maintenance or emergencies.
Conclusion
To sum up, installing an AC disconnect box is a crucial step in ensuring the safety and efficiency of your AC unit. By following the step-by-step guide provided in this blog post, you can easily handle this task on your own without the need for professional help.
Keep in mind the importance of safety precautions and double-checking your work to avoid any potential issues. With the knowledge and confidence gained from this installation process, you’ll be able to enjoy a well-functioning AC system for years to come.
