To install a tank whistle, attach it to the top of the tank using a screw or adhesive. The tank whistle serves as a safety device to alert when the tank is full or low on liquid, preventing overflow or dry run conditions.
Are you worried about the possibility of accidental tank overflow or dry run conditions? Installing a tank whistle is a simple yet effective solution to this problem. By attaching the whistle securely to the top of the tank, you ensure that you’ll be promptly alerted when the tank is either full or low on liquid.
This safety device serves as a valuable prevention measure, keeping costly accidents at bay. We will guide you through the process of installing a tank whistle, ensuring you have peace of mind and worry-free operations.
Understanding The Importance Of A Tank Whistle
When it comes to tank monitoring, having a tank whistle is a crucial component that should not be overlooked. The role of a tank whistle in tank monitoring is significant, as it serves multiple purposes that contribute to maintaining the safety and efficiency of the tank system. This article will delve into the intricacies of tank whistles, exploring how they help prevent dangerous situations and why their installation is paramount for safety.
The role of a tank whistle in tank monitoring
A tank whistle plays a vital role in tank monitoring by providing an audible indication of the tank’s level. When the liquid inside the tank reaches a certain height, the tank whistle produces a distinct sound, alerting the operators to the tank’s status. This is particularly useful in situations where constant visual monitoring of the tank level may not be feasible.
Moreover, tank whistles also assist in maintaining the tank’s pressure balance. As fluids are consumed or added to the tank, the air pressure within the tank changes. The tank whistle acts as a venting mechanism, allowing excess pressure to escape and preventing the tank from becoming over-pressurized. This helps in preventing potential damage to the tank and ensures its proper functioning.
How a tank whistle helps in preventing dangerous situations
Installing a tank whistle is essential as it aids in preventing dangerous situations that may arise from unnoticed or uncontrolled tank levels. The audible alert produced by the tank whistle serves as an early warning system, enabling operators to take immediate action if the tank becomes dangerously full or empty.
Without a tank whistle, it is possible for tanks to overflow, leading to spills or leaks, which can be hazardous to both the environment and personnel. Additionally, in situations where the tank runs dry, equipment relying on the tank’s contents may be damaged, resulting in costly repairs or downtime. The installation of a tank whistle significantly reduces the risk of such incidents, providing peace of mind and safeguarding against potential accidents.
Why installing a tank whistle is crucial for safety
Ensuring the safety of personnel and the environment is of paramount importance when it comes to handling tanks. Installing a tank whistle is a crucial step towards achieving this goal. The tank whistle not only helps prevent dangerous situations but also allows for better control and management of tank levels.
By having a tank whistle in place, operators can avoid the need for constant manual monitoring, freeing up personnel to focus on other crucial tasks. The tank whistle acts as a reliable and efficient monitoring tool, reducing the risk of human error and improving overall safety standards.
In conclusion, understanding the importance of a tank whistle is vital for anyone involved in tank monitoring operations. The role of a tank whistle in tank monitoring is multifaceted, from providing audible alerts to maintaining pressure balance. By installing a tank whistle, one can prevent dangerous situations, protect the environment, and ensure the safety of both personnel and equipment.
Gathering The Necessary Tools And Materials
Before you begin the installation process of a tank whistle, it is important to gather all the necessary tools and materials. Having everything you need in one place will not only save you time but also ensure a smooth and hassle-free installation experience. In this section, we will cover the essential tools, materials, and safety precautions you should consider before starting the installation process.
Essential tools for the installation process
In order to properly install a tank whistle, you will need the following tools:
| Tool | Purpose |
|---|---|
| Adjustable wrench | To tighten and loosen nuts and bolts |
| Screwdriver (flathead and Phillips head) | To remove screws and manipulate components |
| Drill | To create holes for mounting |
| Hacksaw | To cut pipes if necessary |
| Tape measure | To ensure accurate measurements |
Make sure you have these tools readily available before proceeding with the installation.
Materials required for installing a tank whistle
In addition to the essential tools mentioned above, you will also need the following materials:
- Tank whistle kit (including the whistle itself and any accompanying hardware)
- Teflon tape
- Pipe fittings (if not included in the kit)
- Thread sealant
- Appropriate screws or fasteners
Double-check that you have all the necessary materials handy so that you don’t have to interrupt the installation process.
Safety precautions to take before starting the installation
Prior to installing the tank whistle, it is crucial to prioritize safety. Here are some precautions to consider:
- Wear safety goggles to protect your eyes from potential debris or fragments.
- Use gloves to safeguard your hands from sharp edges or potential injuries.
- Ensure the tank is empty and disconnected from any power source to avoid accidents.
- Read and follow the manufacturer’s instructions, paying close attention to any warnings or safety guidelines.
By adhering to these safety precautions, you can ensure a safe and successful installation process.
Step 1: Choosing The Right Location For The Tank Whistle
When it comes to installing a tank whistle, selecting the right location is crucial for its effectiveness and functionality. In this step, we will discuss the factors to consider when choosing the installation spot, ensuring easy access and visibility of the tank whistle, and determining the ideal position for maximum performance.
Factors to consider when selecting the installation spot
Before installing a tank whistle, it’s important to take into account several factors to ensure its proper functioning. Consider the following:
- Noise Level: Choose a location that is easily audible from various parts of your facility or property. Avoid areas with excessive noise that may mask the whistle sound.
- Obstructions: Make sure there are no obstructions such as walls, trees, or equipment that could obstruct the sound waves produced by the whistle. Clear the surrounding area to ensure maximum sound transmission.
- Wind Direction: Take into account the prevailing wind direction in your area. Install the whistle in a location where the wind will carry the sound towards the desired listening areas.
- Environmental Conditions: Consider the environmental conditions of the installation spot. Avoid areas prone to extreme temperatures, excessive moisture, or corrosive substances that could potentially damage the tank whistle over time.
Ensuring easy access and visibility of the tank whistle
In addition to selecting the right spot for the tank whistle, you must also ensure easy access and visibility for maintenance and monitoring purposes. This includes:
- Accessible Height: Install the whistle at a height that allows easy access during regular maintenance and inspection tasks.
- Clear Signage: Clearly label the tank whistle, indicating what it is and its purpose. This will help personnel locate and identify it easily.
- Line of Sight: Position the tank whistle in a place where it can be easily seen from different angles, ensuring that it catches the attention of anyone nearby.
Determining the ideal position for maximum effectiveness
To ensure maximum effectiveness of the tank whistle, you need to install it in the ideal position. Consider the following:
- Tank Location: Place the whistle near the tank it is associated with, ensuring that the sound reaches the desired audience and serves its purpose.
- Sound Propagation: Position the whistle in an area with minimal sound reflection or absorption. Open spaces are ideal for maximizing sound propagation.
- Strategic Placement: If multiple tanks or areas need monitoring, consider installing additional tank whistles in those specific locations to provide comprehensive coverage.
In conclusion, selecting the right location for a tank whistle is crucial for its overall effectiveness. By considering factors such as noise level, obstructions, wind direction, and environmental conditions, ensuring easy access and visibility, as well as determining the ideal position, you can optimize the performance of your tank whistle and enhance its functionality.
Step 2: Preparing The Tank For Installation
Before you can install a tank whistle, it is crucial to properly prepare the tank. This step includes emptying and cleaning the tank, inspecting it for any existing damage or issues, and assessing the tank’s current venting system.
Emptying and cleaning the tank prior to installation
Before installing a tank whistle, it is essential to empty the tank completely. This can be done by following these steps:
- Turn off any valves connected to the tank.
- Open the tank’s drain valve to release any remaining liquid.
- Ensure all the liquid has drained out by keeping the valve open for a few minutes.
Once the tank is empty, it is important to clean it thoroughly to remove any dirt, residue, or contaminants. Follow these cleaning steps:
- Prepare a solution of warm water and mild detergent.
- Use a scrub brush or sponge to clean the interior surfaces of the tank.
- Rinse the tank thoroughly with clean water to remove any detergent residue.
- Allow the tank to dry completely before proceeding to the next step.
Inspecting the tank for any existing damage or issues
Prior to installing a tank whistle, it is important to inspect the tank for any damage or issues that may affect its functionality. Perform a visual inspection of the tank and look out for the following:
- Cracks or leaks in the tank’s structure
- Dents or deformations on the tank’s surface
- Rust or corrosion on the tank’s exterior
If any damage or issues are detected, it is recommended to consult a professional or contact the manufacturer for further guidance. Continuing with installation on a damaged tank may lead to safety hazards or improper functioning.
Assessing the tank’s current venting system
Before installing a tank whistle, it is necessary to assess the tank’s current venting system. The venting system allows the tank to release pressure and prevent the build-up of dangerous gases. Inspect the venting system and ensure the following:
- The vent pipe is clear of any obstructions.
- The vent pipe is properly connected to the tank.
- The vent pipe is in good condition without any leaks or damages.
If any issues are found with the tank’s venting system, it is crucial to address them before proceeding with the installation of the tank whistle. A proper venting system is necessary for the safe and efficient operation of the tank.
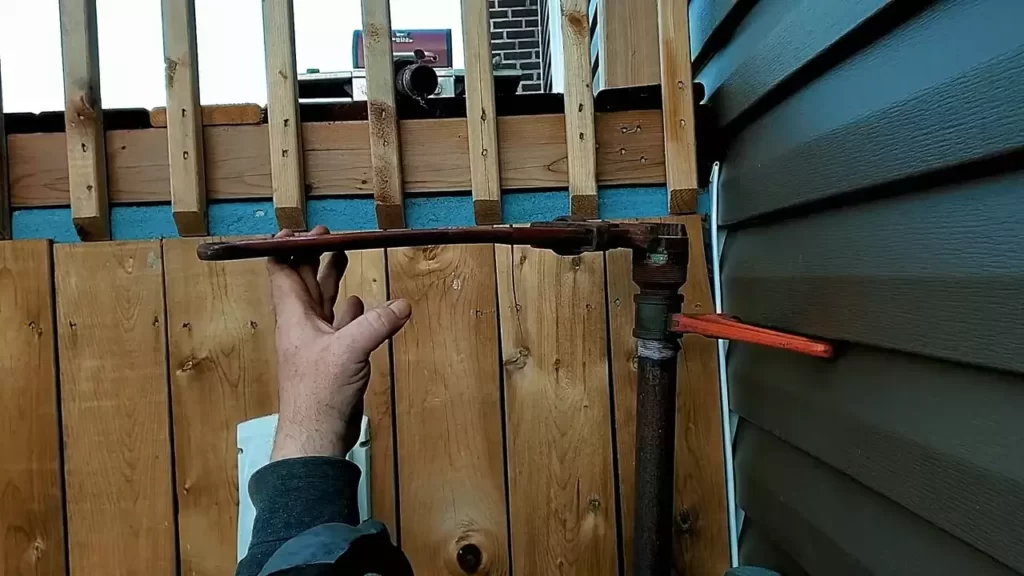
Step 3: Installing The Tank Whistle
Installing a tank whistle can provide an efficient way to monitor the air flow in your tank’s vent pipe. Not only does it help prevent overpressurization and potential damage to your tank, but it also ensures your tank is functioning optimally. In this step-by-step guide, we will walk you through the process of installing a tank whistle to help you maintain the safety and performance of your tank.
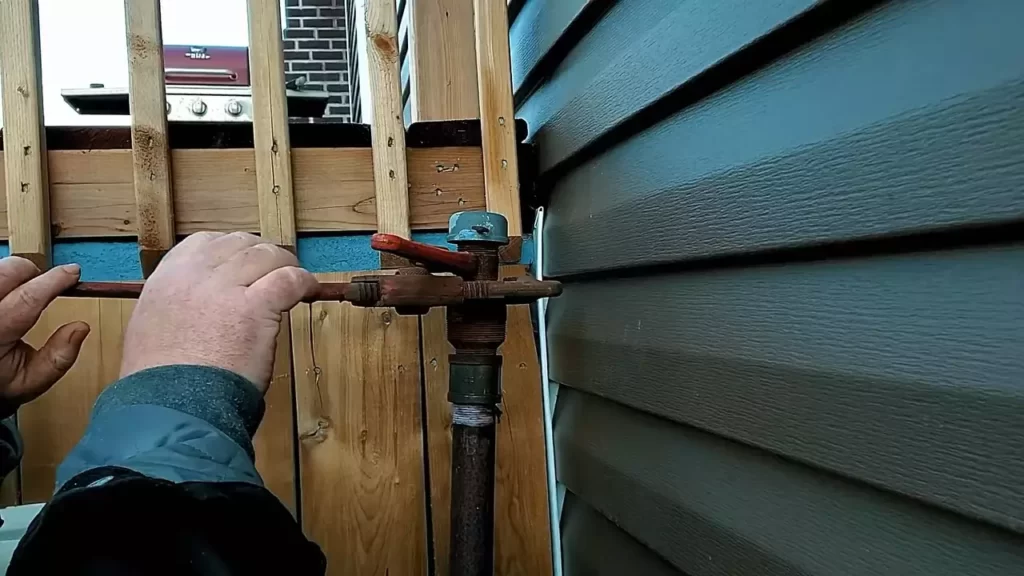
Connecting the tank whistle to the tank’s vent pipe
Begin by locating the vent pipe on your tank. This is typically a vertical pipe extending from the top of the tank, allowing air to flow in and out. Before connecting the tank whistle, ensure the vent pipe is clean and free from any obstructions.
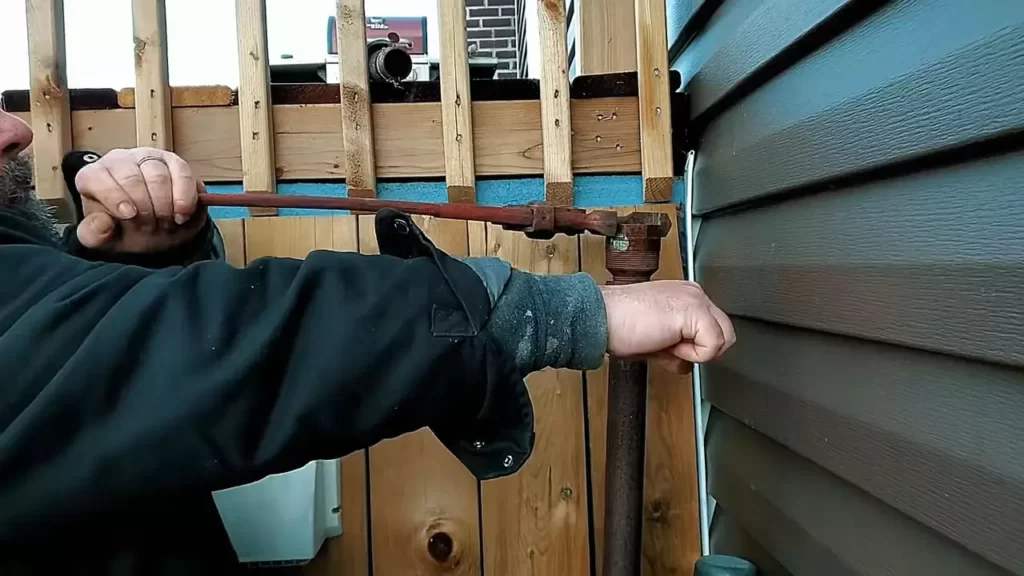
Next, take your tank whistle and place it at the opening of the vent pipe. The whistle should snugly fit into the pipe, allowing for proper air flow. Use a wrench or pliers to secure the whistle in place, ensuring it won’t loosen or come off easily.
It is important to note that different tank whistle models may have varying installation methods. Refer to the manufacturer’s instructions to ensure you are properly installing your specific tank whistle.
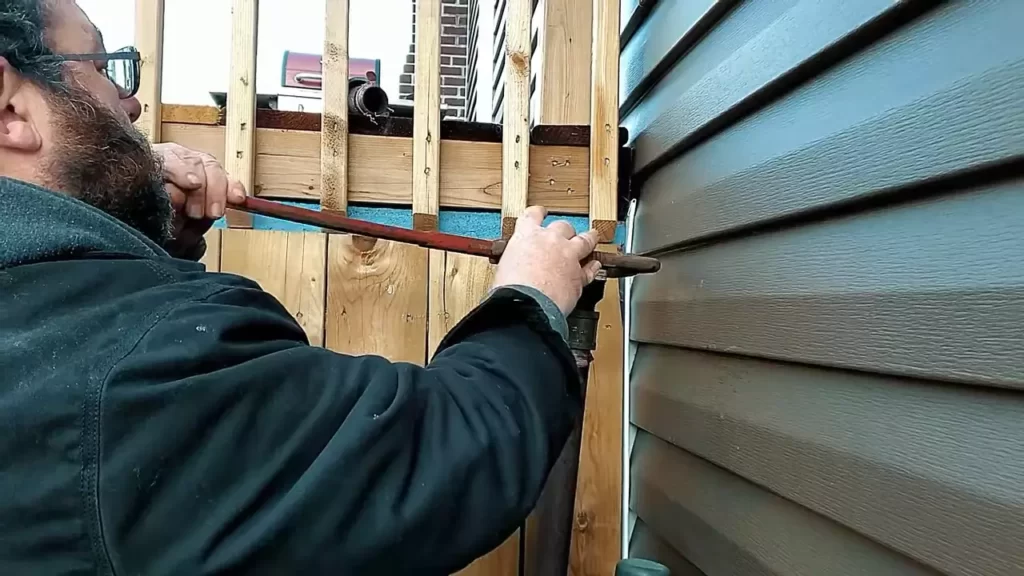
Properly aligning and securing the whistle in place
Once the tank whistle is connected to the vent pipe, take a moment to ensure it is properly aligned and secured. The whistle should be positioned upright and centered, allowing for easy visibility and accurate readings.
If your tank whistle has adjustable brackets or clamps, use them to secure the whistle firmly in place. Tighten any screws or fasteners to ensure a secure attachment. This will prevent the whistle from moving or falling off during normal tank operations.
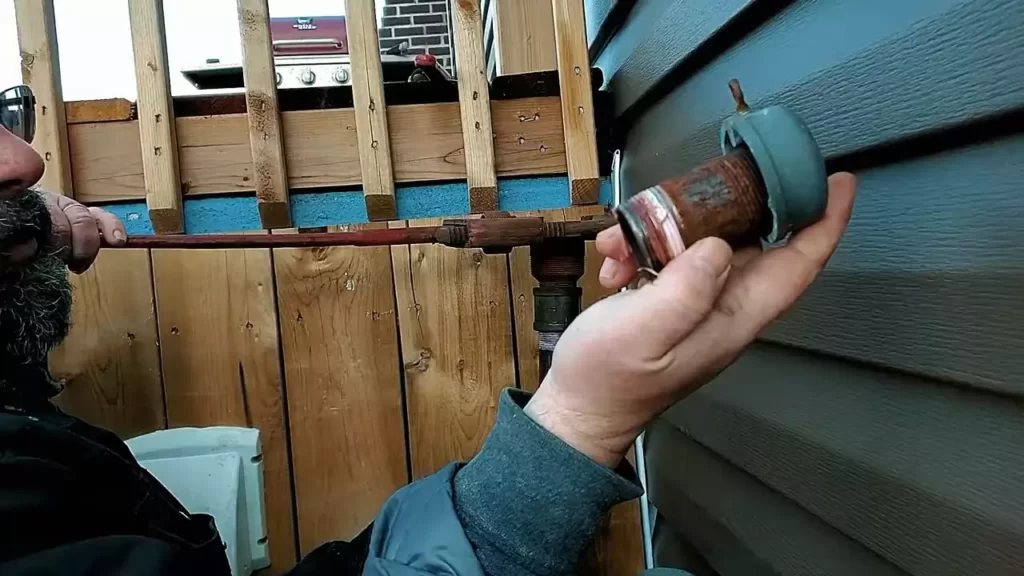
Testing the functionality of the installed tank whistle
After installing and securing the tank whistle, it’s time to test its functionality. Begin by releasing a small amount of air into the tank or opening the tank’s pressure relief valve. The tank whistle should produce a clear and audible sound, indicating the airflow through the vent pipe.
Observe the tank whistle for any signs of malfunction, such as a weak or nonexistent sound. If the whistle does not produce a sound, double-check the installation to ensure it is properly connected and secured. Additionally, inspect the whistle for any damage or debris that may be obstructing its functionality.
Ensuring the tank whistle is functioning correctly is crucial for maintaining the safety and efficiency of your tank. Regularly check the whistle to make sure it continues to produce a clear sound, signaling proper airflow in the tank’s vent pipe.
Step 4: Verifying The Tank Whistle’s Performance
Once you have successfully installed the tank whistle, it is crucial to ensure that it is functioning correctly. This step will not only help you confirm that the whistle is in proper working order but also aid in detecting any potential issues or malfunctions. It is recommended to conduct regular checks to monitor the tank whistle’s sound and performance. This way, you can quickly address any problems that may arise, ensuring the efficient operation of your tank whistle.
Conducting a check to ensure the whistle is functioning correctly
To evaluate the performance of your tank whistle, you will need to conduct a thorough examination. Here is a step-by-step breakdown of how to verify if the whistle is functioning correctly:
- Start by observing the tank whistle during its operation. Listen carefully to the sound it produces and make a note of any abnormalities.
- Check the tank whistle’s physical condition. Ensure that it is securely attached to the tank and that there are no visible signs of damage or wear. Take note of any loose bolts or fittings that may require tightening.
- Inspect the vent stack to ensure it is clear of any obstructions that may impede the whistle’s performance. Remove any debris or buildup if necessary.
- Test the tank whistle by adding or releasing pressure within the tank system. This will help determine if the whistle activates as expected.
- Seek assistance from a professional if you are unsure about the tank whistle’s performance or if any issues are detected during the check.
Monitoring the tank whistle’s sound and performance regularly
After conducting the initial check, it is essential to monitor the tank whistle’s sound and performance regularly. By doing so, you can detect any changes or malfunctions early on and take the necessary measures. Keep the following points in mind:
- Listen for any variations in the tank whistle’s sound or volume. A sudden change in the pitch or intensity of the whistle could be indicative of a problem.
- Note any irregular patterns of activation. If the tank whistle is going off too frequently or not at all, it may signify an issue.
- Record the date and results of each monitoring session to maintain a log of the tank whistle’s performance over time.
Taking necessary measures if any issues or malfunctions are detected
If during your monitoring or check, you identify any issues or malfunctions with the tank whistle, it is crucial to take immediate action. Here are the steps you should follow:
- Investigate the cause of the problem. Check for any obstructions, damages, or loose components that may be affecting the whistle’s performance.
- Refer to the manufacturer’s instructions or contact their customer support for guidance on resolving the issue.
- Depending on the severity of the problem, consider consulting a professional for assistance. They will have the necessary expertise to diagnose and repair any complex faults.
- Ensure the tank whistle is properly repaired before returning it to service. Regularly test it to verify that the issue has been resolved.
By being proactive in verifying the tank whistle’s performance and addressing any issues promptly, you can maintain the efficient and safe operation of your tank system.
Additional Tips For Maintaining The Tank Whistle
Once you’ve successfully installed your tank whistle, it’s important to regularly clean and maintain it to ensure it functions properly and efficiently. By following these additional tips, you can prolong the lifespan of your tank whistle and avoid any disruption in its performance.
Cleaning and Maintaining the Tank Whistle Regularly
Cleaning your tank whistle regularly is essential to keep it in optimal condition. Over time, dirt, dust, and debris can accumulate, leading to reduced performance and potential malfunction. Follow these steps to clean and maintain your tank whistle:
- Turn off the tank whistle: Before you start cleaning, make sure to turn off the tank whistle and disconnect it from any power source to avoid any accidents.
- Remove any visible dirt: Using a soft cloth or brush, gently wipe away any visible dirt or debris on the surface of the tank whistle. This will help prevent the accumulation of grime and keep it looking clean.
- Use compressed air: To remove any dust or particles that may have settled inside the tank whistle, use a can of compressed air. Gently blow air into the whistle’s openings to dislodge any trapped dirt.
- Inspect for damage: While cleaning, take the opportunity to inspect the tank whistle for any signs of damage or wear. Look for loose wires, cracks, or any other issues that may affect its functionality.
Troubleshooting Common Problems with the Tank Whistle
Despite regular maintenance, there may be instances when your tank whistle encounters problems. Here are a few common issues you might face and how to troubleshoot them:
| Problem | Troubleshooting Steps |
|---|---|
| No sound is produced |
|
| Weak or inconsistent sound |
|
| Continuous or excessive noise |
|
Replacing or Upgrading the Tank Whistle if Needed
If you’ve tried troubleshooting the problems with your tank whistle and still cannot resolve the issues, it may be time to consider replacing or upgrading it. Here are a few steps to follow when replacing or upgrading your tank whistle:
- Research and select a new whistle: Take the time to research and choose a new tank whistle that fits your specific needs and requirements. Look for reliable brands and read customer reviews to ensure you’re making the right choice.
- Disconnect the old whistle: Turn off the power supply and disconnect the old tank whistle from the tank or any other connections it may have.
- Install the new whistle: Follow the installation instructions provided by the manufacturer to properly install the new tank whistle. Ensure all connections are secure and the whistle is correctly aligned.
- Test the new whistle: Once installed, turn on the power supply and test the new whistle to ensure it is functioning correctly. Make any necessary adjustments as needed.
By following these additional tips for maintaining your tank whistle, you can keep it running smoothly and efficiently for years to come. Regular cleaning, troubleshooting common problems, and replacing or upgrading when necessary will ensure your tank whistle continues to serve its purpose effectively.
Frequently Asked Questions For How To Install A Tank Whistle
How Does A Fuel Tank Whistle Work?
A fuel tank whistle works by creating a high-pitched sound when air escapes. The whistle is designed to release pressure and prevent the tank from becoming damaged.
Why Is There No Whistle On My Oil Tank?
There may not be a whistle on your oil tank due to different tank designs or variations. The absence of a whistle does not affect the functionality of the tank.
Where Should The Vent Alarm Be Installed On An Oil Delivery System?
The vent alarm should be installed at the highest point of an oil delivery system.
Does Every Oil Tank Require A Vent Alarm And Tank Gauge?
Yes, every oil tank requires a vent alarm and tank gauge for safe and accurate monitoring of oil levels. These devices ensure proper ventilation and prevent overfilling, reducing the risk of leaks and potential damage.
Conclusion
To conclude, installing a tank whistle is a simple and effective way to ensure efficient operation and safety in any tank system. By following the step-by-step process outlined in this guide, you can easily add this important device to your tank without any hassle.
Remember to prioritize safety precautions and consult a professional if you feel unsure about any aspect of the installation. With a tank whistle in place, you can rest assured knowing that you’ll be alerted to any potential issues before they become major problems.