To install a Whirlpool over the range microwave, mount the unit to the wall and secure it with the provided screws. Connect the microwave to a safe power source and test its functionality before use.
Introducing a Whirlpool over the range microwave is a convenient addition to any kitchen. It not only saves counter space but also provides an efficient way to cook and heat food. However, correctly installing the microwave is crucial to ensure its proper functioning and safety.
We will provide a step-by-step guide on how to install a Whirlpool over the range microwave. From mounting the unit to connecting it to a power source, we will cover all the necessary steps for a successful installation. So let’s get started!
Tools And Materials You’ll Need
Installing a Whirlpool over the range microwave is an exciting project that can greatly enhance the functionality and aesthetics of your kitchen. To ensure a successful installation, it is important to have the right tools and materials at your disposal. In this section, we will discuss the required tools as well as the necessary materials for mounting the microwave.
Required tools for installation
Before you begin the installation process, make sure you have the following tools:
- Measuring tape
- Phillips screwdriver
- Stud finder
- Level
- Drill with bits
- Pencil or marker
These tools are essential for measuring, marking, and securing the microwave in place. Having them readily available will make the installation process much smoother and efficient.
Necessary materials for mounting the microwave
In addition to the tools mentioned above, you will also need the following materials:
| Materials | Description |
|---|---|
| Mounting bracket | A bracket specifically designed for supporting the weight of the microwave and attaching it to the wall. |
| Mounting template | A template that helps you determine the exact placement of the mounting bracket on the wall. |
| Wall studs | These are vertical wooden beams within your wall that provide structural support. They are crucial for securely fastening the mounting bracket. |
| Screws and anchors | These are used to secure the mounting bracket to the wall studs. |
| Ventilation duct | A duct that allows the microwave to expel heat and odors outside. It should be compatible with the microwave model you have. |
By having these materials on hand, you can ensure a proper and secure installation of your Whirlpool over the range microwave.
Now that you know what tools and materials are required, you are ready to start installing your Whirlpool over the range microwave. In the next section, we will guide you through the step-by-step installation process.
Preparing For Installation
Before you begin installing your Whirlpool Over the Range Microwave, it’s important to take the necessary steps to ensure a smooth and hassle-free process. In this section, we’ll cover the key points to keep in mind when preparing for installation. Let’s dive right in!
Ensure Proper Ventilation in the Installation Area
Proper ventilation is crucial for the efficient functioning of your over the range microwave. Without adequate ventilation, the microwave could overheat and experience performance issues. So, before you start the installation process, make sure the installation area has proper ventilation.
If you’re replacing an existing range hood or microwave, check that the ventilation system is in good working condition. Ensure that the air flow is not obstructed and that the exhaust ducts are clean and free from debris. This will help the microwave to properly expel steam, smoke, and odors, keeping your kitchen fresh and clean.
Check the Space and Measurements for a Perfect Fit
Prior to installation, it’s important to check the space and measurements where the Whirlpool Over the Range Microwave will be placed. By doing so, you can ensure a perfect fit and avoid any potential issues later on.
Measure the height, width, and depth of the space where the microwave will be installed. Compare these measurements to the dimensions of the microwave to ensure there is enough clearance for proper installation. Be sure to check the installation manual for the specific clearance requirements provided by Whirlpool.
Additionally, consider the location of existing cabinets or any other items that may interfere with the installation. Make sure there is enough space for the microwave door to open and close comfortably. Taking these measurements and considerations into account will help you achieve a seamless installation.
Remove Any Existing Microwave or Range Hood
If you currently have a microwave or range hood in the installation area, you’ll need to remove it before installing the Whirlpool Over the Range Microwave. This step is essential to ensure a clean, clutter-free space and proper installation.
Start by disconnecting the power supply to the existing appliance. Remove any screws or brackets that are holding it in place. With the help of another person, carefully lift and remove the old appliance from its position. Take your time to avoid any damage to the surrounding area or yourself.
Remember to dispose of the old appliance responsibly. Check your local regulations regarding proper disposal methods or consider recycling options for electronic appliances.
Now that you’ve prepared for installation by ensuring proper ventilation, checking space and measurements, and removing any existing microwave or range hood, you’re ready to move on to the next step: Installing your Whirlpool Over the Range Microwave. Stay tuned for the next section where we’ll guide you through the installation process step-by-step.
Mounting The Microwave
Installing a Whirlpool over the range microwave is an efficient and space-saving solution for your kitchen. However, proper installation is crucial to ensure that it is secure and functions optimally. In this guide, we will walk you through the process of mounting the microwave to the wall. Follow these simple steps to get your Whirlpool over the range microwave ready for use.
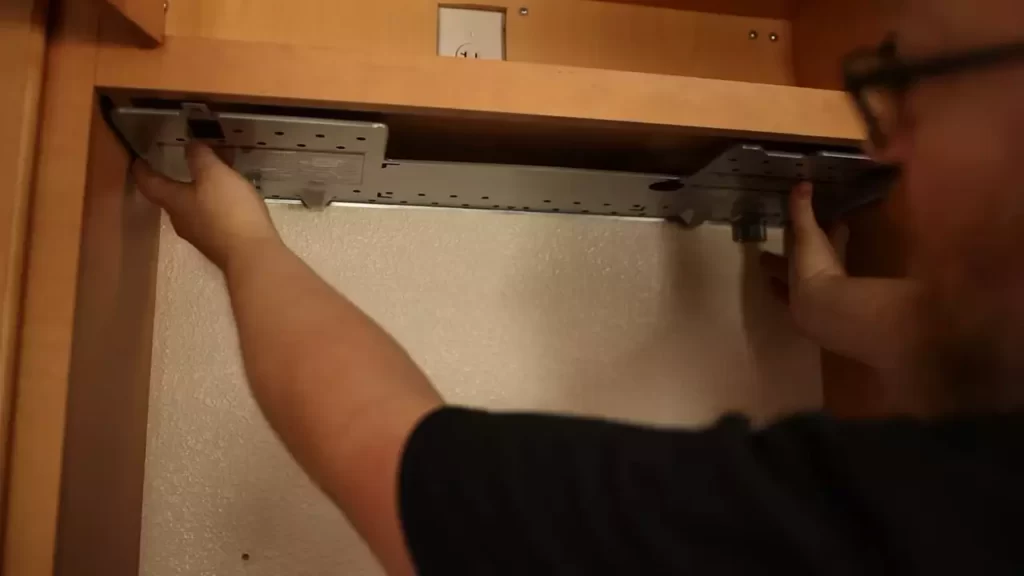
Locate the mounting bracket and mark the drill holes
The first step in mounting the Whirlpool over the range microwave is locating the mounting bracket and marking the drill holes on the wall. The mounting bracket is usually included in the packaging of the microwave. Ensure you have all the necessary tools handy, including a drill and a measuring tape.
Start by measuring and marking the desired height for the microwave. The typical height for mounting an over the range microwave is about 18-24 inches from the cooktop surface. Once you have determined the height, use a pencil to mark the drill holes for the mounting bracket.
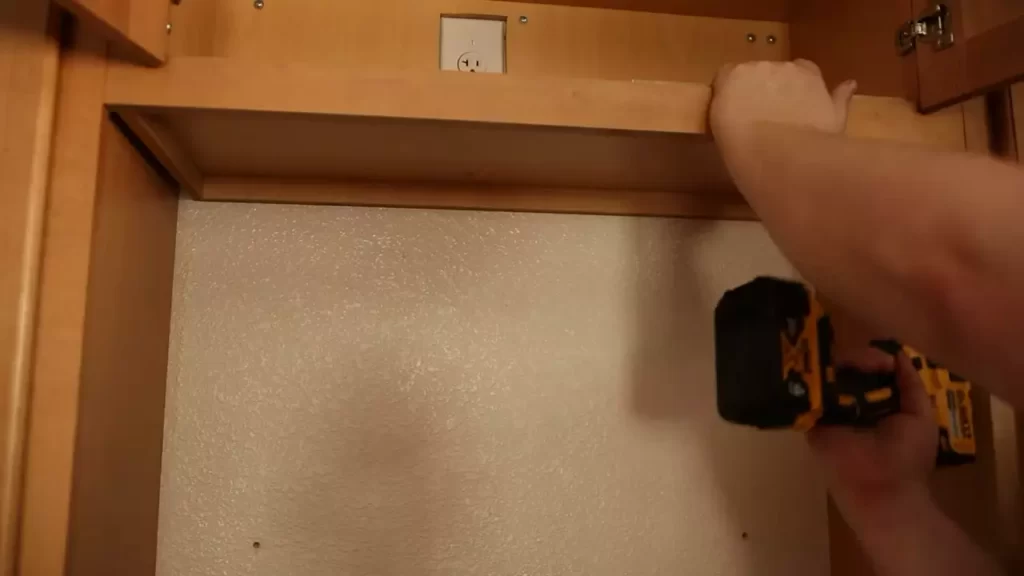
Drill holes for the bracket and secure it to the wall
After marking the drill holes, it’s time to drill them into the wall. Make sure you use the appropriate drill bit size for the specific wall material you are working with. For instance, if you have a drywall, use a drywall anchor to secure the screws.
Once the holes are drilled, attach the mounting bracket to the wall using the provided screws. Ensure that the bracket is level and securely fastened. This will provide a sturdy base for your over the range microwave.
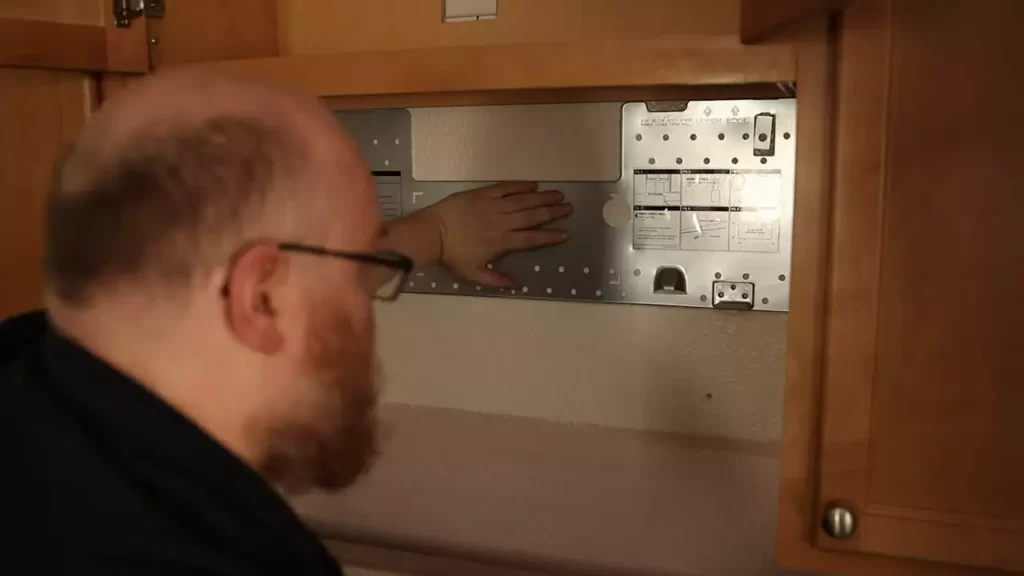
Attach the mounting plate to the microwave
With the mounting bracket securely installed, it’s time to attach the mounting plate to the Whirlpool over the range microwave. Locate the mounting plate on the back of the microwave and align it with the holes on the bracket.
Carefully slide the microwave onto the mounting bracket, ensuring that it sits evenly and securely. You may need a second person to assist with holding the microwave in place while attaching it to the bracket.
Once the microwave is in position, insert and tighten the screws provided to secure the mounting plate to the bracket. Double-check the stability of the microwave to ensure it is properly attached.
Congratulations! You have successfully mounted your Whirlpool over the range microwave. Remember to follow any additional manufacturer instructions for finalizing the installation, such as connecting the power and exhaust vent.
Now that your Whirlpool over the range microwave is properly mounted, you can enjoy the convenience it offers in your kitchen. Whether you’re reheating leftovers or cooking a delicious meal, your new microwave will be an essential tool in your culinary adventures.
Electrical Connections
Installing a Whirlpool over the range microwave requires proper electrical connections to ensure safe and efficient operation. Follow these steps to make the electrical connections:
Shut off power to the microwave installation area
Before starting any electrical work, it’s important to turn off the power to the microwave installation area. This helps prevent any accidental electrical shocks or damage during the installation. Locate the circuit breaker or fuse panel and switch off the power supply to the designated area.
Determine the electrical requirements and gather the necessary supplies
It’s crucial to determine the electrical requirements of the Whirlpool over the range microwave and gather the necessary supplies before making the connections. Check the user manual or specifications provided by the manufacturer for the specific electrical requirements, such as voltage, amperage, and wire size.
Once you have the electrical requirements, gather the necessary supplies including wire nuts, electrical tape, wire strippers, and a junction box or electrical outlet box. Ensure that the supplies are of good quality and meet the safety standards for electrical connections.
Make electrical connections following safety guidelines
When making electrical connections, it is essential to follow safety guidelines to prevent any accidents or damage. Here are the steps to make the electrical connections:
- Remove the knockout on the junction box or electrical outlet box and secure it in place.
- Strip the electrical wires to expose the copper ends using wire strippers.
- Connect the wires following the specific wiring diagram provided by the microwave manufacturer. Typically, the white wire connects to the neutral terminal, the black wire connects to the live or hot terminal, and the green or bare copper wire connects to the ground terminal. Use wire nuts to secure the connections.
- After making the connections, wrap electrical tape around the wire nuts to provide extra protection.
- Carefully tuck the wires into the junction box or electrical outlet box, making sure they are not pinched or damaged.
- Double-check all the connections to ensure they are secure and tight.
It is crucial to adhere to safety guidelines and consult a licensed electrician if you are unsure about any step or if you are not experienced in electrical work.
Remember to restore the power supply to the microwave installation area once the electrical connections are completed.
Exhaust Configuration
Choose the appropriate exhaust configuration for your kitchen
When it comes to installing your Whirlpool over the range microwave, one important aspect to consider is the exhaust configuration. This is crucial for ensuring proper ventilation in your kitchen and maintaining a clean and comfortable cooking environment.
First, assess the layout of your kitchen and determine the best exhaust configuration that suits your needs. Whirlpool offers two main options for exhaust – recirculating and vented to the outside.
- Recirculating: This configuration is ideal if you don’t have access to an exterior vent. In this setup, the microwave’s exhaust system filters and recirculates the air back into the kitchen. It includes a charcoal filter that helps remove cooking odors and grease particles.
- Vented to the outside: If you already have an exterior vent or if you can install one, this configuration provides the most effective ventilation. It expels the cooking fumes, odors, and heat directly outside, creating a cleaner and more comfortable cooking environment.
Install the exhaust vent and connect it to the microwave
Once you have chosen the appropriate exhaust configuration, it’s time to install the exhaust vent and connect it to the microwave. Here are the steps to follow:
- Determine the ideal location for the vent on the exterior wall or roof. It should be placed as close to the microwave as possible for optimal airflow.
- Ensure there are no obstacles such as electrical wires, plumbing pipes, or structural elements in the chosen location.
- Drill a hole in the exterior wall or roof with the appropriate size for the vent.
- Attach the vent cap on the exterior side of the hole.
- Connect the exhaust vent to the microwave according to the manufacturer’s instructions. This may involve inserting an adapter into the exhaust opening of the microwave and securing it with appropriate fasteners.
- Use duct tape or clamps to secure the connection between the vent and the microwave, ensuring a tight seal.
Test the exhaust system for proper ventilation
After installing the exhaust vent and connecting it to the microwave, it’s crucial to test the exhaust system to ensure proper ventilation. Here’s how you can do it:
- Turn on the microwave and set it to the highest power setting.
- Place a sheet of paper or tissue near the vent hood to see if it gets pulled towards the vent. This indicates that the exhaust system is functioning properly and effectively removing air from the kitchen.
- If the paper or tissue does not get pulled towards the vent, check for any obstructions or leaks in the exhaust system. Make sure all connections are secure and tight. You may need to reposition or adjust the vent if necessary.
- Repeat the test after making any adjustments to ensure the exhaust system is working as intended.
By following these steps and choosing the appropriate exhaust configuration, you’ll be able to install your Whirlpool over the range microwave and ensure efficient ventilation in your kitchen. A well-ventilated kitchen not only helps eliminate unwanted odors and fumes but also creates a healthier and more pleasant cooking environment for you and your family.
Final Steps
Now that you have successfully installed the wall-mounted bracket and attached the Whirlpool over the range microwave, it’s time to complete the final steps to ensure everything is secure and functioning properly. Follow these instructions to complete the installation process:
Secure the microwave to the wall-mounted bracket
First, make sure the microwave is aligned correctly with the wall-mounted bracket. Adjust the microwave if necessary so that it lines up with the mounting holes on the bracket. Once aligned, use the provided screws to fasten the microwave to the bracket. Be sure to tighten the screws securely to ensure the microwave is firmly attached.
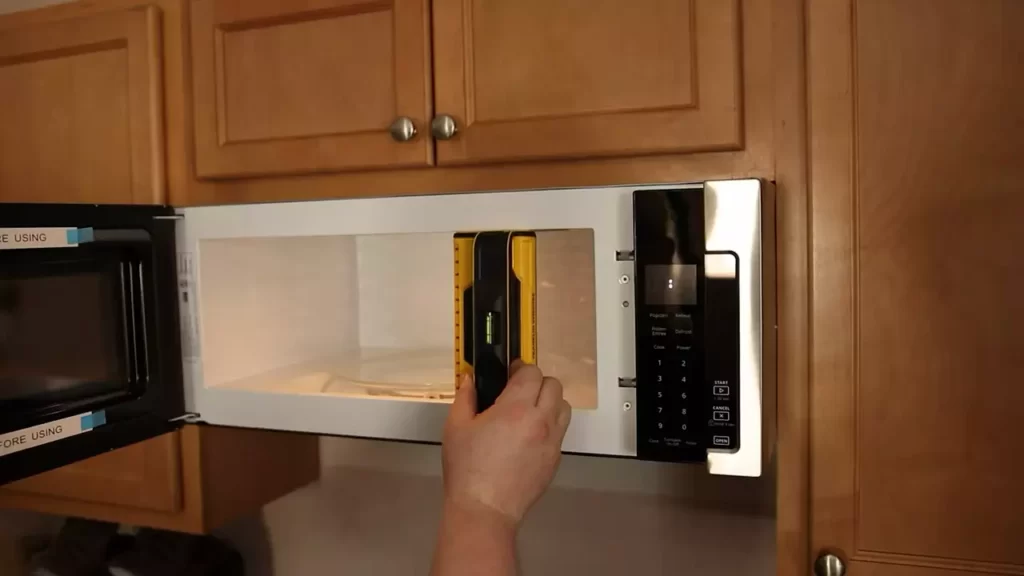
Adjust and level the microwave
Next, check to see if the microwave is level. Place a level on top of the microwave and adjust accordingly. Use a wrench to loosen the bolts on the microwave’s mounting assembly if needed, then make any necessary adjustments. Once the microwave is level, tighten the bolts back up to secure the microwave in place.
Test the microwave to ensure it is functioning properly
After securing and leveling the microwave, it’s important to test it to ensure it is functioning properly. Plug in the microwave and turn it on. Test the control panel buttons, check if the interior light turns on, and listen for any unusual sounds. Additionally, heat up a small cup of water to test the microwave’s heating capabilities. If everything is working as it should, congratulations! Your Whirlpool over the range microwave installation is complete.
Installing a Whirlpool over the range microwave can be a straightforward process when following the proper steps. By securely attaching the microwave to the wall-mounted bracket, adjusting and leveling it, and thoroughly testing its functionality, you can be confident in your successful installation. Now, it’s time to enjoy the convenience of your new microwave for all your cooking needs.
Safety Precautions
Follow safety guidelines throughout the installation process
When it comes to installing a Whirlpool Over the Range Microwave, it is important to prioritize safety precautions at every step of the process. By following these guidelines, you can ensure a smooth and secure installation without compromising your safety or the integrity of your microwave.
- Before beginning the installation, make sure to read and understand the manufacturer’s instructions and safety guidelines. This will provide you with the necessary knowledge to carry out the installation correctly and safely.
- Always turn off the power supply to the area where you will be working. This will prevent any electrical shocks or accidents. It is also crucial to unplug the microwave from the power source before starting the installation.
- Wear appropriate safety gear such as gloves and safety glasses to protect yourself from any potential hazards. This is particularly important when handling electrical wiring or heavy objects.
Take necessary precautions when working with electrical wiring
Working with electrical wiring can be dangerous if not done correctly. To ensure your safety, it is essential to follow these precautions when installing your Whirlpool Over the Range Microwave:
- Ensure the power is completely turned off before you start working on any electrical connections or wiring. This will prevent any electrical shocks or accidents during the installation process.
- Handle electrical wires with care and avoid touching any exposed wires or terminals. If you are unsure about any aspect of the wiring, it is best to consult a professional electrician.
- Use appropriate wire connectors and insulation to secure all electrical connections. This will reduce the risk of electrical short circuits and ensure the longevity of your microwave.
Use caution when handling the microwave and mounting hardware
During the installation process, it is important to handle the Whirlpool Over the Range Microwave and its mounting hardware with caution. Follow these precautions to avoid any accidents or damage:
- Ensure the area where you will be working is clear of any obstacles or hazards. This includes removing any dishes or objects from the microwave and keeping the workspace tidy.
- When lifting the microwave, use proper lifting techniques and ask for assistance if it is heavy. This will prevent strain or injury to your back or muscles.
- Carefully read the manufacturer’s instructions on how to mount the microwave to the wall or cabinet. Follow the instructions precisely to ensure a secure and stable installation.
Frequently Asked Questions Of How To Install Whirlpool Over The Range Microwave
How Do You Mount A Whirlpool Microwave Over The Stove?
To mount a Whirlpool microwave over the stove, follow these steps:
1. Measure the space above the stove to ensure it fits.
2. Locate the studs in the wall for secure support.
3. Install the mounting plate using the provided template.
4. Hang the microwave on the plate and secure it.
5. Plug in the microwave and test it before use.
Can You Install An Over The Range Microwave Yourself?
Yes, you can install an over the range microwave yourself. It is a fairly simple process that typically involves mounting the microwave, connecting it to the vent and power supply, and properly securing it. Just ensure you follow the manufacturer’s instructions and take necessary safety precautions.
How Are Over The Range Microwaves Attached?
Over the range microwaves are attached by mounting them onto a wall bracket, which is secured to the wall studs. The microwave is then placed onto the bracket and fastened securely with screws. Ensure to follow the manufacturer’s instructions for specific guidance on attachment.
How Do You Remove A Whirlpool Over The Range Microwave?
To remove a Whirlpool over the range microwave, follow these steps:
1. Unplug the microwave.
2. Open the cabinet above the microwave.
3. Locate and remove the screws securing the microwave to the cabinet.
4. Lift the microwave off the mounting plate.
5. Carefully lower and remove the microwave.
Conclusion
Installing a Whirlpool over the range microwave can be a straightforward process with the right guidance. By following the step-by-step instructions provided in this blog post, you can ensure a successful installation without any hassle. From preparing the space to connecting the electrical and venting components, each detail has been covered to help you achieve a seamless installation.
With your new Whirlpool over the range microwave in place, you can now easily enjoy the convenience and efficiency it brings to your kitchen. Happy cooking!