To install a wall heater gas, you must follow these steps: turn off the gas supply, mount the heater securely on the wall, connect the gas line, and test for any gas leaks. Before beginning the installation process, ensure that you have all the necessary tools and materials on hand, such as a wrench, a level, and gas pipe sealant.
It is also important to consult the manufacturer’s instructions for your specific model, as the installation steps may vary. Wall heater gas installations should be carried out by a professional if you are not confident or experienced in handling gas connections.
Factors To Consider Before Installation
The installation of a wall heater gas is not a task to be taken lightly. There are several factors that need to be carefully considered before proceeding with the installation. These factors include the size and BTU requirements of the heater, efficiency ratings, and safety features to look for. By considering these factors before installation, you can ensure that you choose the right wall heater gas that meets your needs and provides efficient and safe heating for your space.
Size and BTU Requirements
One of the first factors to consider before installing a wall heater gas is the size of the unit and its BTU (British Thermal Units) requirements. The size of the heater should be determined based on the dimensions of the room or space where it will be installed. A heater that is too small may struggle to adequately heat the space, while a heater that is too large may waste energy and result in higher utility bills. Additionally, the BTU requirements should be considered to ensure that the heater has sufficient power output to effectively heat the desired area.
Efficiency Ratings
Efficiency ratings are another important factor to consider when installing a wall heater gas. The efficiency rating of a gas heater is typically expressed as an AFUE (Annual Fuel Utilization Efficiency) percentage. This percentage indicates the amount of fuel that is converted into usable heat. A higher AFUE percentage means that more heat is produced using less fuel, resulting in greater energy efficiency and lower operating costs. When choosing a wall heater gas, consider selecting a unit with a higher AFUE rating to ensure optimal efficiency and cost-effectiveness.
Safety Features to Look for
Safety should always be a top priority when installing a wall heater gas. Look for safety features that are included with the unit to ensure safe operation and peace of mind. Some important safety features to consider include:
- Automatic shut-off: This feature automatically turns off the heater if it detects a malfunction or if it tips over, preventing the risk of fire or gas leaks.
- Low oxygen sensor: A low oxygen sensor detects if the oxygen level in the room drops below a safe level, triggering the heater to shut off to prevent the accumulation of carbon monoxide.
- Pilot light indicator: This feature indicates whether the pilot light is on or off, allowing you to easily monitor the status of the heater and ensure it is functioning properly.
- Child safety lock: If you have children or pets, a child safety lock can provide an extra layer of protection by preventing accidental changes to the heater’s settings.
By considering these safety features and selecting a wall heater gas that incorporates them, you can ensure the safety of your household and minimize the risk of accidents or hazards.
Before proceeding with the installation of a wall heater gas, take the time to carefully consider these factors. The size and BTU requirements, efficiency ratings, and safety features should all be taken into account to ensure that you select the right unit for your needs. By making an informed decision and taking the necessary precautions, you can enjoy the comfort and warmth provided by your wall heater gas while maintaining a safe and efficient heating system.
Turning Off The Gas Supply
Before you begin installing your wall heater gas, it is crucial to turn off the gas supply to ensure your safety. Shutting off the gas supply is an essential step in the installation process that should never be overlooked. Follow the steps below to turn off the main gas valve:
- Locate the main gas valve in your home. This valve is typically located near your gas meter or where the gas line enters your house.
- Using a wrench or pliers, turn the valve handle clockwise to shut off the gas supply. Ensure that the valve is fully closed and in the off position.
- Take this opportunity to inform other residents or family members that the gas supply will be temporarily turned off.
- Always keep in mind that safety should be your top priority during the installation process.
Checking for Gas Leaks
Once you have successfully shut off the main gas valve, it’s essential to verify if there are any gas leaks. This step is necessary to ensure the safety of your household. Follow these steps to check for gas leaks:
- Mix a solution of one part liquid dish soap and one part water in a spray bottle.
- Before turning the gas supply back on, spray the solution onto all connections, fittings, and joints along the gas line.
- Observe for any bubbles forming. If bubbles appear, it indicates a gas leak, and you should immediately contact a professional gas technician to handle the situation.
- If no bubbles appear, this means that the connections are secure, and you can proceed with the installation process.
Ventilation Requirements
When installing a wall heater gas, it is crucial to consider the ventilation requirements for proper operation and to maintain indoor air quality. Adequate ventilation prevents the build-up of potentially harmful gases, such as carbon monoxide. Here are some important points to remember regarding ventilation:
- Follow the manufacturer’s guidelines and instructions regarding ventilation requirements specific to your wall heater gas model.
- Ensure that there is an adequate air supply for combustion by providing proper ventilation to the room.
- Check if there are any obstructions, such as furniture or curtains, that may impede the flow of fresh air into the room.
- Consider installing carbon monoxide detectors near the wall heater gas and in other areas of your home as an additional safety measure.
By turning off the gas supply, checking for gas leaks, and adhering to proper ventilation requirements, you are ensuring the safe and efficient installation of your wall heater gas.
Preparing The Installation Area
Before you begin installing your wall heater gas, it is essential to prepare the installation area properly. This will not only ensure a smooth and hassle-free installation process but also optimize the heating efficiency of your device. In this section, we will guide you through the necessary steps to clear the space, determine the proper placement, and consider the mounting options and materials required.

Clearing the Space
The first step in preparing the installation area is to clear the space where you intend to mount your wall heater gas. Remove any furniture, decorations, or other objects that might obstruct the installation process or pose a safety hazard. Creating an uncluttered space will also allow for better air circulation and heat distribution, maximizing the effectiveness of your wall heater. Moreover, make sure to clean the area thoroughly to remove any dust or debris that could potentially interfere with the installation or affect the performance of your unit.
Proper Placement for Optimal Heating
Selecting the right location for your wall heater gas is crucial to ensure optimal heating throughout the room. Consider factors such as the size of the area, the layout of the room, and the presence of windows, doors, or other openings. Ideally, the heater should be placed on an exterior wall to minimize heat loss. This way, the warmth produced by the unit will be retained within the room more effectively, resulting in a more comfortable environment and potentially lower energy costs. Additionally, position the heater at a height that allows for easy access and efficient heat distribution. Keep in mind that the heater should be installed away from any flammable materials or obstacles that could impede its proper functioning.
Mounting Options and Materials Needed
When it comes to mounting your wall heater gas, there are various options and materials available to consider. The most common mounting options include surface-mounting and recessed installation. Surface-mounting involves attaching the heater directly to the wall, while recessed installation requires creating a cavity in the wall to house the unit partially or completely. The choice between these options depends on factors such as personal preference, available space, and the desired aesthetic. Whichever option you choose, make sure to use appropriate mounting brackets, screws, and anchors that are compatible with your specific wall heater gas model. Consult the manufacturer’s instructions for the recommended materials and guidelines to ensure a secure and stable installation.
Gathering The Necessary Tools And Materials
Before you begin the installation process for your wall heater gas, it’s important to gather all the necessary tools and materials. By having everything you need in advance, you can save time and ensure a smooth installation. In this section, we will discuss the list of required tools, materials and connectors needed, as well as the safety equipment that you should have on hand.
List of Required Tools
Here is a comprehensive list of the tools you will need to install a wall heater gas:
- Wrench set
- Screwdriver set
- Drill
- Level
- Measuring tape
- Pipe cutter
- Adjustable pliers
- Hacksaw
- Masking tape
- Pencil or marker
Materials and Connectors Needed
In addition to the tools, you will also need a variety of materials and connectors. Here is a list of what you should gather:
- Wall heater gas unit
- Gas supply line
- Gas shut-off valve
- Flexible gas connector
- Thread sealant
- Mounting brackets
- Wall studs
- Insulation materials (if required)
- Mounting hardware
- Electrical wiring (if applicable)
Safety Equipment
When it comes to working with gas and electrical components, safety is of utmost importance. Make sure you have the following safety equipment readily available:
- Protective gloves
- Safety goggles
- Dust mask
- Fire extinguisher
By gathering all the necessary tools, materials, connectors, and safety equipment, you are now ready to proceed with the installation process. Remember to refer to the manufacturer’s instructions and local building codes for specific guidelines and regulations. Let’s delve into the step-by-step process of installing your wall heater gas in the next section.
Installing The Gas Line
When installing a gas wall heater, it is crucial to ensure a safe and effective gas line installation. This involves several important steps, such as determining the correct pipe size, measuring and cutting the pipe, and using Teflon tape for sealing. In this section, we will guide you through each step to help you successfully install the gas line for your wall heater.
Determining the Correct Pipe Size
Before you begin, it’s essential to determine the correct pipe size for your gas line. The size of the pipe will depend on the BTU (British Thermal Units) rating of your wall heater and the distance it needs to cover. A larger BTU rating will require a larger pipe size to ensure proper gas flow.
To determine the correct pipe size, consult the manufacturer’s specifications for your wall heater. They will typically provide a recommended pipe size based on the BTU rating. It’s crucial to follow these recommendations to ensure safe and efficient operation.
Measuring and Cutting the Pipe
Once you have determined the correct pipe size, it’s time to measure and cut the pipe. Make sure you have all the necessary tools, such as a pipe cutter and a deburring tool, to complete this task.
Measure the length of the pipe required, keeping in mind any bends or turns that may be necessary to accommodate the installation. Use a pipe cutter to make a clean, square cut at the measured location. After cutting the pipe, use a deburring tool to remove any burrs or rough edges that may interfere with proper sealing.
Using Teflon Tape for Sealing
Proper sealing is critical to prevent any gas leaks and ensure the safety of your gas wall heater installation. One effective method for sealing gas connections is by using Teflon tape.
To apply Teflon tape, start by wrapping it clockwise around the male end of the pipe threads. Make sure to wrap the tape tightly, overlapping each wrap to create a secure seal. Continue wrapping until the entire threaded section is covered with tape.
After applying the Teflon tape, carefully thread the pipe into the fitting, ensuring a tight connection. Avoid over-tightening, as this can damage the threads and lead to leaks. If you notice any leaks, immediately turn off the gas supply and inspect the sealing to identify any areas that need adjustment.
By following these steps, you can install the gas line for your wall heater efficiently and safely. Remember to always prioritize safety and consult a professional if you are unsure or uncomfortable with any aspect of the installation process.
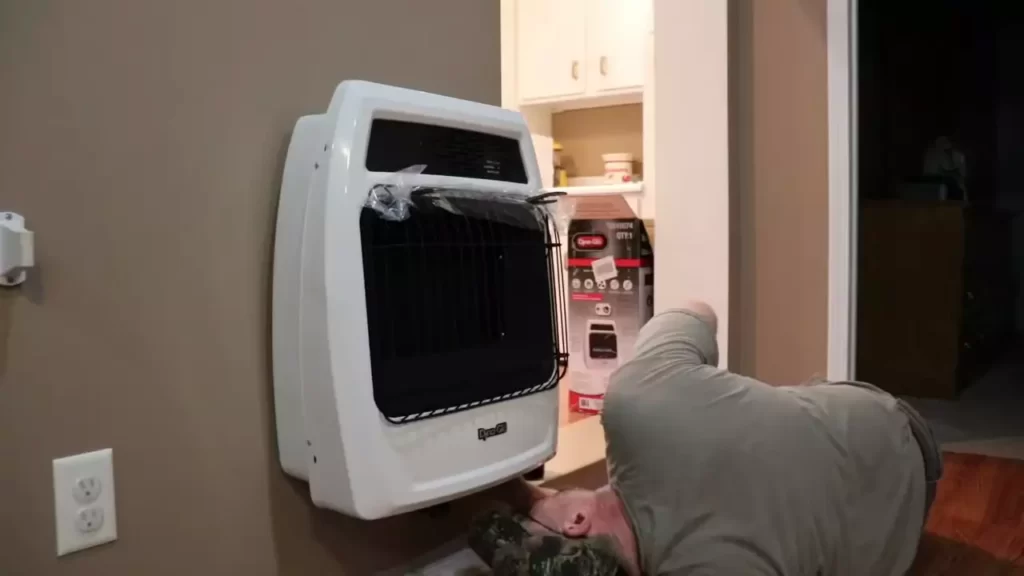
Attaching The Wall Heater
Attaching the wall heater is a crucial step in the installation process. It ensures that the unit is securely mounted on the wall, allowing for efficient and effective heat distribution. In this section, we will guide you through the necessary steps to properly attach your gas wall heater, including positioning the unit, connecting the gas line, and securing the heater to the wall.
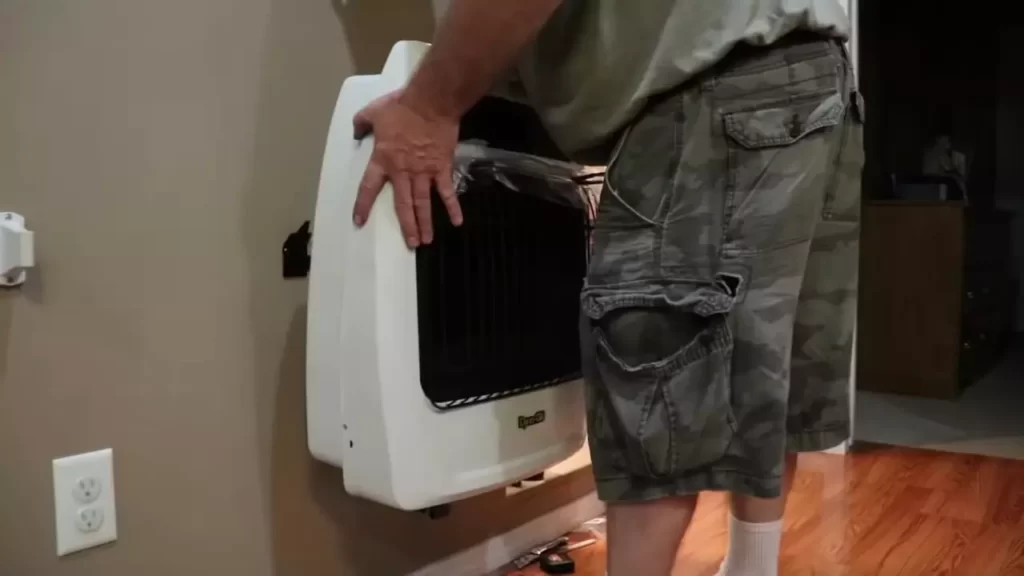
Positioning the Unit
Before attaching the wall heater, it is important to find the ideal location for optimal heat distribution. Consider the following factors when positioning the unit:
- Choose a spot that is central to the room, allowing the heat to evenly reach all areas.
- Ensure there is proper clearance around the unit, following the manufacturer’s guidelines for minimum distance from combustible materials.
- Take into account the height of the unit to avoid obstructions and ensure easy accessibility for maintenance and repairs.
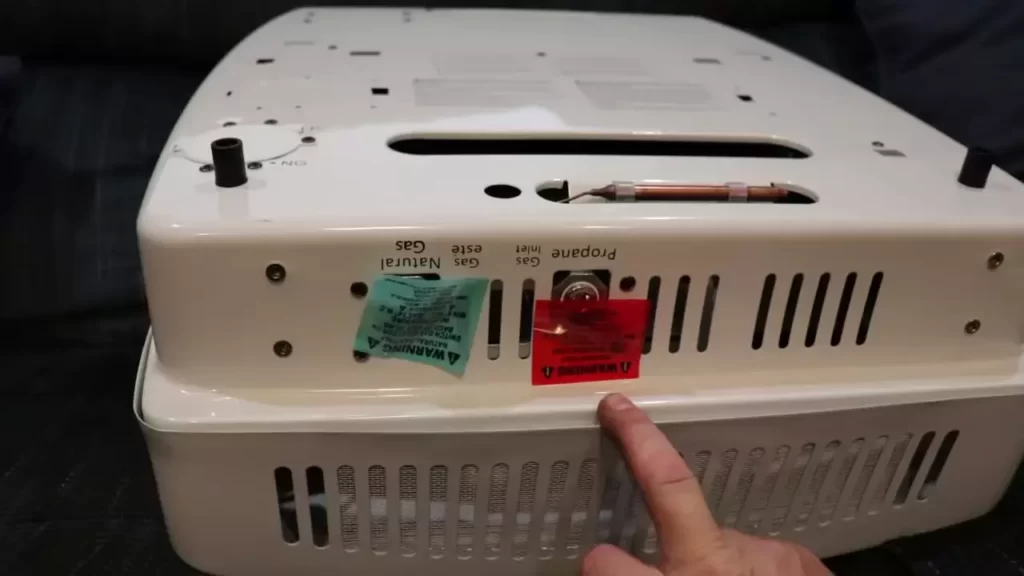
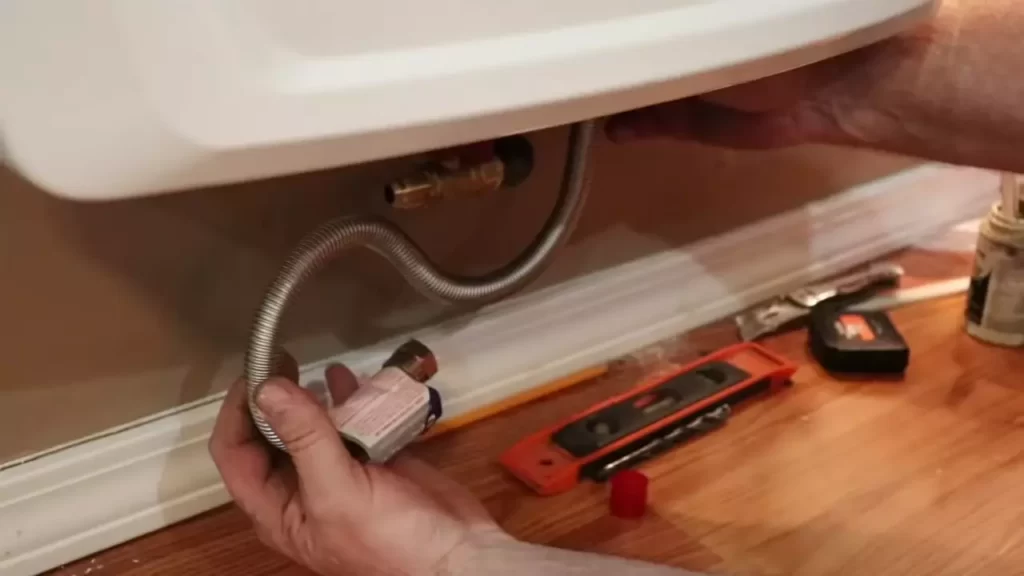
Connecting the Gas Line
Once you have positioned the wall heater, the next step is to connect the gas line. Follow these steps to safely and securely connect the gas line:
- Locate the gas supply line in the wall near the heater’s installation area.
- Using an appropriate pipe wrench, remove the threaded cap from the gas supply line.
- Apply plumber’s tape to the threads of the gas supply line to ensure a tight and leak-free connection.
- Connect the gas line to the heater’s gas inlet, twisting it firmly until it is securely in place.
- Using a wrench, tighten the connection between the gas line and the gas inlet, ensuring it is snug but not overtightened to avoid damaging the threads.
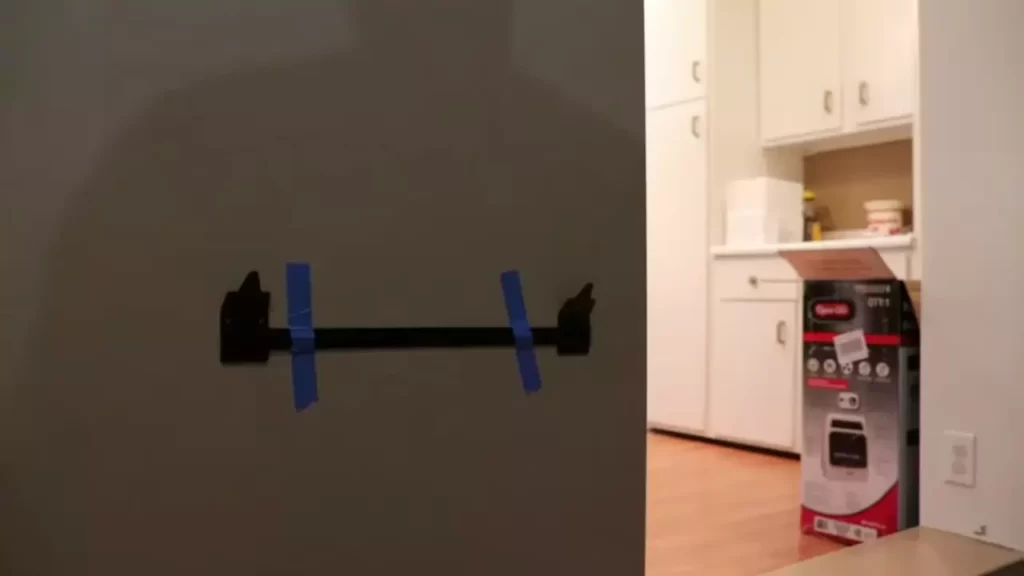
Securing the Heater to the Wall
Once the gas line is connected, it’s time to secure the wall heater to the wall. Follow these steps to ensure a sturdy and stable mounting:
- Position the heater against the wall, aligning it with any mounting holes provided.
- Mark the location of the mounting holes on the wall using a pencil or marker.
- Using an appropriate drill bit, create pilot holes at the marked locations.
- Insert wall anchors into the pilot holes to provide additional support for the mounting screws.
- Align the heater’s mounting holes with the pilot holes and wall anchors, then attach the unit to the wall using the provided screws.
- Ensure that all screws are tightened securely, but avoid overtightening to prevent damage to the heater or wall.
By following these steps, you will be able to successfully attach your wall heater gas and enjoy its warmth and comfort.
Testing And Finalizing The Installation
When it comes to installing a wall heater gas, testing and finalizing the installation is a crucial step to ensure safety and proper functioning. This involves checking for gas leaks, venting the unit correctly, and testing the heater for proper functioning. By following these steps, you can confidently conclude the installation process.
Checking for Gas Leaks
It is essential to check for gas leaks to prevent any potential hazards. Here’s how you can do it:
- Apply a mixture of soapy water on all the gas connections, including the supply line and fittings.
- If you notice any bubbles forming, it indicates a gas leak. In such situations, tighten the connections or consult a professional for assistance.
- Ensure the gas shut-off valve is in the “off” position before testing for leaks.
Venting the Unit
Venting the gas heater properly is essential for safety and efficient operation. Here are the steps to follow:
- Refer to the manufacturer’s instructions to determine the specific venting requirements for your gas heater.
- Ensure there is an adequate amount of clearance around the vent pipe, following the specified measurements.
- Connect the vent pipe securely to the unit, making sure it is perfectly aligned and tightly sealed.
- Verify that the vent pipe is directed outdoors, away from any windows, doors, or vents that may allow the exhaust gas to re-enter the house.
- Inspect the exterior vent hood to ensure there is no blockage or obstruction that may impede proper venting.
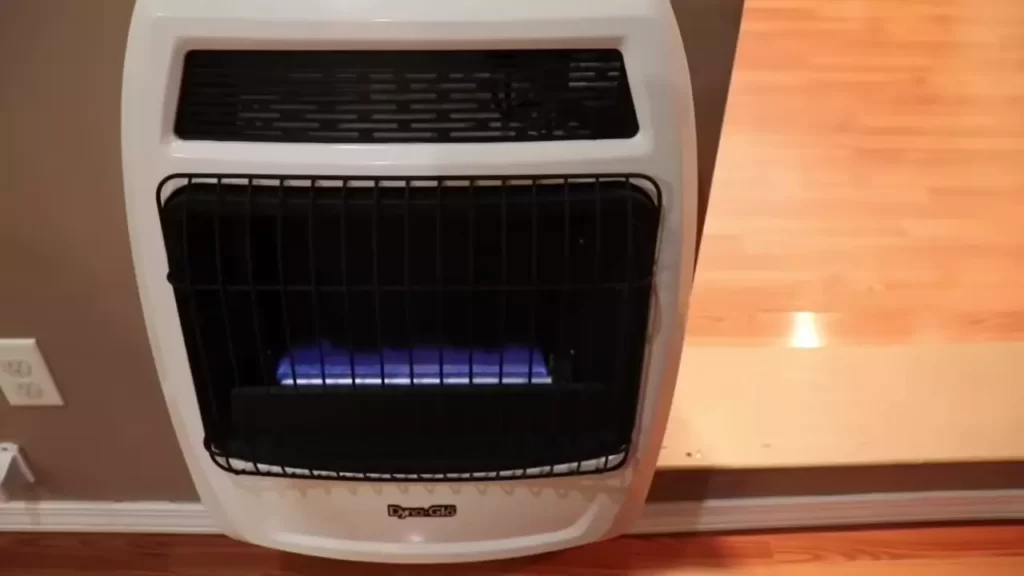
Testing the Heater for Proper Functioning
Before finalizing the installation, it is crucial to test the heater to ensure it functions properly. Follow these steps for testing:
- Turn on the gas supply and set the thermostat to the desired temperature.
- Allow the heater to run for a few minutes to ensure it ignites and produces heat.
- Check the burner flame to ensure it is burning blue and steady. If the flame is yellow or flickering, there may be an issue with the gas flow or combustion, and professional assistance may be required.
- Monitor the area around the heater for any unusual odors or sounds that may indicate a problem.
- Ensure all controls, including the thermostat and ignition, are functioning correctly.
By following these steps and testing the heater thoroughly, you can finalize the installation process with confidence. However, it is essential to consult the manufacturer’s instructions or seek professional guidance for specific guidelines relating to your wall heater gas model.
Regular Cleaning And Maintenance
Regular cleaning and maintenance are essential to ensure that your wall heater gas functions efficiently and safely. By keeping up with these tasks, you can extend the lifespan of your unit and reduce the risk of potential hazards. In this section, we will discuss three important aspects of regular cleaning and maintenance: cleaning the exhaust vents, checking for obstructions, and inspecting the pilot light.
Cleaning the Exhaust Vents
One of the main components of your wall heater gas is the exhaust vents. Over time, these vents can accumulate dust, debris, and other particles, hindering the flow of air and reducing the heater’s efficiency. To prevent this, it is important to clean the exhaust vents regularly.
Start by turning off the heater and allowing it to cool down completely. Once it is safe to handle, remove the vent covers using a screwdriver or the appropriate tool. Take a soft brush or vacuum cleaner and carefully remove any dirt or debris from the vents. Ensure that there are no blockages that could impede the airflow.
Checking for Obstructions
In addition to cleaning the exhaust vents, it is crucial to check for obstructions on a regular basis. Obstructions in the airflow can cause poor combustion and reduce the effectiveness of your wall heater gas. Some common obstructions include dust, pet hair, and lint.
Inspect the area around the heater and remove any objects or clutter that might hinder the proper functioning of the unit. Take a close look at the intake vents and clean them using a soft cloth or brush. Make sure that there are no obstructions that could potentially affect the performance of your wall heater gas.
Inspecting the Pilot Light
The pilot light is an essential part of your gas wall heater. It provides the ignition source for the burners, allowing the unit to produce heat. Regularly inspecting the pilot light ensures that it is functioning correctly and safely.
To inspect the pilot light, follow these steps:
1. Locate the pilot light assembly, usually located near the bottom of the heater.
2. Turn off the gas supply to the heater and wait for a few minutes to allow any remaining gas to dissipate.
3. Carefully remove the cover or panel that protects the pilot light assembly.
4. Visually inspect the pilot light flame. It should be blue with a small yellow tip. If the flame is mostly yellow or flickering, there may be an issue with the gas mixture or airflow. In this case, it is best to contact a professional technician.
Regularly cleaning and maintaining your wall heater gas not only enhances its performance but also ensures the safety of your home. By cleaning the exhaust vents, checking for obstructions, and inspecting the pilot light, you can enjoy the comfort and efficiency of your gas wall heater for years to come.
Troubleshooting Common Issues
Installing a wall heater gas can bring warmth and comfort to any room. However, like any other appliance, at times, it may encounter some problems. In this section, we will explore the most common issues that might arise when installing a wall heater gas and provide troubleshooting tips to help you resolve them.
No Heat or Low Heating
If your wall heater gas is not producing enough heat or no heat at all, several factors might be at play:
- Thermostat Settings: Start by checking the thermostat settings. Ensure that it is set to a temperature higher than the room’s current temperature. If necessary, adjust the thermostat accordingly.
- Gas Supply: Verify that the gas supply to the wall heater gas is open. If the gas valve is closed, open it and check if the heat production improves. If not, proceed to the next step.
- Clogged Burner or Vent: Inspect the burner and vent for any signs of blockages. Use a soft brush or vacuum to remove any dirt, debris, or obstructions that might impede the flow of gas. A clogged burner or vent can restrict heat production.
- Pilot Light: The pilot light may need relighting or adjusting. Refer to the manufacturer’s instructions on how to safely relight or adjust the pilot light.
Gas Odor
If you detect a gas odor near your wall heater gas, take immediate action:
- Evacuate: If you smell gas, leave the area immediately. Do not attempt to fix the issue yourself. Call the gas company or emergency services for professional assistance.
- Avoid Ignition Sources: Do not use any electrical switches, lighters, or matches, as they can cause an ignition.
- Do Not Operate Appliances: Avoid using any appliances or fixtures that could create a spark, such as turning on lights or using appliances that are connected to electrical outlets.
- Open Windows and Doors: If it is safe to do so, open windows and doors to ventilate the area and allow the gas to dissipate.
Pilot Light Not Staying Lit
If the pilot light on your wall heater gas keeps going out, here are some potential solutions:
- Flame Sensor: The flame sensor may be dirty or malfunctioning. Remove any dirt or debris from it, ensuring it is clean. If the problem persists, consider contacting a professional technician for assistance in replacing the flame sensor.
- Gas Pressure: Insufficient gas pressure can cause the pilot light to go out. Check the gas pressure regulator to ensure it is set correctly. If needed, consult a qualified technician to adjust the gas pressure appropriately.
- Thermocouple: The thermocouple might be faulty. Consider replacing it with a new one as a faulty thermocouple can prevent the pilot light from staying lit.
- Air Flow: Ensure that there is adequate airflow around the pilot light area. Remove any obstructions and ensure the area is clean so that the pilot light can receive sufficient oxygen for proper combustion.
By troubleshooting these common issues, you can enjoy the warmth and coziness provided by your wall heater gas efficiently and comfortably.
Frequently Asked Questions For How To Install Wall Heater Gas
Can I Install A Wall Heater Myself?
No, it is not recommended for you to install a wall heater yourself. It is better to hire a professional to ensure safe and proper installation.
How Do You Install A Wall Heater?
To install a wall heater, follow these steps:
1. Choose a suitable location on the wall.
2. Mark the position and cut an opening.
3. Install the mounting brackets.
4. Connect the electrical wiring.
5. Secure the heater to the wall and test it to ensure it works properly.
Is It Hard To Install A Gas Heater?
Installing a gas heater is not difficult. The process is straightforward and can be done by following the manufacturer’s instructions. It is recommended to hire a professional for safety purposes, especially if you lack experience in handling gas appliances.
How Safe Are Wall-Mounted Gas Heaters?
Wall-mounted gas heaters are safe if installed and used correctly. They feature built-in safety features like oxygen depletion sensors and flame failure devices. Proper ventilation and regular maintenance ensure safe operation. It’s important to follow the manufacturer’s instructions and get professional installation to minimize risks.
Conclusion
Installing a gas wall heater can be a simple and cost-effective solution for efficient heating in your home. By following the step-by-step instructions provided in this blog post, you can easily install a wall heater gas unit without any hassle.
Remember to ensure the safety of your home by properly venting the heater and following all safety precautions. With a gas wall heater in place, you can enjoy a cozy and warm environment throughout the colder months.