To install a GE over the range microwave, start by unpacking the microwave and reading the installation instructions carefully. Then, follow the step-by-step instructions provided, ensuring that you have all the necessary tools and equipment.
Introducing a new kitchen appliance can be both exciting and daunting. One such appliance is the GE over the range microwave. Whether you’re replacing an old microwave or starting fresh with a new installation, it’s important to know how to properly install it to ensure functionality and safety.
We will guide you through the installation process of a GE over the range microwave, providing clear and concise instructions. By following these steps, you’ll have your microwave up and running in no time. So, let’s get started!
Choosing The Right Location
Factors to consider when selecting the location
Choosing the right location for your GE over the range microwave is an important step in the installation process. It not only ensures optimal functionality but also enhances the overall aesthetics of your kitchen. Here are some factors to consider when selecting the location:
- Available space: Measure the space above your cooking range to determine the appropriate size of the microwave. A minimum of 30 inches of clearance between the top of the range and the bottom of the microwave is generally recommended.
- Proximity to cabinets: Take into account the distance between the microwave and any adjacent cabinets. It’s essential to have enough space for comfortable access and proper ventilation.
- Cooking habits: Consider your cooking habits and the size of the pots and pans you regularly use. Ensure that the location allows ample space for maneuvering cookware without any hindrance from the microwave.
- Line of sight: If you like to keep an eye on your food while it cooks, select a location that provides a clear line of sight to the stovetop. This way, you can easily monitor your cooking progress without any obstructions.

Ensuring clearance requirements are met
Once you have identified a potential location for your GE over the range microwave, it’s crucial to ensure that clearance requirements are met. Adhering to these requirements will prevent any safety hazards and guarantee the efficient operation of your appliance. Here’s what you need to consider:
- Top clearance: Make sure there is enough space between the top of the range and the bottom of the microwave. This will allow for proper ventilation and prevent heat damage to the microwave.
- Side clearance: Check the manufacturer’s specifications for required side clearances. These clearances ensure proper airflow and prevent any obstructions from affecting the performance of your microwave.
- Bottom clearance: Verify the recommended distance between the bottom of the microwave and the cooking surface. This will help avoid any accidental contact with hot pots or pans, ensuring safety during cooking.
Determining the accessibility of electrical and ventilation outlets
Before finalizing the location for your GE over the range microwave, it’s essential to determine the accessibility of electrical and ventilation outlets. Ensuring convenient access to these outlets will simplify the installation process. Here’s what you need to check:
- Electrical outlet: Ensure that there is an easily accessible electrical outlet near the selected location. This will enable a straightforward connection and prevent the need for extensive electrical work.
- Ventilation outlet: Check if there is a ventilation outlet in close proximity to the microwave’s installation location. Proper ventilation is crucial for removing smoke, odors, and steam generated during cooking.
By considering these factors, ensuring clearance requirements are met, and determining the accessibility of electrical and ventilation outlets, you can confidently choose the perfect location to install your GE over the range microwave. This will not only enhance your cooking experience but also add a touch of modernity to your kitchen’s design.
Preparing For Installation
Gathering the necessary tools and materials
Before you start installing your GE over the range microwave, it’s crucial to gather all the necessary tools and materials to ensure a smooth and efficient installation process. Having everything you need at hand will save you from unnecessary trips to the hardware store and make the installation process much faster.
- A flathead screwdriver
- A Phillips screwdriver
- A drill with a 3/16-inch drill bit
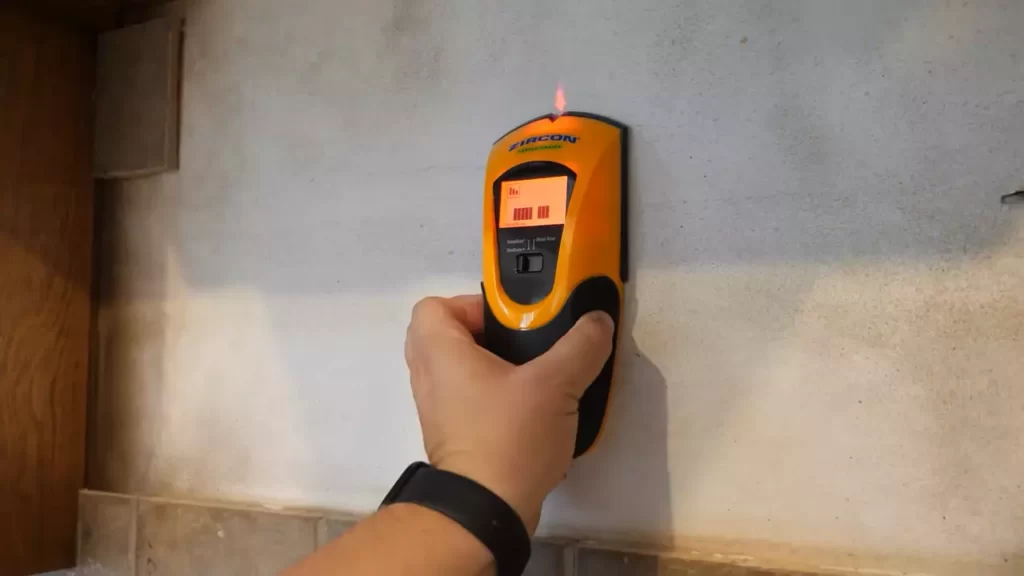
- A stud finder
- A level
- Measuring tape
- A pencil or marker
- Electrical tape or wire connectors
- Mounting brackets and screws
- Exhaust duct
- Vent adapter
- Range hood vent cover (if needed)
Reviewing the manufacturer’s instructions and safety precautions
Before you dive into the installation process, take the time to thoroughly review the manufacturer’s instructions and safety precautions. This step is crucial to ensure you follow the manufacturer’s recommended guidelines and avoid any potential risks or hazards. Familiarize yourself with the instructions and make sure to adhere to the safety precautions, as they are there to protect you and ensure a successful installation.
Taking measurements and marking the mounting holes
Prior to installing your GE over the range microwave, you’ll need to take accurate measurements and mark the mounting holes to ensure proper placement and alignment. Follow these steps:
- Using a stud finder, locate the studs in the wall above your range. This is where the microwave will be mounted for stability.
- Measure the distance between the top of your range and the bottom of the cabinet or any other obstructions.
- Based on the measurements, determine the appropriate height for your microwave installation. Remember to leave at least an inch of clearance above the microwave to allow for proper ventilation.
- Using a pencil or marker, mark the location of the mounting holes on the wall, making sure they align with the studs. Double-check the measurements and markings to ensure accuracy.
Once you have completed these preparation steps, you’ll be ready to move on to the actual installation process of your GE over the range microwave. Having gathered the necessary tools and materials, reviewed the manufacturer’s instructions and safety precautions, and taken accurate measurements and marked the mounting holes, you’ll be well-prepared for a successful installation. Stay tuned for our next blog post on the installation process itself!
Mounting The Microwave
Installing a GE over the range microwave requires careful attention to ensure a secure and reliable mount. In this section, we will guide you step-by-step through the process of mounting the microwave. By following these instructions, you’ll have your microwave installed and ready to use in no time.
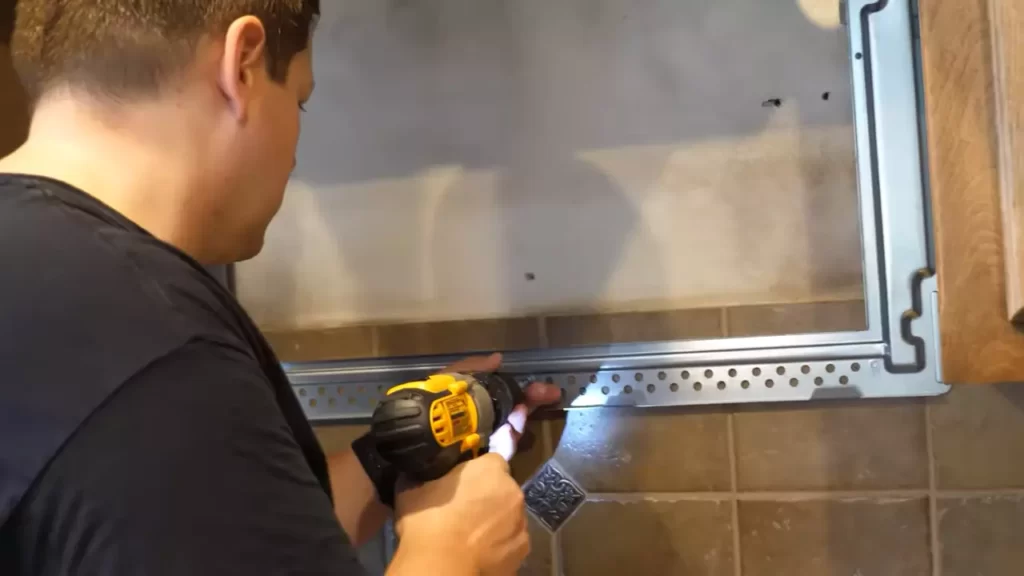
Installing the mounting plate onto the wall
To begin the installation process, you’ll first need to install the mounting plate onto the wall. Follow these steps:
- Hold the mounting plate against the wall in the desired position above the range. Make sure it is level.
- Using a pencil, mark the location of the screw holes on the wall.
- Drill holes at the marked locations, ensuring they are the appropriate size for the screws.
- Align the mounting plate with the drilled holes and attach it to the wall using the provided screws.
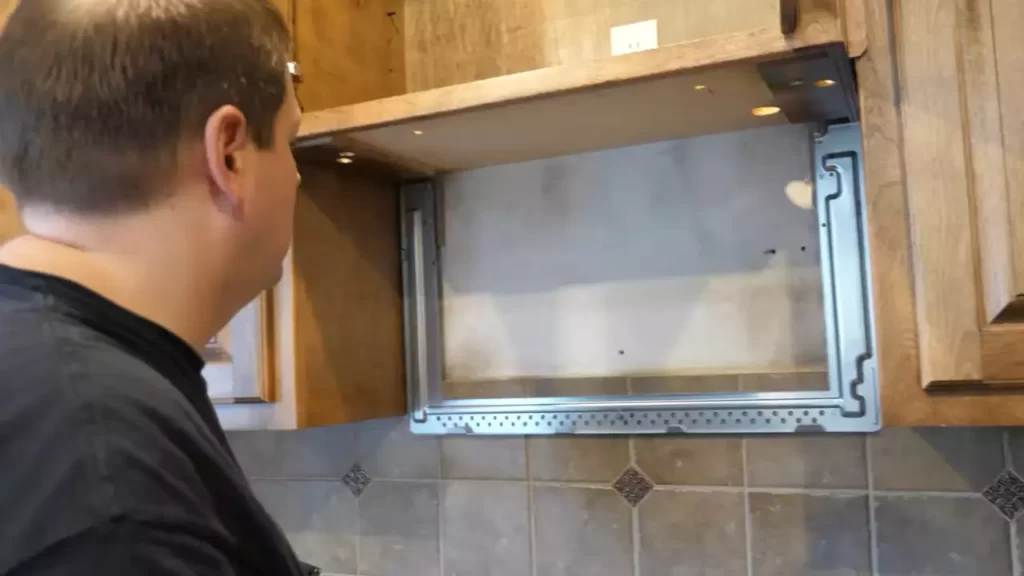
Attaching the support brackets to the cabinet above
With the mounting plate secured to the wall, it’s time to attach the support brackets to the cabinet above. Follow these steps:
- Locate the support brackets included with your GE over the range microwave.
- Position the brackets on the bottom of the cabinet, ensuring they are centered and aligned with the mounting plate.
- Securely attach the support brackets to the cabinet using the provided screws.
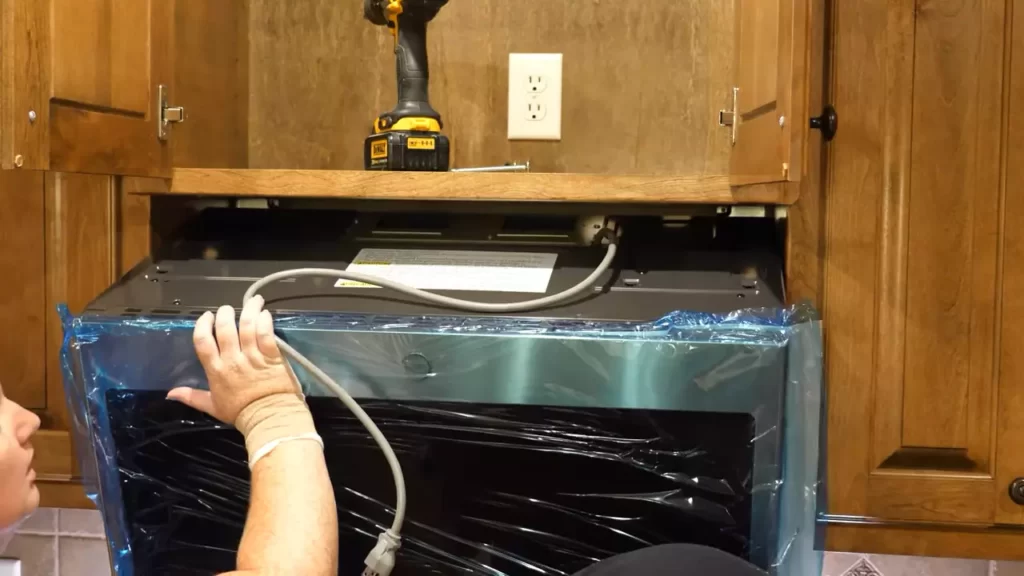
Aligning the microwave with the mounting plate and securing it in place
Now that both the mounting plate and support brackets are in place, it’s time to align the microwave and secure it to the wall. Follow these steps:
- With the help of another person, lift the microwave and carefully slide it onto the mounting plate.
- Make sure the microwave aligns properly with the mounting plate and that the support brackets are securely in place.
- Once aligned, use a screwdriver or drill to secure the microwave to the mounting plate using the provided screws.
After completing these steps, your GE over the range microwave should be securely mounted and ready for use. It’s important to double-check that the microwave is stable and level before using it.
Connecting The Electrical And Ventilation
Connecting the electrical circuit and ventilation duct are crucial steps when installing a GE over-the-range microwave. This ensures proper functionality and safety of your appliance. In this section, we will guide you through the process of wiring the microwave to the electrical circuit, connecting the ventilation duct to the microwave, and testing the electrical and ventilation functions.
Wiring the microwave to the electrical circuit
Properly wiring your GE over-the-range microwave to the electrical circuit is essential for its operation. Before starting, ensure that you have turned off the power supply to the circuit where the microwave will be connected.
- Locate the electrical junction box: Open the microwave installation template and align it with the wall studs. Once you have determined the position, find the electrical junction box in the upper cabinet. Remove the cover.
- Connect the wires: Inside the electrical junction box, you will see black, white, and copper wires. Match the corresponding colors with the wires coming from the microwave. Use wire nuts to securely connect the wires, making sure there are no loose connections.
- Ground the microwave: Locate the grounding wire on the microwave and connect it to the copper wire in the electrical junction box. Fasten them together using a wire nut or grounding screw.
- Secure the electrical connections: Once all the wires are properly connected, carefully tuck them into the electrical junction box. Ensure that no exposed wires are visible.
Connecting the ventilation duct to the microwave
Proper ventilation is crucial for the optimal performance of your GE over-the-range microwave. Here’s how you can connect the ventilation duct:
- Locate the microwave’s exhaust port: Identify the exhaust port on the back of the microwave. It is usually located at the top or rear side.
- Measure and cut the ventilation duct: Measure the distance between the microwave’s exhaust port and the exterior vent. Using a duct pipe, cut it to the appropriate length. Ensure a secure fit by using clamps or duct tape.
- Connect the ventilation duct: Attach one end of the ventilation duct to the microwave’s exhaust port. Then, connect the other end to the exterior vent. Make sure the connections are tight to avoid any leaks or air restrictions.
- Secure the duct connections: After connecting the duct, use metal duct tape or clamps to secure the joints. This will ensure that the ventilation system operates efficiently, eliminating any air leaks.
Testing the electrical and ventilation functions
Before finalizing the installation process, it is crucial to test the electrical and ventilation functions of your GE over-the-range microwave. Follow these steps:
- Turn on the power supply: Go to your electrical panel and switch on the circuit that supplies power to the microwave. Ensure that the circuit breaker is correctly engaged.
- Test the electrical functions: Turn on the microwave and check if all the buttons, lights, and display are functioning correctly. Test various functionalities, such as cooking, defrosting, and timer settings, to verify their proper operation.
- Test the ventilation system: Use the microwave’s venting feature and verify if the air is properly vented to the exterior. Listen for any unusual sounds or vibrations while the ventilation system is operational.
- Inspect for safety: Carefully examine the electrical connections and ventilation duct for any signs of overheating, loose connections, or damage. If you notice any issues, make necessary adjustments or seek professional assistance.
Congratulations! You have successfully connected the electrical and ventilation components of your GE over-the-range microwave. Now you can enjoy the efficiency and convenience it provides to your kitchen!
Finishing Touches
After successfully mounting your GE over the range microwave, there are a few final steps to take to ensure it is properly aligned, securely connected, and ready for use. These finishing touches are quick and easy to complete, and will give you peace of mind knowing that your microwave is installed and functioning correctly. Follow these steps to complete the installation process:
Adjusting the microwave for proper alignment and level
Proper alignment and level are crucial for the optimal performance of your GE over the range microwave. Take the time to adjust and level the microwave to ensure it is aligned with your cabinetry and countertops. This will not only improve the aesthetic appeal but also prevent any issues with the door closing properly and food spills. Use a level tool to check the front, side, and rear alignment of the microwave. Adjust the mounting bracket or the cabinet screws if necessary, until the microwave is perfectly level and aligned with the surrounding area.
Double-checking all connections and screws for tightness
Before you start using your newly installed GE over the range microwave, it is essential to double-check all connections and screws for tightness. Loose connections can not only cause the microwave to malfunction but also pose a safety risk. Carefully inspect the electrical connections and ensure they are securely fastened. Additionally, check the mounting screws and brackets to ensure they are tightened properly. This step will help prevent any potential issues and ensure the microwave operates safely and efficiently.
Cleaning and inspecting the microwave before use
Lastly, it is crucial to thoroughly clean and inspect your GE over the range microwave before using it for the first time. Wipe down the interior and exterior surfaces with a damp cloth to remove any dust or debris accumulated during the installation process. Pay attention to the turntable and sides within the microwave to ensure they are clean and free from obstruction. Inspect the door seals to ensure they are intact and properly aligned. This will help prevent any potential issues and ensure a hygienic and functional experience when using the microwave.
Following these steps for the finishing touches of your GE over the range microwave installation will ensure a seamless and successful installation. Take the time to adjust the microwave for proper alignment and level, double-check all connections and screws for tightness, and clean and inspect the microwave before use. By doing so, you can enjoy the convenience and efficiency of your new microwave worry-free.
Troubleshooting Common Issues
Addressing common installation problems and solutions
Installing a GE over the range microwave can seem like a daunting task, but with the right troubleshooting techniques, you can overcome any common issues that may arise. In this section, we will address some of the most frequently encountered problems during installation and provide you with practical solutions.
Troubleshooting electrical and ventilation issues
When it comes to electrical and ventilation issues related to your GE over the range microwave, it’s important to address them promptly to ensure proper functionality and safety. Here are some common problems you may encounter:
1. Power connectivity problems
If your microwave is not turning on or displaying any power indications, the issue may lie in the power connection. To troubleshoot this problem, follow these steps:
- Check if the power cord is securely plugged into a functioning power outlet.
- Inspect the circuit breaker or fuse that corresponds to the microwave and ensure it has not tripped or blown.
- If the above steps don’t resolve the issue, consider testing the outlet with another electrical device to determine if it is indeed providing power.
2. Ventilation problems
Proper ventilation is crucial for the efficient operation of your microwave. If you notice any ventilation issues, take the following troubleshooting steps:
- Ensure that the microwave’s vents are not blocked or obstructed by any objects or debris, as this can hinder airflow.
- Check if the exhaust fan is running properly by turning it on and assessing the airflow. If it’s not working, clean the fan or consider replacing it.
- If the airflow is weak or inadequate, inspect the vent duct for any blockages or damage. Clear any obstructions and repair or replace the duct if necessary.
Seeking professional assistance if needed
If you have exhausted all troubleshooting options and are still experiencing issues with the installation of your GE over the range microwave, it may be time to seek professional assistance. While DIY solutions can often solve common problems, there are instances where expert knowledge and tools are essential for a safe and effective resolution. By reaching out to a qualified technician or contacting the GE customer support team, you can ensure that any complex issues are addressed in the best way possible.
Safety Tips For Using A Ge Over The Range Microwave
Operating a GE Over the Range Microwave is a convenient and efficient way to prepare meals in the kitchen. However, it’s essential to prioritize safety when using this appliance to prevent any accidents or mishaps. By following a few important safety precautions, keeping up with regular cleaning and maintenance, and ensuring proper ventilation, you can enjoy the benefits of your GE Over the Range Microwave while keeping your kitchen both functional and safe.
Important safety precautions to follow when using the microwave
When using a GE Over the Range Microwave, it’s crucial to keep the following safety precautions in mind:
- Read the instruction manual carefully before operating the microwave to understand its features and safety guidelines.
- Ensure that the microwave is installed correctly and securely, following the manufacturer’s instructions.
- Never operate the microwave if the door is damaged or doesn’t close properly.
- Avoid using metal containers or utensils inside the microwave, as they can cause sparks and damage the appliance.
- Do not operate the microwave when it is empty, as this can lead to overheating and potential damage.
- Always supervise the microwave when in use and never leave it unattended.
- Keep children and pets away from the microwave while it’s operating to prevent accidents.
- To avoid burns, use oven mitts or heat-resistant gloves when handling hot dishes or containers.
- If any unusual smells, smoke, or sparks occur while using the microwave, immediately turn it off and unplug it.
Cleaning and maintenance tips for optimal performance
Maintaining a clean and well-maintained GE Over the Range Microwave is essential for its optimal performance and longevity. Here are some cleaning and maintenance tips to keep in mind:
- Regularly wipe down the microwave’s interior and exterior with a damp cloth or sponge to remove any food splatters or stains.
- Use a mild detergent or microwave-safe cleaner for stubborn stains or spills.
- Remove and clean the microwave’s turntable and roller ring according to the manufacturer’s instructions.
- Check and clean the microwave’s air filters if applicable, to ensure proper ventilation and prevent odors.
- Inspect the power cord for any signs of damage and replace it if necessary.
- Periodically test the microwave’s door seal to ensure it’s working properly for efficient operation.
Ensuring proper ventilation and preventing overheating
Proper ventilation is essential to prevent overheating and maintain the performance of your GE Over the Range Microwave. Follow these tips for ensuring proper ventilation:
- Ensure that the microwave’s exhaust vent is not blocked and is free from obstructions.
- Regularly check and clean the microwave’s exhaust filters to remove any grease or debris.
- Allow enough space around the microwave for proper airflow.
- Avoid using the microwave to store items on top, as it can block the ventilation system.
- If you notice any overheating issues, such as the microwave shutting off or displaying error messages, contact a qualified technician for assistance.
By following these safety tips, cleaning and maintenance guidelines, and ensuring proper ventilation, you can enjoy the benefits of your GE Over the Range Microwave while keeping your kitchen safe and functional.
Frequently Asked Questions Of How To Install Ge Over The Range Microwave
Can You Install An Over The Range Microwave Yourself?
Yes, you can install an over the range microwave yourself. It is a DIY project that requires following the instruction manual, securing it properly, and connecting it to a power source. Take safety precautions and ensure your kitchen has the necessary electrical and ventilation requirements.
How Are Over The Range Microwaves Attached?
Over the range microwaves are attached by mounting brackets on the wall and screws through the upper cabinet. Follow the manufacturer’s instructions for proper installation.
Do All Ge Over The Range Microwaves Use The Same Mounting Bracket?
Yes, all GE over the range microwaves use the same mounting bracket.
Is It Hard To Install A Microwave Above A Range?
Installing a microwave above a range can be challenging but not necessarily hard. It requires proper measuring, electrical work, and mounting. It’s best to follow manufacturer’s instructions or hire a professional for a safe and efficient installation.
Conclusion
Installing a GE over the range microwave is a straightforward process that can elevate your kitchen’s functionality. By following the steps outlined in this guide, you can ensure a seamless installation. From assembling the mounting bracket to connecting the power cord, each step has been simplified to ensure a hassle-free experience.
With the versatility and convenience of a GE over the range microwave, meal preparation has never been easier. Upgrade your kitchen today and enjoy a microwave that is both stylish and efficient.