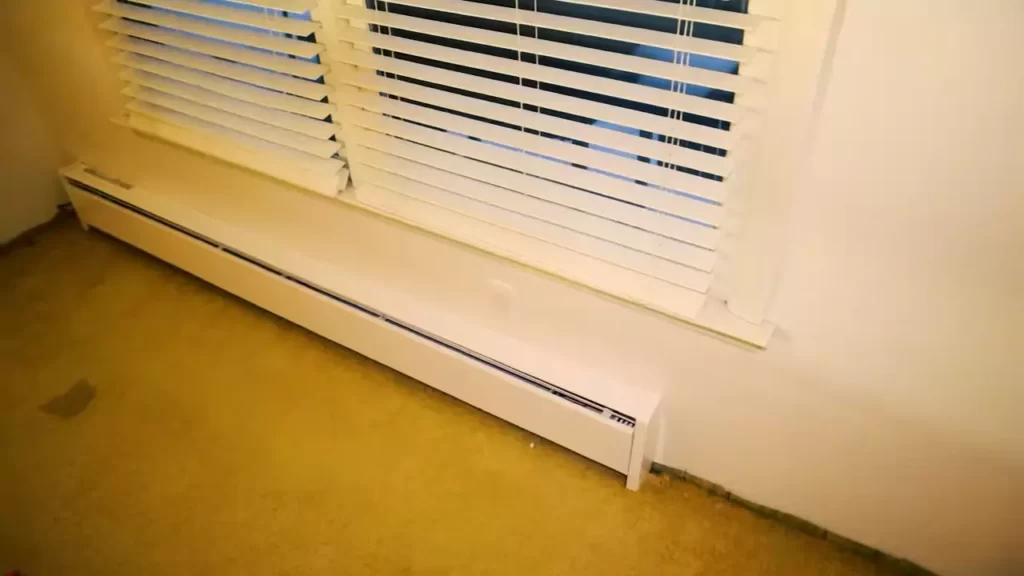
To install an electric baseboard heater, follow these steps: first, determine the location and size of the heater, then shut off the power supply, mount the heater to the wall, connect the wiring following the manufacturer’s instructions, and finally, restore power and test the heater. Installing an electric baseboard heater is a simple process that can provide efficient and comfortable heating for your home.
By following these steps, you can ensure a safe and effective installation. We will guide you through each step in detail, so you can confidently install your electric baseboard heater with ease.
Factors To Consider When Selecting An Electric Baseboard Heater
Installing an electric baseboard heater can be a great solution for keeping your home warm and cozy during the colder months. However, with the wide variety of options available in the market, it’s important to consider a few factors before making your purchase. By doing so, you can ensure that you select a heater that meets your room size, heating needs, energy efficiency, and safety requirements.
Room Size and Heating Needs
One of the first factors to consider when selecting an electric baseboard heater is the size of the room you want to heat. A heater that is too small for the room may not provide adequate warmth, while a heater that is too large may result in wasted energy and higher electricity bills.
Start by measuring the dimensions of your room and calculating its square footage. This will help you determine the heating capacity you need in terms of watts per square foot. As a general rule of thumb, you’ll require about 10 watts per square foot for a well-insulated room, and up to 15 watts per square foot for a poorly insulated one.
Additionally, consider the insulation of your walls, windows, and doors in the room. If you have inadequate insulation, you may need a heater with a higher heating capacity to compensate for the heat loss.
Energy Efficiency
Energy efficiency is an essential aspect to consider when selecting an electric baseboard heater. Not only does an energy-efficient heater help reduce your carbon footprint, but it also saves you money on energy bills in the long run. Look for heaters with ENERGY STAR certification, as they meet the rigorous energy efficiency standards set by the Environmental Protection Agency.
Another feature to consider is a programmable thermostat, which allows you to set the temperature according to your schedule. This ensures that the heater only operates when needed, thus reducing energy consumption and maximizing efficiency.
Safety Features
Safety should be a top priority when selecting an electric baseboard heater. Look for heaters with built-in safety features such as overheat protection and tip-over switches. Overheat protection automatically shuts off the heater if it reaches a certain temperature, preventing any potential fire hazards. Similarly, a tip-over switch cuts off power to the heater if it accidentally gets knocked over, minimizing the risk of accidents.
It is also worth considering a heater with a cool-to-touch surface. This feature ensures that the outer casing of the heater remains cool even when the unit is in operation, reducing the risk of burns or injuries, especially if you have children or pets at home.
By considering these factors – room size and heating needs, energy efficiency, and safety features – you can confidently select an electric baseboard heater that meets your specific requirements, providing you with warmth, comfort, and peace of mind throughout the winter season.

Gathering The Necessary Tools And Materials
Before you dive into installing an electric baseboard heater, it’s essential to gather all the necessary tools and materials so that you can complete the task efficiently and effectively. In this section, we will discuss the tools and materials you’ll need to have on hand before you begin.
Screwdriver
A screwdriver is an indispensable tool when it comes to installing an electric baseboard heater. It allows you to remove or tighten screws, which are often used in securing the heater to the wall. To ensure a smooth installation process, make sure you have both a Phillips head screwdriver and a flathead screwdriver.
Electric Drill
An electric drill is a handy tool for drilling holes in the wall to mount the baseboard heater. It’s important to have an electric drill with a variety of drill bits of different sizes to accommodate the specific requirements of your installation.
Measuring Tape
Accurate measurements are crucial when installing an electric baseboard heater, as it needs to fit perfectly against the wall. A measuring tape helps you determine the exact dimensions of the space you have available for the heater. This way, you can ensure a precise installation and avoid any unnecessary gaps or overlaps.
In addition to these specific tools, here is a list of other materials and equipment you’ll also need:
- Baseboard heater: Ensure you have the correct size and type of baseboard heater that suits your needs and the dimensions of your room.
- Mounting brackets: These brackets are used to secure the baseboard heater to the wall.
- Electrical wire: You’ll need electrical wire to connect the heater to the power source.
- Wire connectors: These connectors are essential for joining the electrical wires securely.
- Pencil or marker: You’ll need a pencil or marker to mark the mounting spots on the wall.
- Level: A level helps you ensure that the baseboard heater is perfectly straight and balanced once mounted.
- Circuit tester: It’s crucial to have a circuit tester to make sure the power is off before you start working on the installation.
- Safety equipment: Don’t forget to prioritize your safety by wearing gloves and safety glasses during the installation process.
Gathering all the necessary tools and materials beforehand will save you time and prevent any unnecessary interruptions during the installation. Make a checklist and ensure everything is ready to go before you get started. Now that you’ve gathered everything you need, let’s move on to the next step of the installation process.
Assessing The Electrical System
Before you begin the installation of an electric baseboard heater, it is crucial to assess the electrical system in your home. This step ensures that your heater will function properly and safely. Here are a few key tasks you should complete:
Checking the Circuit Breaker
The first step in assessing your electrical system is to verify if your circuit breaker has the necessary capacity to accommodate an electric baseboard heater. Locate your circuit breaker panel and identify the breaker that controls the circuit in the room where you intend to install the heater. Check if it is a dedicated circuit, which means that it powers only one appliance or set of outlets. A dedicated circuit is vital to ensure that your heater receives enough power without overloading the circuit.
If you notice that the circuit breaker is already overloaded with other appliances or outlets, it may be necessary to consult an electrician for an electrical upgrade before proceeding with the installation of your baseboard heater.
Determining the Voltage and Amperage Requirements
Once you have confirmed the suitability of your circuit breaker, the next step is to determine the voltage and amperage requirements of your electric baseboard heater. These specifications are essential to ensure that the heater is compatible with your home’s electrical system.
To determine the voltage requirement, carefully inspect the label on the heater or refer to the instruction manual. Most electric baseboard heaters operate on standard household voltage, typically 120 volts or 240 volts. It’s important to note that using the wrong voltage can damage the heater or pose a safety hazard, so double-check this information before proceeding.
Additionally, find out the amperage requirements of your baseboard heater. Amperage refers to the amount of electrical current the heater uses. This information can usually be found on the heater label or in the product specifications. Make sure that the circuit breaker supplying power to the heater can handle the specified amperage to prevent any electrical issues.
Once you have completed these steps, you can move on to the next phase of installing your electric baseboard heater. Assessing the electrical system upfront ensures that you have a safe and reliable setup, allowing you to enjoy the warmth and comfort of your new heater without any worries.
Step 1: Measuring And Marking The Placement
Determining the Ideal Location
When it comes to installing an electric baseboard heater, the first step is to measure and mark the placement. Determining the ideal location for your heater is crucial to ensure efficient and effective heating in your space. Here are a few factors to consider when determining the ideal location:
- The size of the room: Take into account the square footage of the room you want to heat. If the room is large, you may need more than one baseboard heater to adequately distribute heat.
- The layout of the room: Consider the layout and furniture placement in the room. You should aim to install the heater in a location that allows for unobstructed airflow and even heat distribution.
- The electrical outlets: Baseboard heaters require an electrical outlet for power. Ensure there is a nearby outlet to connect the heater to, and plan the placement accordingly.
Taking these factors into consideration will help you determine the ideal location for your baseboard heater, ensuring optimal heat distribution and energy efficiency.
Marking the Height for Installation
Once you have determined the ideal location for your electric baseboard heater, it’s time to mark the height for installation. Proper positioning and height are important for optimal performance. Follow these steps to mark the height for installation:
- Start by measuring the height of the baseboard heater. Use a measuring tape to determine the height from the bottom of the heater to the mounting holes or brackets.
- Decide on the height you want the heater to be installed at. This will depend on factors such as the room’s layout and furniture placement.
- Using a pencil or marker, mark the desired height on the wall where the heater will be installed. Make sure the mark is level and easily visible.
- Measure the distance from the floor to the mark to double-check the accuracy of your placement.
By carefully measuring and marking the height for installation, you can ensure that your baseboard heater is positioned at the optimal height for efficient heat distribution. Remember to refer to the manufacturer’s instructions for any specific guidelines or requirements for your particular heater model.
Installing an electric baseboard heater can be a simple and effective way to add supplemental heat to your space. By following these steps, you can ensure that your heater is properly installed and functions efficiently. In the next step, we will cover how to properly prepare the wall for installation to ensure a secure and sturdy mounting.
Step 2: Mounting The Electric Baseboard Heater
Now that you have prepared the wall and made the necessary electrical connections, it’s time to mount the electric baseboard heater. Follow these simple steps to securely attach the unit and ensure it stays in place.
Attaching the Mounting Bracket
Start by locating the mounting bracket that came with your electric baseboard heater. This bracket is essential for providing stability and support to the unit. Carefully read the instructions provided by the manufacturer to ensure you are attaching the bracket correctly.
To attach the mounting bracket, follow these steps:
- Hold the bracket up against the wall where you want to position the heater.
- Use a level to make sure the bracket is straight.
- Mark the mounting holes on the wall with a pencil.
- Set the bracket aside and drill pilot holes on the marked spots. The size of the pilot holes will depend on the type of screws you are using.
- Line up the bracket with the pilot holes and attach it to the wall using the appropriate screws.
Once the bracket is securely attached to the wall, you’re ready to proceed to the next step.
Securing the Heater to the Bracket
With the mounting bracket in place, it’s time to secure the electric baseboard heater. Follow these steps to ensure a safe and secure installation:
- Position the heater onto the mounting bracket, aligning it with the pre-drilled holes on the back of the unit.
- Insert the screws provided by the manufacturer through the mounting holes and into the bracket.
- Tighten the screws using a screwdriver or a drill, making sure the heater is firmly attached to the bracket.
- Check the stability of the heater by giving it a gentle push. It should not move or feel loose.
Now that you have securely mounted the electric baseboard heater, you can move on to the final step of the installation process. Make sure to consult the manufacturer’s instructions for any additional steps specific to your heater model.
Remember, a properly installed electric baseboard heater not only ensures efficient heating but also provides a safe and comfortable environment in your home or office.
Step 3: Connecting The Electrical Wiring
Now comes the crucial step of connecting the electrical wiring for your electric baseboard heater. Ensuring the proper connection is essential for the safe and efficient operation of your heater. Let’s break down this step into three parts:
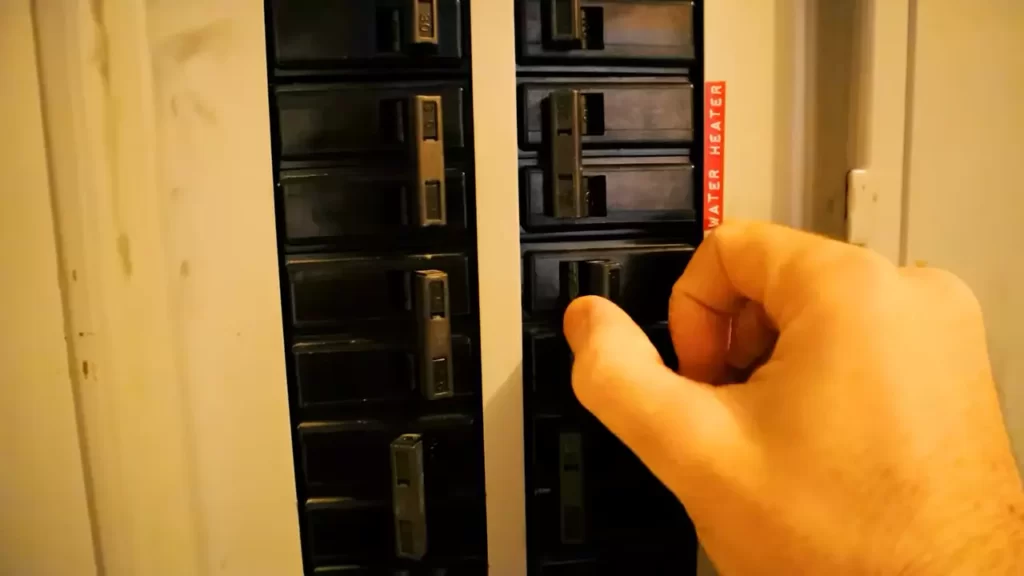
Turning Off the Power Supply
The first step in connecting the electrical wiring is to turn off the power supply to avoid any electrical accidents. Locate the main electrical panel in your home, usually found in the basement or utility room. Open the panel door and identify the circuit breaker that controls the power to the baseboard heater. Flip the corresponding breaker to the “off” position. Double-check with a voltage tester to ensure there is no power running to the circuit.
Connecting the Wiring to the Circuit
Once you have ensured that the power is off, begin connecting the wiring to the circuit. Strip the insulation off the ends of the heater wires and the circuit wires using a wire stripper, exposing about ½ inch of the copper conductors. Use wire nuts to connect the matching colored wires, twisting them clockwise until they are secure. Ensure each connection is tight and there are no exposed wires. For additional safety, wrap each wire nut with electrical tape to prevent any possible loosening over time.
Testing the Connection
After securing the connections, it’s vital to test the connection before proceeding. Turn the power supply back on at the main electrical panel and switch the breaker for the baseboard heater to the “on” position. Use a multimeter to verify that the correct voltage is reaching the heater. If the reading matches the required voltage, you have successfully connected the electrical wiring.
Remember, if you are unsure or uncomfortable with any step in the process, it is always wise to consult a qualified electrician to ensure a safe and reliable installation.
Step 4: Installing The Thermostat
Choosing the Right Thermostat
Before you can start using your electric baseboard heater, you need to choose the right thermostat to control it. The thermostat is responsible for regulating the temperature and ensuring that the heater turns on and off as needed. When selecting a thermostat, there are a few factors to consider:
- Compatibility: Make sure that the thermostat you choose is compatible with your electric baseboard heater. Check the specifications of both the heater and the thermostat to ensure they are compatible with each other.
- Programmable or Non-programmable: Decide whether you want a programmable or non-programmable thermostat. A programmable thermostat allows you to set different temperature levels at different times of the day, which can help save energy and optimize comfort. On the other hand, a non-programmable thermostat is simple to use and doesn’t require any programming.
- Voltage: Verify that the thermostat is designed for the voltage of your electric baseboard heater. Most electric baseboard heaters operate on either 120V or 240V, so choose a thermostat that matches the voltage requirements.
- Digital or Analog: Decide whether you prefer a digital or analog thermostat. Digital thermostats provide precise temperature control and often come with additional features such as backlighting and touch screens. Analog thermostats, on the other hand, are more straightforward and may require manual adjustments.
Wiring and Programming the Thermostat
Now that you have chosen the right thermostat for your electric baseboard heater, it’s time to install and wire it correctly. Follow these steps to ensure proper installation:
- Shut off the power: Before starting any wiring work, it’s crucial to turn off the power to the circuit. Locate the correct circuit breaker in your electrical panel and switch it off.
- Disconnect the existing thermostat: If you already have a thermostat installed, you need to disconnect it. Remove the cover and disconnect the wires, making sure to label each wire to ensure proper connections later.
- Install the new thermostat: Mount the new thermostat on the wall, following the manufacturer’s instructions. Use a level to ensure it is straight and secure.
- Wire the thermostat: Refer to the wiring diagram provided with your thermostat to connect the wires correctly. Typically, thermostats have labeled terminals, such as R (power), W (heat), and C (common). Connect each wire to its corresponding terminal, making sure the connections are tight.
- Program the thermostat: If you have chosen a programmable thermostat, set the desired temperature levels and schedule according to your needs. Follow the manufacturer’s instructions to program the thermostat correctly.
- Test the thermostat: After wiring and programming the thermostat, it’s essential to test it. Turn the power back on and ensure that the thermostat controls the electric baseboard heater as expected. Monitor the temperature changes and adjust the settings if necessary.
By following these steps, you can successfully install and program the thermostat for your electric baseboard heater, allowing you to enjoy optimal control over your heating system. Remember to always refer to the manufacturer’s instructions and consult a professional if you encounter any difficulties or uncertainties during the process.
Step 5: Reinstalling The Trim And Baseboards
After successfully installing your electric baseboard heater, it’s time to bring back the finishing touches to your room. Reinstalling the trim and baseboards not only adds a polished look to your space but also helps to protect the walls from any damage. In this step-by-step guide, we’ll walk you through the process of cutting, measuring, and attaching the trim and baseboards seamlessly.
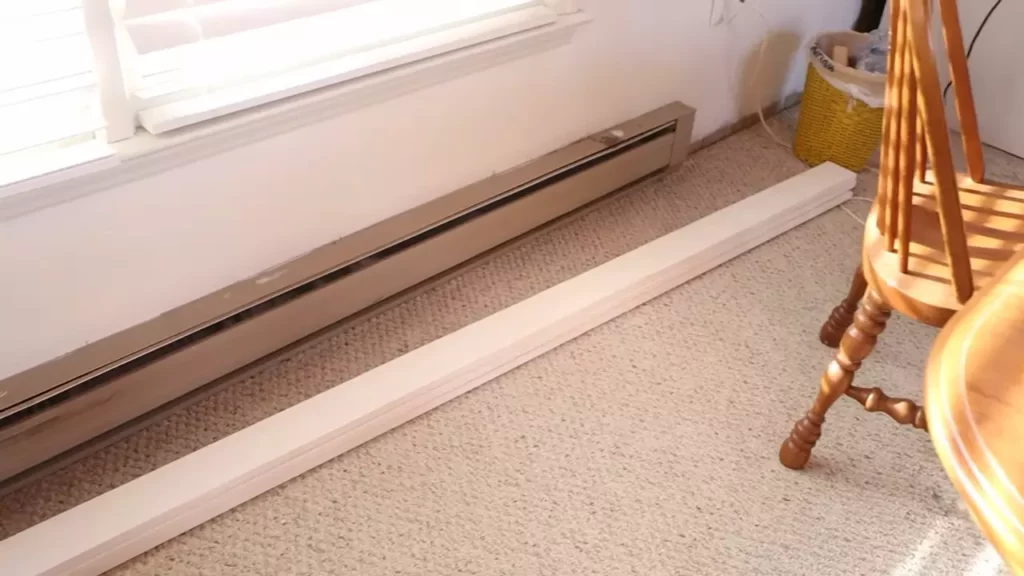
Cutting and Measuring the Trim
Before you begin cutting the trim, ensure you have all the necessary tools such as a miter saw, measuring tape, and a pencil. Measure the length of the wall where the trim will be installed and mark the measurements accordingly. Use the miter saw to cut the trim pieces at a 45-degree angle to create clean corners. Take your time with each cut to ensure precision and accuracy.
If you have multiple walls that require trim, make sure to label each piece to avoid confusion during the installation process. It’s important to note that each corner may require different angles, so measure each section carefully to achieve a seamless finish.
Attaching the Trim and Baseboards
Once you have cut the trim pieces to the desired length, it’s time to attach them to the walls. Start by laying out the trim pieces along the floor, matching each piece with its corresponding wall. This step will allow you to ensure that everything fits properly before attaching it permanently.
Using a nail gun or a hammer and finish nails, attach the trim directly to the wall. Ensure that the nails are driven into the studs for maximum stability. Throughout the installation, check for any gaps or unevenness in the trim and make adjustments as needed. Remember to use wood putty to fill in any nail holes and sand the trim smooth for a professional look.
Next, it’s time to reinstall the baseboards. Measure and cut the baseboards to fit snugly against the wall. Use a level to ensure they are straight. Attach them to the wall using the same method as the trim, making sure the nails are driven into the studs.
Once all the trim and baseboards are securely attached, step back and admire your handiwork. The room now has a clean, finished look that complements the overall aesthetic.
Pro tip: To achieve a seamless transition between trim pieces, consider using corner blocks instead of cutting angles. Corner blocks are pre-made decorative pieces that fit in the corners, eliminating the need for miter cuts and providing a polished look to your baseboard trim.
Reinstalling the trim and baseboards is the final step in the installation process of your electric baseboard heater. With careful measurements, precise cuts, and proper attachment, you can transform your space into a cozy haven.
Step 6: Testing The Electric Baseboard Heater
Congratulations! You have successfully installed your electric baseboard heater. But before you start enjoying the cozy warmth it provides, it’s crucial to test the heater to ensure everything is in proper working order. This step-by-step guide will walk you through the necessary tests to ensure your electric baseboard heater is safe and efficient.
Turning On the Power
- Switching on the Circuit Breaker: Locate the circuit breaker panel in your home and find the breaker that controls power to the area where you installed the electric baseboard heater. Flip the breaker switch to the “On” position to restore power.
- Confirming Power Supply: Check the electrical supply panel near the heater to ensure it is receiving power. Look for a green light or an indication on the display panel that signifies the heater is connected to a power source.
Adjusting the Temperature
- Locating the Thermostat: Locate the thermostat attached to the electric baseboard heater. It is usually mounted on the wall nearby or directly on the heater unit itself.
- Setting the Initial Temperature: Set the thermostat to a low temperature, like 65°F (18°C), to ensure it accurately adjusts the heat output. You can increase the temperature later once you have confirmed the heater is functioning correctly.
- Waiting for the Heater to Activate: Give the electric baseboard heater some time to respond to the temperature adjustment. The heater should start producing heat and warm up the room gradually.
Checking for Proper Operation
Now that you have turned on the power and set the temperature, it’s essential to assess the proper operation of your electric baseboard heater. Follow these steps to ensure everything is functioning as it should:
- Inspecting for Heat: Place your hand near the heating element of the baseboard heater. You should feel a steady flow of warm air emanating from the unit.
- Verifying Temperature Adjustments: Adjust the thermostat to a higher temperature and ensure the heater responds accordingly by producing more heat. Repeat this process at different temperature settings to confirm the heater adjusts effectively.
- Identifying Strange Noises or Odors: Listen for any unusual noises or detect any unfamiliar odors when the heater is running. Uncommon sounds or smells could indicate a problem with the unit and may require further investigation by a professional.
By following these steps and conducting the necessary tests, you can ensure that your newly installed electric baseboard heater is operating safely and efficiently. Now, sit back, relax, and enjoy the cozy warmth it provides during the chilly months.
Common Issues And Solutions
Installing an electric baseboard heater is a cost-effective way to keep your home warm during the winter months. However, like any heating system, these heaters can encounter common issues that may affect their performance. Here we will cover two common issues: No Power to the Heater and Insufficient Heat Output, along with their solutions.
No Power to the Heater
If you find that your electric baseboard heater is not turning on, the first thing to check is the power supply. Here are some common causes and their solutions:
- Tripped breaker: A tripped breaker is a common issue that can cut off power to your heater. Check your electrical panel for any tripped breakers and reset them if necessary. If the breaker continues to trip, there may be a wiring issue that needs professional attention.
- Faulty thermostat: If the breaker is not the issue, the thermostat may be the culprit. Ensure that the thermostat is set to the desired temperature and functioning correctly. You can test the thermostat’s functionality by temporarily bypassing it and directly connecting the heater to power. If the heater turns on, you may need to replace the thermostat.
- Loose connections: Over time, the electrical connections in your heater may become loose, causing a loss of power. Turn off the power to the heater and carefully inspect the wiring connections. Tighten any loose connections and secure them with electrical tape or wire nuts.
Insufficient Heat Output
In some instances, the electric baseboard heater may turn on but fail to provide sufficient heat. Here are some common causes and solutions:
- Incorrect sizing: It’s important to ensure that the baseboard heater you choose is the right size for the room. A heater that is too small for the space may struggle to provide adequate heat. Consult the manufacturer’s guidelines or seek professional advice to determine the appropriate size for your room.
- Blocked airflow: Blocked airflow can greatly reduce the heat output of your baseboard heater. Make sure that the heater is not obstructed by furniture, curtains, or any other objects. Clear the space around the heater to allow proper airflow.
- Dust and debris: Over time, dust and debris can accumulate on the heating element, affecting its performance. Regularly clean the heater with a soft brush or vacuum to remove any built-up dirt. This will help maintain the efficiency of the heater and improve heat output.
By addressing these common issues and implementing the solutions mentioned, you can ensure that your electric baseboard heater operates efficiently and provides optimum heating for your home.
Cleaning And Maintaining The Electric Baseboard Heater
Regular cleaning and maintenance of your electric baseboard heater are essential to ensure it operates efficiently and safely. By following a few simple steps, you can keep your heater in optimal condition and extend its lifespan. In this section, we will discuss two important aspects of cleaning and maintaining your electric baseboard heater: regular dusting and vacuuming, and checking for loose connections.
Regular Dusting and Vacuuming
Dusting and vacuuming your electric baseboard heater on a regular basis will help prevent the buildup of dust, debris, and other particles that can impede its efficiency. Follow these steps for effective cleaning:
- Turn off the power: Before you start cleaning, make sure to turn off the power supply to the heater. This will prevent any accidents or electrical shocks.
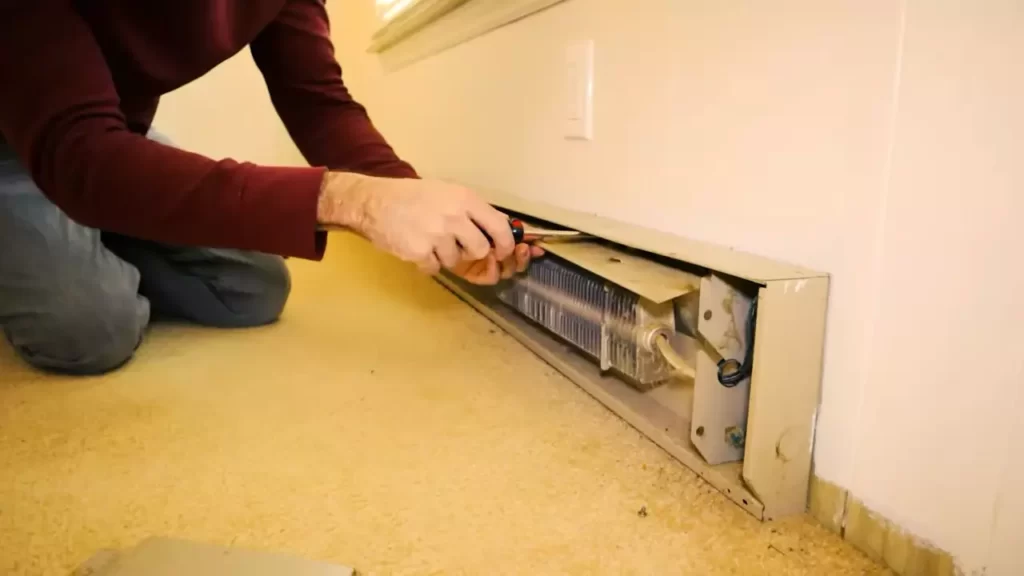
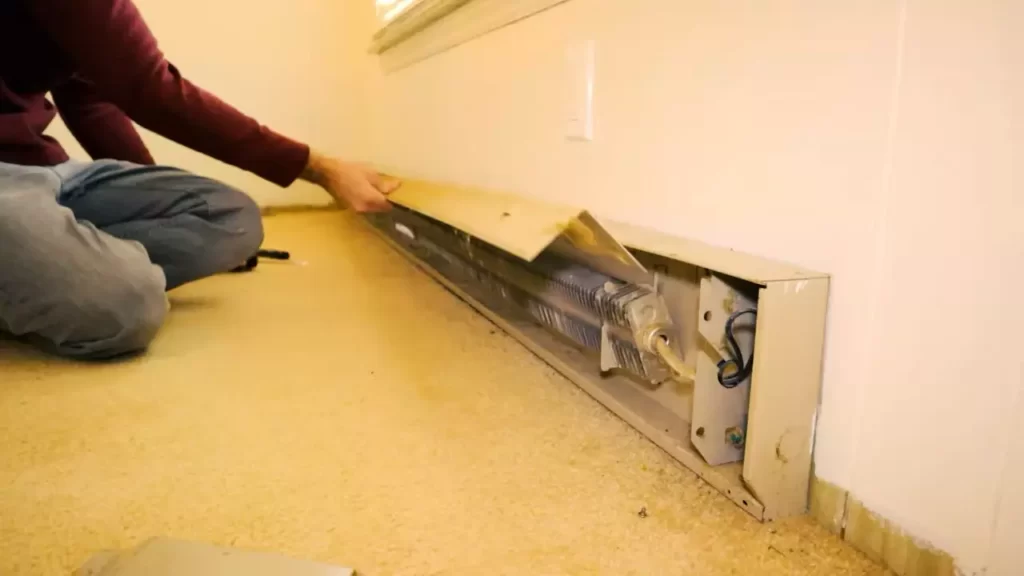
- Remove the cover: Gently remove the cover of the baseboard heater by loosening the screws or clips holding it in place. Set aside the cover in a safe location.
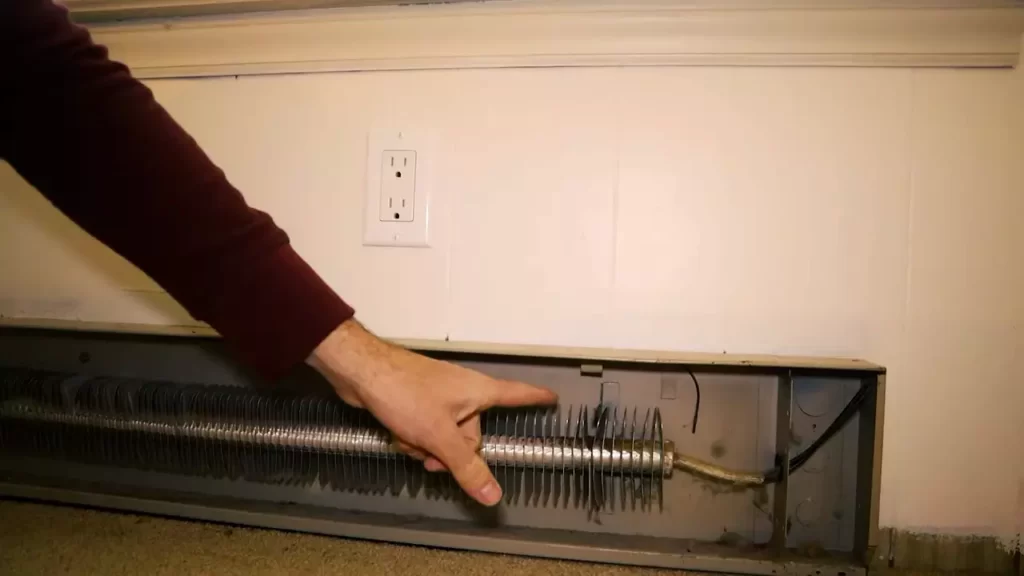
- Dust the interior: Using a soft brush or a microfiber cloth, gently dust the interior components of the heater. Pay close attention to the heating elements and fins, as these are the areas where dust tends to accumulate the most.
- Vacuum the fins: After dusting, use a vacuum cleaner with a brush attachment to remove any remaining dust from the fins. Move the brush attachment along the length of the fins, being careful not to damage them.
- Clean the cover: Wipe or vacuum the cover to remove any dust or debris. If necessary, you can use a mild detergent and water solution to clean the cover thoroughly. Ensure it is completely dry before reattaching it.
- Reassemble the heater: Once the heater and cover are clean, carefully reattach the cover using the screws or clips. Make sure it is securely fastened.
- Restore power: Finally, restore the power supply to the heater and ensure it is functioning properly.
Checking for Loose Connections
Regularly checking for loose connections is crucial to maintain the safety and efficiency of your electric baseboard heater. Follow these steps to perform this important maintenance task:
- Turn off the power: As with any electrical work, it’s important to turn off the power supply to the heater before conducting any inspections.
- Remove the cover: Remove the cover of the baseboard heater, as mentioned in the previous section.
- Inspect the wiring: Carefully inspect the wiring connections to ensure they are secure and free from any signs of damage. Look for any loose or corroded connections, and tighten or replace them as necessary.
- Check for overheating: While the cover is off, inspect the interior components for any signs of overheating, such as discoloration or melted plastic. If you notice anything unusual, contact a qualified electrician for further assistance.
- Reassemble the heater: Once you have checked and secured all the connections, reattach the cover of the heater.
- Restore power: Turn the power supply back on and ensure the heater is functioning properly.
Safety Precautions
Avoiding Flammable Materials Nearby
When installing an electric baseboard heater, it is crucial to take proper safety precautions to prevent any potential accidents. One of the most important steps is to ensure that there are no flammable materials nearby. It is essential to keep a safe distance between the heater and any other objects that could catch fire easily. This includes curtains, furniture, bedding, or any other combustible items.
It is always recommended to maintain a minimum distance of at least 12 inches between the heater and any flammable materials. This will help to prevent any accidental fires and ensure the safety of your home and loved ones. Additionally, it is imperative to regularly check the surrounding area to ensure that no items have been placed near the heater, which could pose a fire hazard.
Keeping the Heater Ventilation Clear
Another important safety precaution when installing an electric baseboard heater is to keep the heater ventilation area clear. This is necessary to prevent any overheating and potential damage to the unit, as well as to maintain proper airflow within the room. Blocked ventilation can lead to inadequate heat distribution, reduced efficiency, and even the risk of the heater malfunctioning.
To ensure adequate ventilation, make sure that there are no obstructions near the baseboard heater, such as furniture, curtains, or rugs. It is recommended to maintain a clearance of at least 12 inches in front of the unit and 6 inches on each side. This will allow for proper air circulation and prevent the unit from overheating. Regularly check the ventilation area to ensure that no objects have been placed in front of or around the heater, which could impede airflow.
Frequently Asked Questions Of How To Install An Electric Baseboard Heater
Can I Install A Baseboard Heater Myself?
Yes, you can install a baseboard heater yourself. Just follow these steps:
1. Turn off the power.
2. Remove the old heater.
3. Install the new heater according to the manufacturer’s instructions.
4. Connect the wiring.
5. Turn the power back on and test the heater.
Do You Need An Electrician To Install A Baseboard Heater?
Yes, it is recommended to hire an electrician to install a baseboard heater for safety and efficiency purposes. Electricians have the knowledge and expertise to properly handle electrical wiring and ensure the installation is done correctly.
How Are Electric Baseboard Heaters Installed?
Electric baseboard heaters are installed by following a few steps. First, locate the studs in the wall and mark where the brackets will be installed. Then, attach the brackets securely to the wall. Next, connect the wiring to the heater and mount it onto the brackets.
Finally, test the heater to ensure it is working properly.
Where Should Electric Baseboard Heaters Be Placed?
Electric baseboard heaters should be placed along exterior walls, near windows or in rooms that tend to be colder. The goal is to provide heat where it is most needed. Make sure there is at least 6 inches of space between the heater and any surrounding furniture or objects.
Conclusion
To summarize, installing an electric baseboard heater can provide efficient and reliable heating to your home. By following the step-by-step instructions provided in this guide, you can successfully install the heater and enjoy its benefits. It is important to remember safety precautions and consult a professional if you have any doubts.
With proper installation and maintenance, your electric baseboard heater can keep you comfortable during the chilly winter months. Stay warm and cozy!