To Install an Intermatic Timer, connect the timer to the circuit and set the desired schedule. Installing an Intermatic Timer is a straightforward process that allows you to automate and control your electrical devices.
By connecting the timer to the circuit and programming the desired schedule, you can easily set when your devices should turn on and off. Whether you want to automate your lights, appliances, or outdoor equipment, an Intermatic Timer offers convenience and energy savings.
We will guide you through the step-by-step process of installing an Intermatic Timer, so you can enjoy the benefits of automated control in your home or workplace.
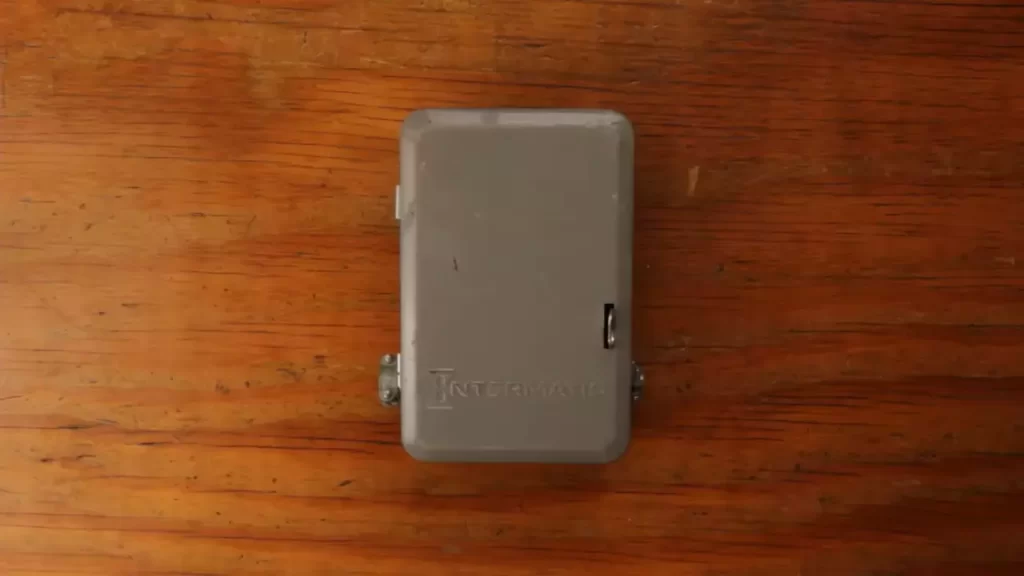
Understanding The Intermatic Timer
In order to effectively install an Intermatic Timer, it’s important to first gain a thorough understanding of what this device is and how it works. The Intermatic Timer is a versatile and reliable tool that allows you to control the timing of electrical devices, such as lights, pumps, and heaters. It offers a wide range of beneficial features, making it an ideal choice for both residential and commercial applications.
What is an Intermatic Timer?
An Intermatic Timer is a programmable device that allows you to automate the on-off cycles of electrical appliances or systems. It is designed to provide convenience, energy efficiency, and enhanced security to your home or workplace. With an Intermatic Timer, you no longer have to manually turn devices on and off. Instead, you can set predefined schedules, allowing your devices to operate automatically.
How does it work?
The Intermatic Timer works by controlling the flow of electricity to connected devices based on the scheduled time settings. It features a user-friendly interface that allows you to easily program the desired on and off times. The timer has multiple settable events, allowing you to program different schedules for different days of the week.
To better understand how it works, let’s walk through a basic example. Let’s say you want to automate your outdoor lights to turn on at dusk and turn off at dawn. With the Intermatic Timer, you can easily program this schedule. Simply set the timer to turn on at the desired dusk time and turn off at the desired dawn time. Once programmed, the timer will automatically activate your outdoor lights according to the schedule you’ve set.
Using an Intermatic Timer comes with a range of benefits. It not only saves you time and effort but also helps reduce energy consumption. By programming the timer to activate devices only when needed, you can optimize energy usage and lower your utility bills. Additionally, the timer provides added security by giving the appearance that someone is home even when you’re away.
Preparing For Installation
Before you begin installing your Intermatic timer, it’s important to make sure you have everything you need and have familiarized yourself with the necessary steps. This will help ensure a smooth and successful installation process. In this guide, we will walk you through the necessary preparations before you start installing your Intermatic timer.
Gather the necessary tools and materials
To install your Intermatic timer, there are a few tools and materials you’ll need to have on hand. Here’s a list of what you’ll need:
| Tools | Materials |
|---|---|
|
|
Having these tools and materials ready will save you time and ensure you have everything you need to complete the installation. Make sure you gather them before you begin so you don’t have to pause midway to find missing items.
Read the instruction manual
Reading the instruction manual is an essential step to ensure you understand the installation process and can follow the correct steps. The manual will provide you with detailed instructions specific to your Intermatic timer model.
When reading the instruction manual, pay attention to any specific requirements or precautions mentioned. This will help you avoid potential mishaps and ensure a safe installation process.
Identify the suitable location for installation
Before you start installing your Intermatic timer, it’s important to identify the most suitable location. Here are a few considerations to keep in mind:
- Choose a location that is easily accessible and within reach of the electrical wires.
- Ensure the location is away from excessive moisture, extreme heat, or other environmental factors that could affect the performance of the timer.
- Consider any regulations or guidelines specific to your area regarding the placement of electrical devices.
By identifying the suitable location beforehand, you can save yourself the trouble of having to relocate the timer later if it’s not in an optimal position.
Now that you’re all set with the necessary tools and materials, have read the instruction manual, and know where to install your Intermatic timer, you’re ready to move on to the installation process. Stay tuned for the next section where we will guide you through the step-by-step installation instructions.
Installing The Intermatic Timer
Installing an Intermatic Timer is a straightforward process that can enhance the efficiency and convenience of your home’s lighting system. By automating your lights, you can save energy and improve security. In this guide, we will walk you through the step-by-step process of installing the Intermatic Timer, so you can start enjoying the benefits.
1. Shut off the power supply
Before beginning any electrical work, it is crucial to ensure your safety by turning off the power supply. Locate the breaker that controls the circuit you will be working on and switch it off. It is recommended to use a voltage tester to verify that there is no electricity flowing to the switch or outlet.
2. Remove the existing switch or outlet cover
Once the power is turned off, carefully remove the cover plate of the existing switch or outlet using a screwdriver. Make sure to set aside the screws, as they will be needed later to secure the Intermatic Timer.
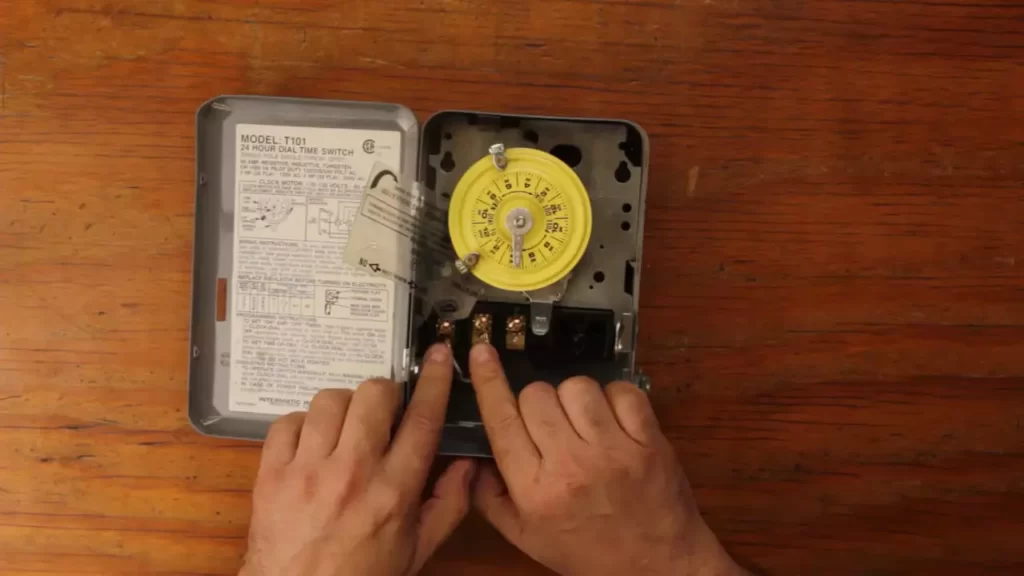
3. Disconnect the wires from the old switch or outlet
Next, identify the wires connected to the old switch or outlet. Carefully disconnect them by loosening the terminal screws. It is essential to keep track of each wire’s location, as they will need to be properly connected to the Intermatic Timer.
4. Connect the wires to the Intermatic Timer
Now it’s time to connect the wires to the Intermatic Timer. The timer will typically have three wires: black (hot), white (neutral), and green or bare copper (ground). Match the corresponding wires from the circuit to the appropriate terminals on the timer, and secure them tightly by tightening the terminal screws.
5. Mount the Intermatic Timer onto the wall or junction box
Once the wires are securely connected, it’s time to mount the Intermatic Timer onto the wall or junction box. Align the timer with the screw holes on the box, and use the screws that were removed earlier to secure it in place. Ensure that the timer is firmly attached and level.
6. Replace the switch or outlet cover
Finally, replace the switch or outlet cover by aligning it with the timer and using the screws to secure it. Make sure the cover is flush against the wall and that all screw holes are aligned properly. This will ensure a neat and professional-looking installation.
With the Intermatic Timer successfully installed, you can now program your desired lighting schedule and enjoy the convenience and energy savings it provides. Don’t forget to turn the power supply back on at the breaker and test the timer to ensure it is functioning correctly.
Configuring The Intermatic Timer
Configuring the Intermatic Timer is an essential step in ensuring its successful installation and optimal functionality. This process involves setting the time and date on the timer, adjusting the timer settings, and customizing it for specific needs such as controlling lights, appliances, and more. In this section, we will guide you through these steps to help you configure your Intermatic Timer.
Set the time and date on the timer
Setting the time and date on your Intermatic Timer is a straightforward process. Follow the steps below to ensure accurate timekeeping:
- Locate the display screen on the timer.
- Press the ‘Set’ button to access the time and date settings.
- Use the arrow buttons to navigate and select the correct time.
- Once the correct time is selected, press the ‘Set’ button again to move to the date settings.
- Follow the same process to set the correct date.
- Once the time and date are accurately set, press the ‘Set’ button to save the changes.
Adjust the timer settings (programmable or manual)
Depending on your needs, you can adjust the Intermatic Timer to operate in either programmable or manual mode. Here’s how you can do it:
- Switch the timer to ‘Program’ mode if you want to set specific schedules for your devices.
- Press the ‘Program’ button to enter the programming mode.
- Using the appropriate buttons, set the desired on/off times for your devices.
- Alternatively, switch the timer to ‘Manual’ mode if you prefer to control your devices manually.
- In ‘Manual’ mode, you can use the ‘On’ and ‘Off’ buttons to directly control the devices connected to the timer.
- Choose the mode that suits your requirements and press the respective button to activate it.
Customize the timer for specific needs (lights, appliances, etc.)
The Intermatic Timer offers the flexibility to customize its settings based on your specific needs. Whether you want to control lights, appliances, or other electrical devices, follow these steps to tailor the timer to your requirements:
- Identify the devices you want to control and ensure they are connected to the timer.
- Refer to the user manual to understand the specific instructions for programming devices.
- Follow the programming steps provided to customize the timer for each device.
- Make sure to carefully set the on/off times and durations for each device.
- Test the timer by activating the programmed settings to verify that the devices respond accordingly.
- Adjust any settings as needed to achieve the desired control over your lights, appliances, or other devices.
By following these steps, you can successfully configure your Intermatic Timer and maximize its functionality. Whether you need to set the time and date, adjust the timer settings, or customize it for specific needs, the configuration process is designed to be user-friendly and efficient.
Testing And Troubleshooting
Testing and troubleshooting your Intermatic timer is an essential step to ensure its proper functionality. By following these steps, you can easily identify any issues and troubleshoot them accordingly. Let’s dive into the process!
Turn on the power supply
Before testing your Intermatic timer, make sure that the power supply is turned on. This will ensure that you have a steady flow of electricity to accurately assess the timer’s functionality. If the power supply is not turned on, the timer may not work as intended.
Test the timer’s functionality
To test the Intermatic timer, follow these steps:
- Set the timer to the desired time and mode.
- Plug the timer into a power outlet.
- Observe if the timer starts counting down or switches on the connected device accordingly.
- If the timer functions as desired, congratulations! You have successfully tested the Intermatic timer.
Troubleshoot any issues that may arise
If you encounter any issues during the testing process, here are a few troubleshooting tips:
- Check the power supply: Ensure that the power outlet is receiving electricity and that the timer is securely plugged in.
- Inspect the timer settings: Double-check that you have set the timer correctly, including the time, mode, and any other specific settings.
- Verify the connected device: Ensure that the device connected to the timer is functioning properly. Test the device independently to rule out any potential issues.
- Reset the timer: If all else fails, try resetting the Intermatic timer. Refer to the user manual for instructions on how to reset the timer to its default settings.
By following these troubleshooting steps, you can identify and resolve any issues that may arise with your Intermatic timer. Remember to always refer to the user manual for specific instructions and contact Intermatic’s customer support if needed. Happy testing!
Additional Tips And Considerations
Installing an Intermatic timer can be a great way to automate your lighting system and improve energy efficiency in your home or workplace. However, to ensure a smooth installation and optimal usage of your timer, there are additional tips and considerations worth noting. From safety precautions to programming tips and common problems, we have got you covered.
Safety Precautions During Installation
Before you begin the installation process, it is essential to prioritize safety to prevent any accidents or damage. Here are some safety precautions you should keep in mind:
- Turn off the power: Make sure to turn off the power to the area where you will be installing the timer. This will prevent any electrical shocks or short circuits.
- Follow the manufacturer’s instructions: Always refer to the manufacturer’s instructions and guidelines specific to your Intermatic timer model. This will ensure that you follow the correct steps and avoid any installation mistakes.
- Use the right tools and equipment: Be sure to use the appropriate tools and equipment for the installation. This will not only make the process easier but also reduce the risk of accidents.
- Double-check wiring connections: Before turning the power back on, double-check all wiring connections to ensure they are secure. Loose connections can lead to malfunctioning or inefficient operation of the timer.
Programming Tips for Optimal Usage
Now that you have successfully installed your Intermatic timer, it’s time to program it for optimal usage. Follow these programming tips to get the most out of your timer:
- Read the manual: Familiarize yourself with the programming options and features of your specific Intermatic timer. The manual will guide you on how to set up different schedules and customize settings according to your needs.
- Create a schedule: Determine when you want your lights or appliances to turn on and off. Create a schedule that aligns with your daily routine or energy-saving goals. Programming your timer to operate only when needed can significantly reduce energy consumption.
- Consider multiple programs: If you have different lighting zones or appliances in your space, consider setting up multiple programs. This will give you more flexibility in controlling the timing and duration of each zone or appliance.
- Test the timer: After programming your timer, it’s essential to test it to ensure it is operating as intended. Manually trigger the timer to see if the lights or appliances respond accordingly.
Common Problems and Solutions
Even with proper installation and programming, you may encounter some common problems with your Intermatic timer. Here are a few troubleshooting tips to help you resolve these issues:
| Problem | Solution |
|---|---|
| Lights/appliances not turning on/off | Check the power supply and wiring connections. Ensure the timer is programmed correctly and that the schedule is accurately set. |
| Inconsistent timing | Verify the time and date settings on your timer. Adjust them if necessary. Make sure there are no conflicting programs or settings. |
| Timer display not working | Check the battery if your timer is equipped with one. Replace the battery if it is dead. If the display is still not functioning, contact Intermatic customer support. |
By following these additional tips and considerations, you can install and use your Intermatic timer with confidence. Remember to prioritize safety during installation, program the timer effectively, and troubleshoot any common problems that may arise. Enjoy the convenience and energy savings that come with automated lighting control!
Frequently Asked Questions Of How To Install Intermatic Timer
How Do You Install An Intermatic Wall Timer?
To install an Intermatic wall timer, follow these steps: 1. Turn off power at the breaker. 2. Remove the old switch. 3. Connect the timer wires to the house wires. 4. Attach the timer in the wall box. 5. Restore power and program the timer as needed.
How Do I Change My Intermatic Timer?
To change your Intermatic timer, follow these steps: 1. Locate the timer switch and turn it off. 2. Remove the cover to access the timer mechanism. 3. Disconnect the old timer by unscrewing the wires. 4. Connect the new timer by attaching the wires correctly.
5. Replace the cover and turn the switch back on.
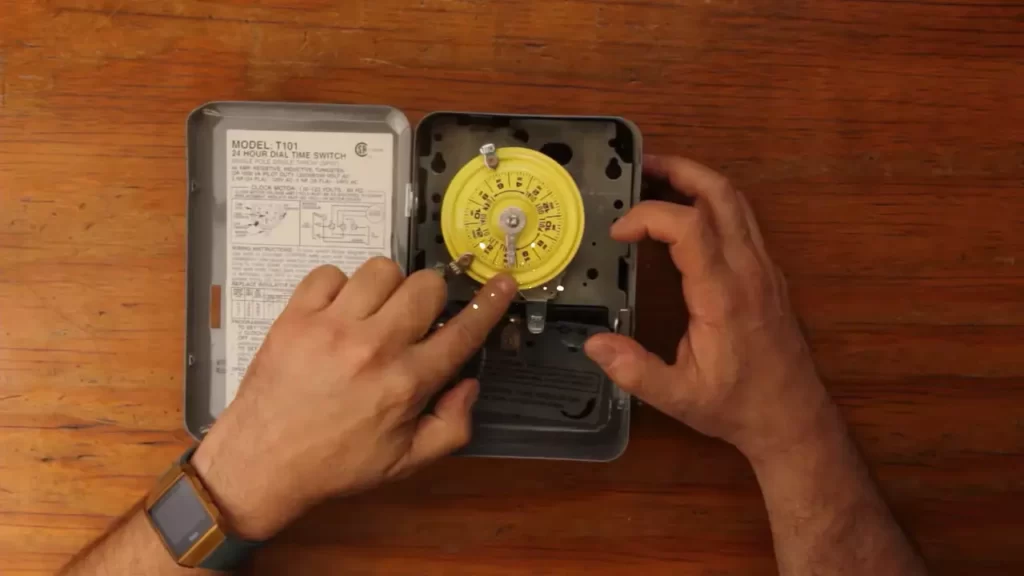
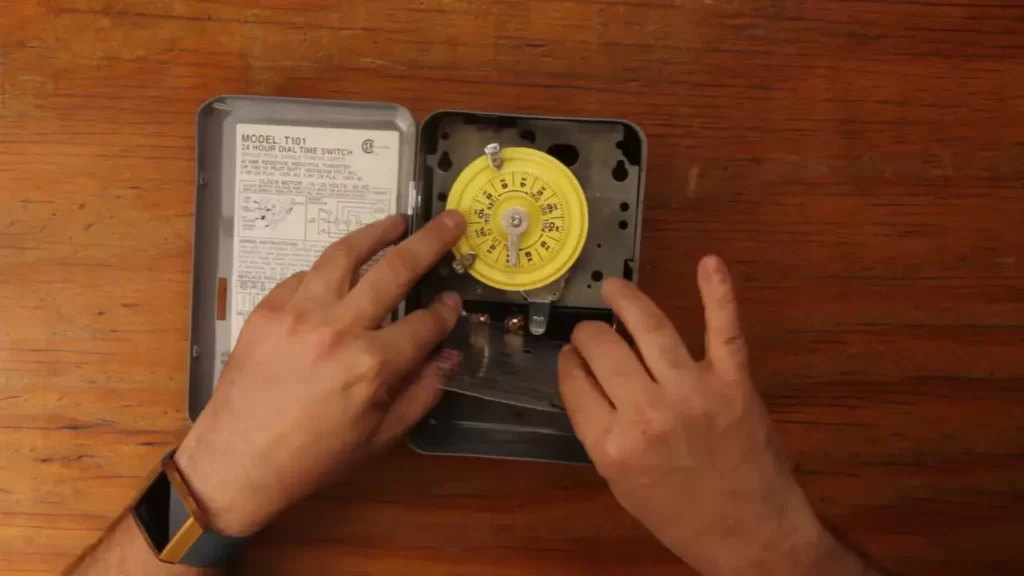
How Do I Set The Timer On My Intermatic T101?
To set the timer on your Intermatic T101, follow these steps: 1. Locate the time dial on the timer. 2. Lift the dial and rotate it until the current time aligns with the pointer. 3. Push the timer tabs down to the desired “ON” and “OFF” times.
4. Set the switch to “Timer” mode. 5. The timer is now set and will automatically turn on and off according to the programmed times.
How Do You Set An Intermatic Lamp And Appliance Timer?
To set an Intermatic lamp and appliance timer, follow these steps: 1. Plug the timer into an electrical outlet. 2. Set the current time using the time-setting wheel or buttons. 3. Press the pins or buttons corresponding to the desired on/off times.
4. Attach the timer to your lamp or appliance. 5. Ensure the timer is plugged in and powered on.
Conclusion
Installing an Intermatic Timer is a simple process that can add convenience and savings to your daily life. By following the clear instructions provided in this guide, you can easily set up and program your timer to automate various electrical devices.
With its user-friendly features and reliable performance, the Intermatic Timer is an essential tool for managing your energy usage. Get started today and experience the benefits of a well-controlled electrical system.