To install a Rheem Tankless Water Heater, follow these steps: Shut off the power and water supply, disconnect the old unit, mount the new unit and connect it to the pipes and power source, and finally, test the heater for functionality. Installing a Rheem Tankless Water Heater can provide numerous benefits, including energy and cost savings, instant hot water and a compact design.
This article provides an easy-to-follow guide on how to install this efficient water heating system. By following these simple steps, you can have a reliable and efficient tankless water heater in your home in no time. So, let’s get started with the installation process.
Choosing The Right Location
One of the most important considerations when installing a Rheem tankless water heater is choosing the right location. The right location not only ensures optimum performance but also enhances safety and convenience. In this section, we will discuss two key factors that need to be taken into account: ventilation requirements and assessing electrical and plumbing needs.
Considering Ventilation Requirements
Proper ventilation is crucial for the safe and efficient operation of your Rheem tankless water heater. As these heaters produce combustion gases during operation, it is essential to vent them outside to prevent the accumulation of harmful gases such as carbon monoxide inside your home.
To determine the right location for your tankless water heater, you need to consider the following ventilation requirements:
- Identify a location near an exterior wall: A tankless water heater should be installed near an exterior wall to allow for easy venting to the outside. This minimizes the distance that the vent pipes need to travel and ensures effective removal of combustion gases.
- Check local building codes: Different regions may have specific regulations regarding venting requirements for tankless water heaters. It is essential to consult local building codes and adhere to their guidelines to ensure compliance and safety.
- Choose the right venting materials: Rheem tankless water heaters can use either PVC or stainless steel vent pipes. The choice between the two will depend on factors like your local climate, venting distance, and any local code requirements. It is advisable to consult a professional or the manufacturer’s guidelines to select the appropriate venting materials for your specific installation.
- Plan for proper air intake: Along with venting the combustion gases, a tankless water heater also requires an adequate air intake for combustion. Ensure that the chosen location allows enough fresh air to enter the unit. This may involve providing sufficient space around the heater or installing additional vents for proper air circulation.
Assessing Electrical and Plumbing Needs
Aside from ventilation requirements, it is crucial to assess the electrical and plumbing needs of your Rheem tankless water heater to ensure a smooth installation process. Here are a few factors you should consider:
- Ensure proper electrical supply: Tankless water heaters require a dedicated electrical circuit with the correct voltage and amperage. It is recommended to consult an electrician to determine if your electrical panel can handle the power requirements and whether any additional wiring or upgrades are necessary.
- Evaluate available plumbing connections: Look for accessible plumbing connections near the desired installation location. This will make it easier to connect the incoming cold water supply and outgoing hot water lines to the tankless water heater. If necessary, consult a plumber to evaluate the existing plumbing layout and make any required modifications.
- Consider water hardness and filtration: The quality of your water supply can affect the performance and longevity of your tankless water heater. If you have hard water or other water quality issues, consider installing a water softener or filtration system to prevent mineral buildup and maintain optimal heater efficiency.
- Think about future maintenance: When choosing the location for your tankless water heater, consider easy access for future maintenance and servicing. This includes leaving enough space around the unit for technicians to perform inspections, cleanings, and potential repairs.
By carefully considering the ventilation requirements and assessing the electrical and plumbing needs, you can choose the ideal location for your Rheem tankless water heater. Remember to consult professionals, follow local building codes, and refer to the manufacturer’s guidelines to ensure a safe and flawless installation.
Step-By-Step Guide
Installing a Rheem Tankless Water Heater can be a great upgrade for your home, providing hot water on demand while saving space and energy. To ensure a successful installation, it is important to follow a step-by-step guide. This guide will walk you through the process, from shutting off the water and gas supply to connecting the gas supply. Let’s get started!
Shutting Off the Water and Gas Supply
Before you begin, make sure to shut off the water and gas supply to your current water heater. This can usually be done by turning off the main water valve and gas valve. It’s important to prevent any water or gas from flowing during the installation process.
Mounting the Water Heater Securely
Once the water and gas supply are shut off, it’s time to mount the new Rheem Tankless Water Heater securely. Choose a suitable location for the water heater, keeping in mind the required clearances from walls and other objects. Use the provided mounting hardware to secure the water heater in place, ensuring it is level and stable.
Connecting the Water Supply Lines
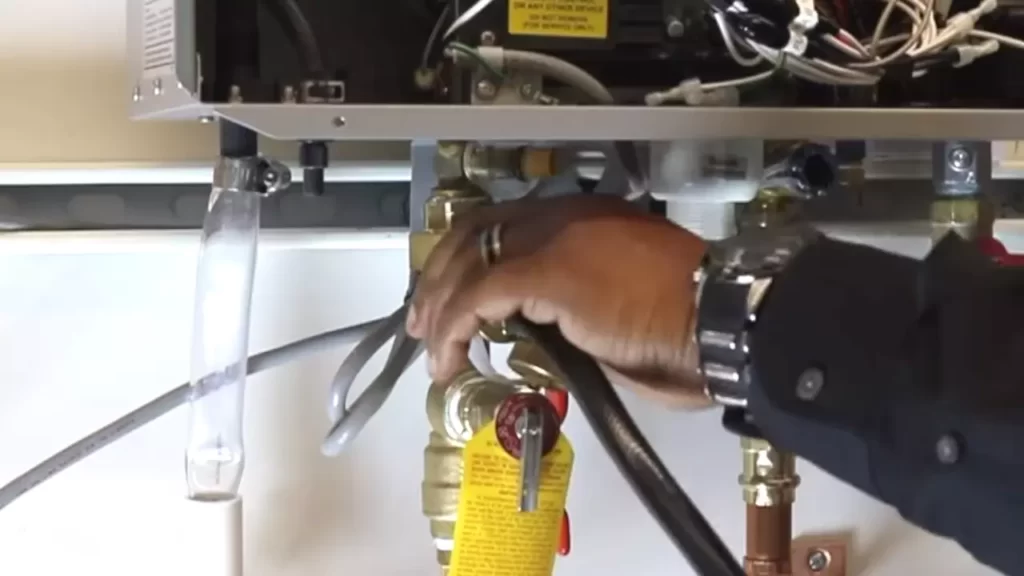
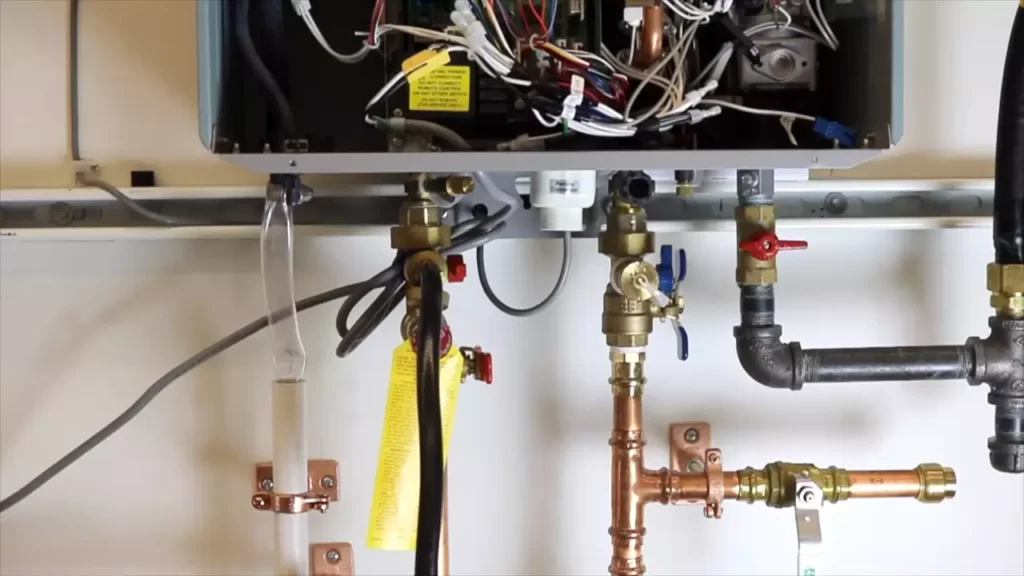
With the water heater securely mounted, it’s time to connect the water supply lines. Begin by connecting the cold water inlet to the bottom of the water heater, using a suitable connector or union. Then, connect the hot water outlet to the top of the water heater. Make sure all connections are tight and leak-free.
Installing the Venting System
Proper venting is crucial for the safe operation of a tankless water heater. Determine the appropriate venting configuration based on the specific model of your Rheem Tankless Water Heater. Install the vent pipe according to the manufacturer’s instructions, ensuring it is correctly sized and sloped for efficient exhaust gas removal.
Connecting the Gas Supply
After completing the water supply connections and venting system installation, it’s time to connect the gas supply. Use a flexible gas connector or pipe to connect the gas supply line to the water heater’s gas inlet. Apply a suitable sealant or thread tape to ensure a tight and leak-free connection. Always refer to the manufacturer’s instructions for proper gas supply connection.
By following this step-by-step guide, you can successfully install your Rheem Tankless Water Heater and enjoy the benefits of on-demand hot water. Remember to always consult the manufacturer’s instructions for detailed installation guidelines specific to your model. With proper installation, your tankless water heater will provide reliable performance and energy savings for years to come.
Ensuring Proper Functionality
After installing your Rheem Tankless Water Heater, it is crucial to ensure that it functions properly to provide you with endless hot water. This section will guide you through the essential steps to ensure proper functionality of your tankless water heater, including checking for gas leaks, testing water temperature and flow rate, and troubleshooting common issues.
Checking for Gas Leaks
Before starting your Rheem Tankless Water Heater, it is important to check for any potential gas leaks. Here’s how you can do it:
- Make sure all connections are secure and properly tightened.
- Apply a gas leak detection solution or soapy water to the gas connections.
- Observe for any bubbles or signs of gas leakage. If you notice any leakage, tighten the connections or contact a professional plumber.
- Finally, ensure that the gas supply valve is fully open for proper gas flow to the water heater.
Testing Water Temperature and Flow rate
To ensure optimal performance of your Rheem Tankless Water Heater, follow these steps to test the water temperature and flow rate:
- Turn on a hot water faucet and let the water flow for a few minutes.
- Using a thermometer, measure the temperature of the water. It should match your desired temperature setting.
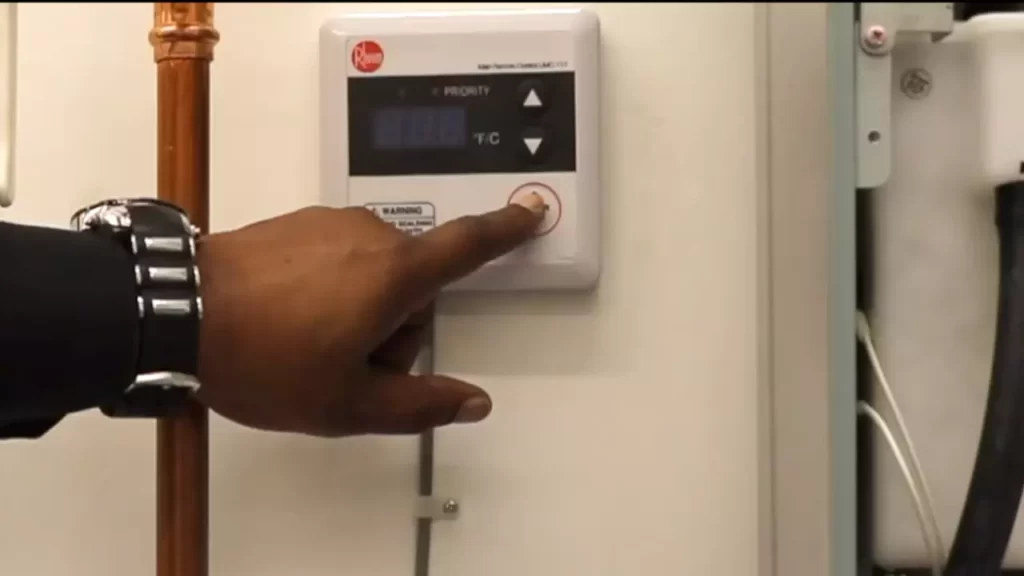
- If the temperature is not satisfactory, adjust the temperature on the water heater control panel to your desired level.
- Next, check the flow rate by filling a measured container with water for one minute.
- Calculate the flow rate by dividing the amount of water collected by one minute.
- The recommended flow rate for most tankless water heaters is typically around 2-5 gallons per minute. If the flow rate is lower than expected, you may need to clean the water filter or consult a professional plumber.
Troubleshooting Common Issues
Even with proper installation, you may occasionally encounter some issues with your Rheem Tankless Water Heater. Here are some common problems and troubleshooting steps:
- If you experience no hot water, check that the gas supply valve is open and there is no interruption in the gas supply. Also, ensure that there is no error code displayed on the water heater.
- If you encounter fluctuating water temperatures, the problem may be due to low flow rates or excessive demand. Increase the flow rate or limit the usage to prevent fluctuations.
- In case of error codes, refer to the manufacturer’s manual to identify the specific issue and follow the recommended troubleshooting steps.
- Remember to always exercise caution and seek professional help if you are unsure about any aspect of troubleshooting.
By following these essential steps, you can ensure the proper functionality of your Rheem Tankless Water Heater. These maintenance tasks will help to keep your water heater running efficiently, providing hot water whenever you need it!
Keeping Your Rheem Tankless Water Heater In Top Shape
Proper maintenance of your Rheem tankless water heater is essential to ensure its longevity and optimal performance. Regular maintenance tasks such as flushing the system for sediment buildup, cleaning the intake filter, and checking and adjusting water pressure can prolong the lifespan of your water heater and prevent costly repairs in the future. In this article, we’ll delve into each of these maintenance tasks and provide you with a step-by-step guide on how to keep your Rheem tankless water heater running smoothly.
Flushing the System for Sediment Buildup
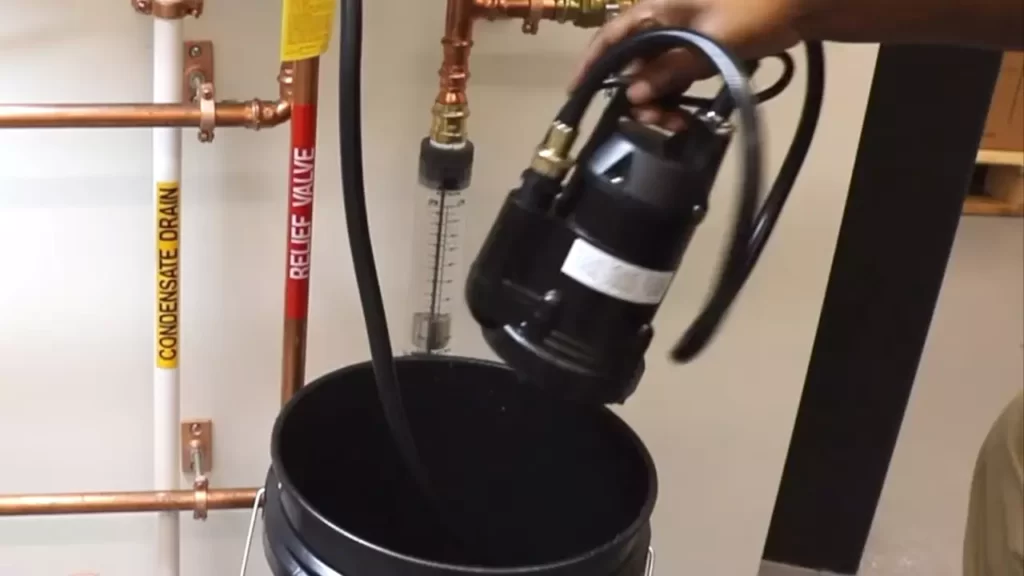
Sediment buildup is a common issue in tankless water heaters that can negatively affect efficiency and functionality. Flushing the system is a fairly simple process that should be performed at least once a year, or more frequently if your water supply is prone to high mineral content. Here’s a step-by-step guide on how to flush your Rheem tankless water heater:
- Turn off the power to the water heater by shutting off the circuit breaker.
- Shut off the water supply to the heater by closing the cold water isolation valve.
- Connect a hose to the hot water isolation valve, located on the bottom of the water heater.
- Place the other end of the hose in a suitable drain location, such as a floor drain or a bucket.
- Open both the hot water isolation valve and a nearby hot water faucet to allow the water heater to drain.
- Once the water heater has drained completely, close the hot water isolation valve.
- Disconnect the hose and ensure all valves are returned to their original positions.
- Turn on the water supply and open the hot water faucet to allow the tankless water heater to fill.
- Finally, restore power to the water heater by flipping on the circuit breaker.
Cleaning the Intake Filter
The intake filter is responsible for preventing debris from entering your Rheem tankless water heater. Over time, it can become clogged with sediment and other particles, obstructing the flow of water and reducing efficiency. Cleaning the intake filter is a simple yet crucial maintenance task. Here’s how you can do it:
- Turn off the power to the water heater by shutting off the circuit breaker.
- Locate the intake filter on the bottom of the water heater.
- Gently remove the filter from its housing.
- Rinse the filter under running water to remove any dirt or debris.
- Inspect the filter for any signs of damage or excessive wear and tear. If necessary, replace it with a new one.
- Reinstall the filter back into its housing.
- Restore power to the water heater by turning on the circuit breaker.
Checking and Adjusting Water Pressure
Optimal water pressure is crucial for the efficient operation of your Rheem tankless water heater. High water pressure can put unnecessary strain on the unit, while low water pressure may lead to inadequate hot water supply. Checking and adjusting water pressure is a straightforward task that can help prolong the lifespan of your water heater. Here’s how you can do it:
- Turn off the power to the water heater by shutting off the circuit breaker.
- Locate the pressure relief valve and pressure gauge on the front of the water heater.
- Slowly turn the pressure relief valve counter.
Frequently Asked Questions Of How To Install A Rheem Tankless Water Heater
Can I Install A Tankless Water Heater By Myself?
Yes, you can install a tankless water heater by yourself. However, it is important to follow the manufacturer’s instructions and guidelines carefully to ensure proper installation and safety. If you’re unsure or unfamiliar with plumbing and electrical work, it’s recommended to hire a professional for the job.
What Is Needed To Install Tankless Hot Water Heater?
To install a tankless hot water heater, you’ll need the following: a suitable location near a power source and gas line (if applicable), proper ventilation, appropriate water connections, and a dedicated electrical circuit.
How Much Does It Cost To Install A Rheem Tankless Water Heater?
The installation cost of a Rheem tankless water heater varies depending on factors such as location, labor charges, and any additional plumbing requirements. It is recommended to consult a professional plumber or local dealer for an accurate estimate tailored to your specific needs.
Does A Rheem Tankless Water Heater Need An Expansion Tank?
Yes, a Rheem tankless water heater requires an expansion tank. The expansion tank helps relieve pressure build-up and prevents damage to the unit, ensuring optimal performance and longevity.
Conclusion
Installing a Rheem tankless water heater is a fairly straightforward process that can greatly improve the efficiency and convenience of your home’s hot water supply. By following the steps outlined in this guide, you can confidently tackle this project on your own.
Remember to carefully read the manufacturer’s instructions, gather the necessary tools and materials, and take the time to properly plan and execute each step. With proper installation, you’ll enjoy endless hot water and potentially lower energy bills. Happy DIY-ing!