To install a baseboard heater, you will need to gather the necessary tools and materials, measure and mark the placement, secure the mounting brackets, run the electrical wires, connect the heater to the power source, and test the unit for functionality. This process can be completed by following a few simple steps.
Installing a baseboard heater is a straightforward task that can help provide efficient heating for your home or office. By following the proper procedures and taking necessary safety precautions, you can easily complete the installation process. We will provide a step-by-step guide on how to install a baseboard heater.
So, let’s get started!
Choosing The Right Baseboard Heater
Factors to consider when selecting a baseboard heater
Choosing the right baseboard heater for your home can make all the difference in terms of heating efficiency and comfort. With so many options available in the market today, it is important to consider a few key factors before making a decision. By understanding the heating capacity and wattage requirements, you can ensure that you choose a baseboard heater that meets your specific needs.
When selecting a baseboard heater, there are a few important factors to keep in mind. Let’s take a closer look at each of these factors and how they can influence your decision-making process.
Understanding the heating capacity and wattage requirements
One of the first things to consider when selecting a baseboard heater is the heating capacity and wattage requirements for your space. Heating capacity refers to the amount of heat a heater can produce, while wattage requirements refer to the amount of power needed to operate the heater effectively.
To determine the heating capacity and wattage requirements for your space, you should consider factors such as the room size, insulation levels, and desired temperature. A larger room or a poorly insulated space may require a higher heating capacity and wattage to effectively warm the area.
It is important to note that selecting a baseboard heater with too low of a heating capacity or wattage can result in inefficient heating, while choosing a heater with too high of a capacity can lead to wasted energy and higher electricity bills. Therefore, finding the right balance is crucial.
To make this process easier, most baseboard heaters come with a wattage chart that helps you determine the appropriate heater size based on your room dimensions. This chart takes into account factors such as insulation, window size, and ceiling height to provide an estimate of the wattage required.
In addition to considering the heating capacity and wattage requirements, it is also important to think about the overall design and aesthetic of the baseboard heater. Look for a heater that matches the style of your home and blends seamlessly with your existing décor.
Choosing the right baseboard heater can have a significant impact on your home’s heating efficiency and comfort. By considering factors such as heating capacity, wattage requirements, and design, you can find a baseboard heater that meets your needs and enhances the overall ambiance of your space.
Preparing For Installation
Before you begin installing a baseboard heater, it is crucial to properly prepare the installation area. Taking the time to measure the length and height of the area, ensuring proper electrical wiring, and clearing any obstructions will help ensure a smooth and efficient installation process. By following the steps outlined below, you can be confident that your baseboard heater will be installed correctly and provide optimal heat for your space.
Measuring the length and height of the installation area
One of the first steps in preparing for baseboard heater installation is to accurately measure the length and height of the area where the heater will be placed. This will help determine the size of the heater you need and ensure a proper fit. To measure the length, simply use a measuring tape to determine the distance between the two endpoints of the installation area. Similarly, measure the height by determining the vertical distance from the floor to the desired height of the heater.
Ensuring proper electrical wiring is in place
Proper electrical wiring is essential for the safe and efficient operation of your baseboard heater. Before installation, it is crucial to check that the electrical wiring in the installation area meets the necessary requirements. This includes ensuring that the electrical circuit can handle the load of the heater and that the wiring is in good condition. If you are unsure about the electrical wiring or need assistance, it is recommended to consult a licensed electrician to ensure compliance with safety standards and codes.
Clearing the area of any obstructions
Prior to installing a baseboard heater, it is essential to clear the installation area of any obstructions that may hinder its performance. Remove any furniture, curtains, or other objects that may obstruct the airflow or come into direct contact with the heater. Additionally, ensure that there are no flammable materials or combustible substances near the installation area. Keeping the area clear of obstructions will not only ensure proper heat distribution but also prevent any potential safety hazards.
By following these important steps of preparation, you can proceed with confidence to install your baseboard heater. Taking the time to measure the length and height, ensuring proper electrical wiring, and clearing the area of any obstructions will help guarantee a successful installation and the reliable heating of your space.
Steps To Install A Baseboard Heater
Installing a baseboard heater is a great way to efficiently heat individual rooms in your home. Whether you are replacing an old unit or installing a new one, this step-by-step guide will walk you through the process. Before you begin, gather the necessary tools and materials to ensure a smooth installation.
Gathering the necessary tools and materials
Before starting the installation process, make sure you have all the tools and materials needed. Here is a list of what you will need:
- Baseboard heater
- Mounting brackets
- Screws
- Electrical wire
- Wire connectors
- Wire stripper
- Drill
- Screwdriver
- Level
- Pencil
Turning off the power supply
Before you begin any electrical work, it is important to turn off the power supply to the circuit you will be working on. Locate the circuit breaker panel for your home and switch off the breaker that corresponds to the room where the baseboard heater will be installed. Double-check that the power is off by using a voltage tester.
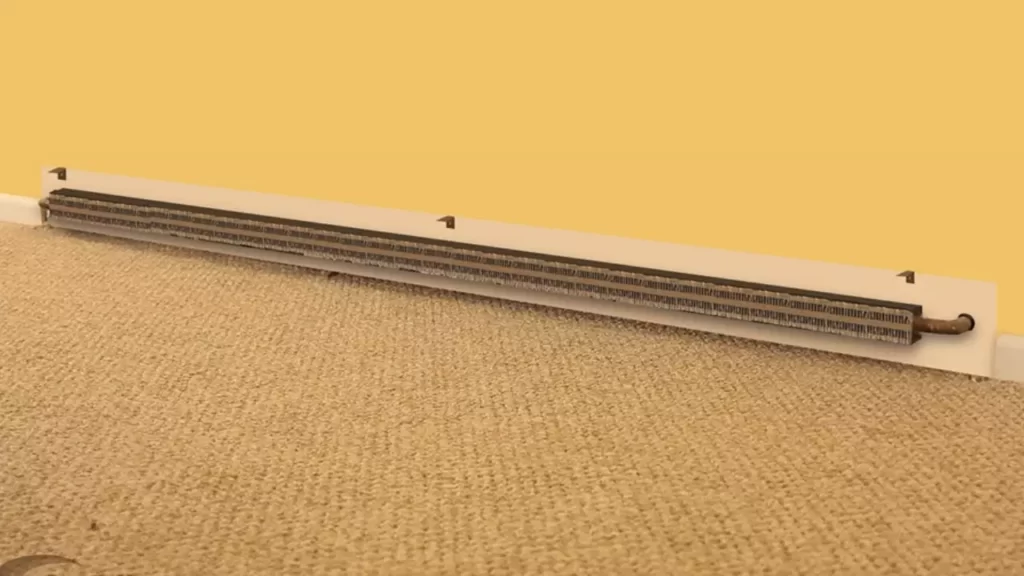
Mounting the heater onto the wall
Once the power is off, you can start mounting the baseboard heater onto the wall. Use the level to ensure that the heater is straight and mark the position of the mounting brackets with a pencil. Attach the mounting brackets securely to the wall using screws. Place the baseboard heater onto the brackets and make sure it is secure.
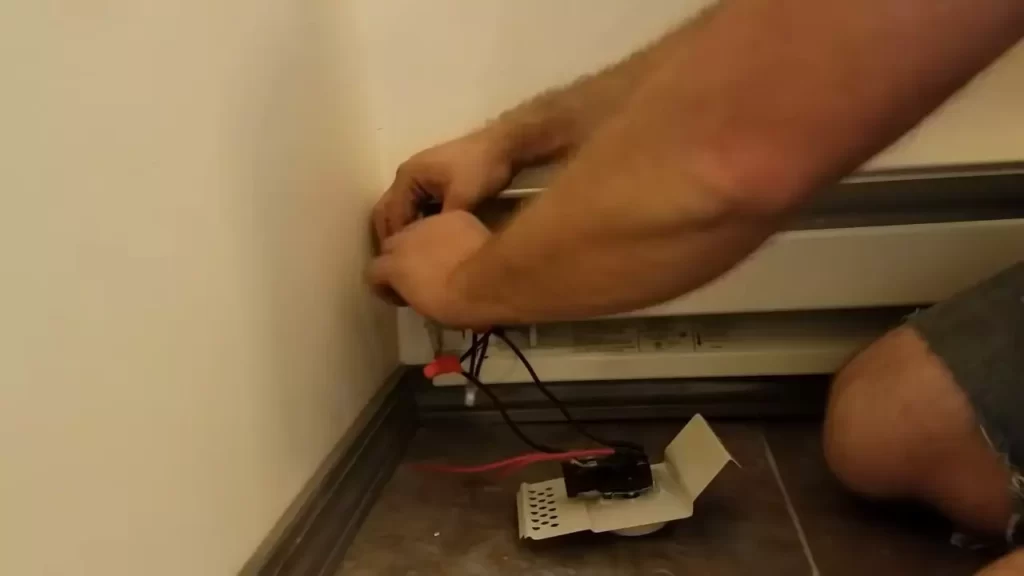
Connecting the wiring properly
With the baseboard heater mounted, it’s time to connect the wiring. Strip the insulation off the ends of the electrical wire using a wire stripper. Connect the wires from the heater to the corresponding wires in the electrical box using wire connectors. Make sure the connections are tight and secure.
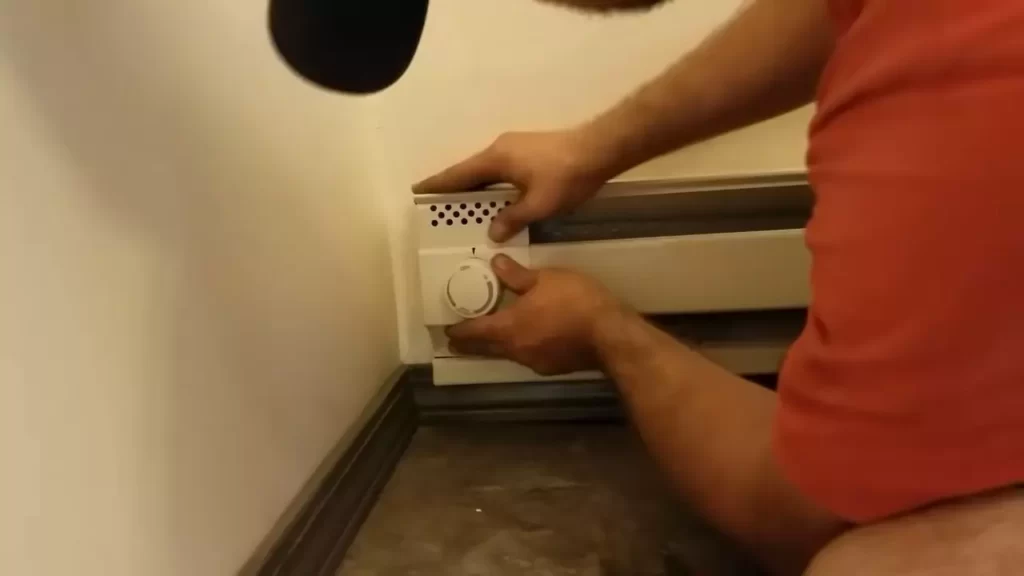
Testing the heater for functionality
Before completing the installation, it’s important to test the baseboard heater for functionality. Switch on the power supply at the circuit breaker and turn on the thermostat. The heater should start producing heat. Make sure to monitor the heater for a while to ensure that it is working properly.
Congratulations! You have successfully installed a baseboard heater. Now you can enjoy the comfort and warmth it provides in your room. Remember to always follow safety guidelines and consult a professional if you are unsure about any part of the installation process.
Mounting The Heater
Now that you have chosen the appropriate location for your baseboard heater installation, it is time to move on to mounting the heater. This crucial step ensures that your heater is securely attached to the wall, providing efficient and reliable heating for your space. Let’s go through the process step by step:
Choosing the appropriate location for installation:
Before you start mounting the heater, it is important to choose the right location. Take into consideration the room’s layout, the proximity to electrical outlets, and the desired heat distribution. You will want to place the heater in an area that allows for maximum heat distribution and where it is easily accessible for cleaning and maintenance. Ensure that there are no obstructions such as furniture or curtains that could block the airflow.
Marking the position for mounting brackets:
Once you have decided on the location, use a pencil to mark the position for the mounting brackets. Make sure to measure carefully and level the brackets before marking. A level will help you ensure that the heater will be straight and securely mounted.
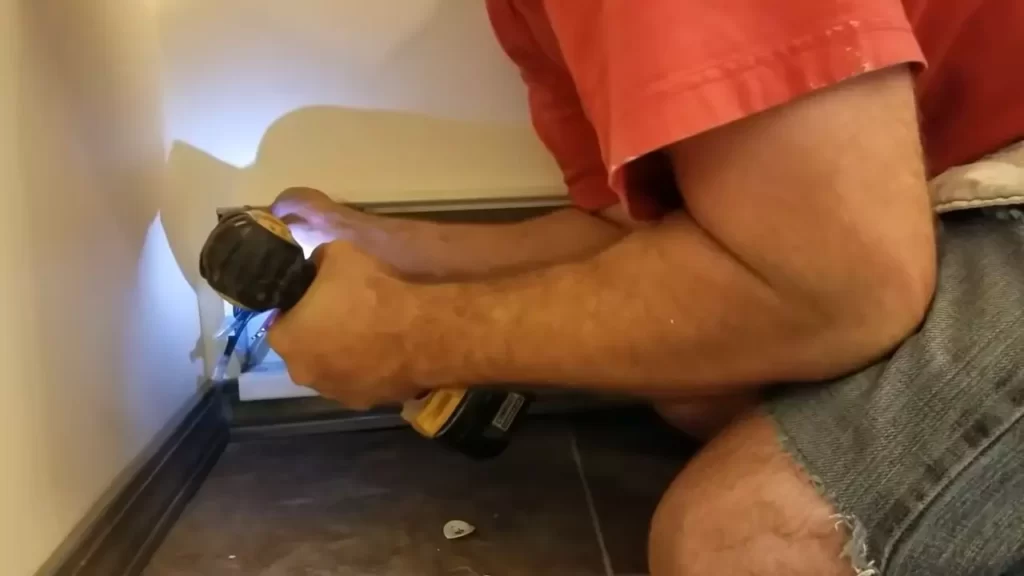
Attaching the brackets securely to the wall:
After marking the positions, it’s time to attach the brackets to the wall. Use a drill and appropriate screws to firmly secure the brackets at the marked spots. Ensure that the brackets are level and securely attached. This step is vital to ensure that the heater remains in place and doesn’t pose any safety hazards.
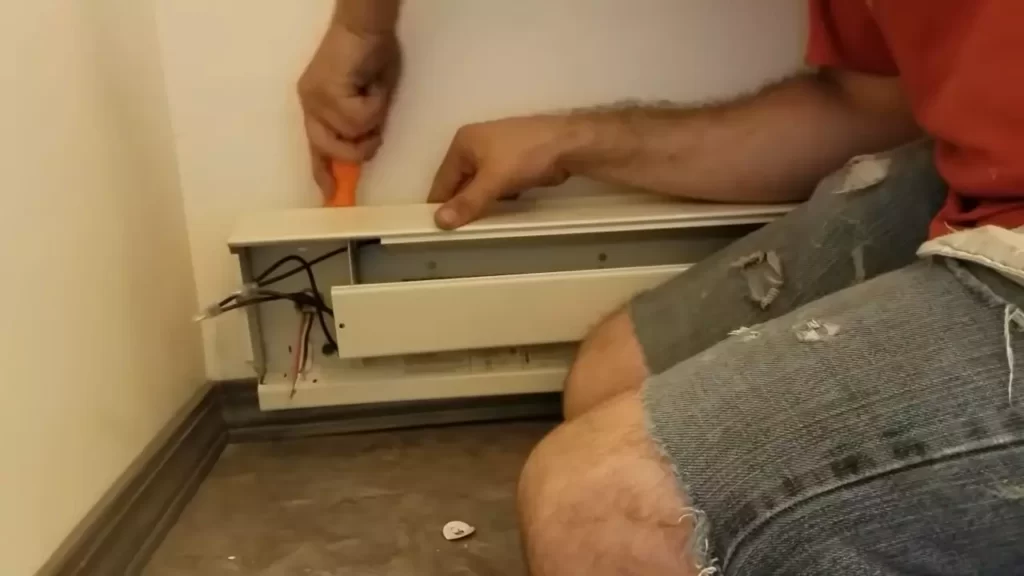
Fixing the heater onto the brackets:
Now that the brackets are securely attached to the wall, it’s time to fix the heater onto the brackets. Carefully line up the heater with the brackets and slide it into place. Once the heater is in position, make sure it is level and secure.
Double-check all the brackets and screws to ensure they are properly fastened before powering on the heater. A loose or unstable installation can lead to safety hazards or inefficient heating.
By following these simple steps, you can easily mount your baseboard heater and enjoy the warmth it provides. Remember to read the manufacturer’s instructions carefully and always prioritize safety during the installation process.
Wiring The Baseboard Heater
When it comes to installing a baseboard heater, one crucial step is wiring the unit properly. This step ensures that the heater functions safely and efficiently. In this section, we will discuss the key points to consider when wiring your baseboard heater. Pay close attention to the subheadings below to ensure a successful installation.
Identifying the wiring connections
Before you begin the wiring process, it’s important to familiarize yourself with the different wiring connections involved in a baseboard heater. These connections typically include a supply wire, a load wire, and a ground wire. The supply wire carries the electrical current to the heater, while the load wire enables the heater to produce heat. The ground wire provides a safety measure by grounding any excess electrical current.
Stripping the wires and connecting them to the heater
- To begin, start by stripping the insulation off the ends of the supply, load, and ground wires. This will expose the bare copper or aluminum conductors, allowing for easy connection.
- Next, connect the supply wire to the corresponding supply terminal on the baseboard heater. This terminal is typically labeled “L1” or “L2.” Ensure that the connection is tight and secure.
- After connecting the supply wire, attach the load wire to the appropriate load terminal on the heater. This terminal is often marked as “T1” or “T2.” Double-check that the connection is secure to avoid any future issues.
- Lastly, connect the ground wire to the grounding terminal on the baseboard heater. The grounding terminal is usually marked with the symbol for ground. This step is crucial to establish proper grounding and ensure electrical safety.
Ensuring proper grounding is in place
In addition to connecting the ground wire to the baseboard heater as mentioned above, it’s essential to confirm that the electrical system is properly grounded. This can be achieved by checking the grounding circuit or grounding conductor. If you are unsure about the grounding requirements, consult a licensed electrician to ensure compliance with local electrical codes.
Securing the wiring with electrical tape or wire connectors
- After connecting all the wires, it is important to secure them properly to prevent any loose connections or potential hazards.
- One effective method is to use electrical tape to wrap around the wire connections. This helps to insulate and protect the wires from accidental damage.
- Alternatively, you can also use wire connectors, commonly known as wire nuts. These connectors are designed to join multiple wires together securely.
- Make sure to choose the appropriate size of electrical tape or wire connectors based on the wire gauge being used.
By following these steps and ensuring each wiring connection is properly identified, stripped, connected, and grounded, you can confidently complete the installation of your baseboard heater. Remember to double-check all connections and consult a professional electrician if you have any concerns or questions about the process.
Testing And Troubleshooting
Turning on the power supply and testing the heater
Once you have successfully installed your baseboard heater, the next step is to turn on the power supply and test the heater to ensure it is functioning properly. This is an important step to avoid any safety hazards or malfunctions in the long run.
To turn on the power supply, locate the circuit breaker or fuse box that controls the heater’s circuit. Make sure it is in the “off” position before proceeding. Then, flip the switch or replace the fuse to activate the power supply.
Now, it’s time to test the heater. Follow these steps:
- Set the thermostat to the desired temperature.
- Wait for a few minutes to allow the heater to warm up.
- Feel the surface of the heater gently with your hand to check if it is heating up.
- Listen for any unusual noises, such as buzzing or rattling, which could indicate a potential issue.
- If the heater is functioning properly, you should feel a consistent warmth and hear no unusual noises.
If your heater fails to warm up or you notice any issues during this testing phase, it is important to troubleshoot the problem promptly to avoid further complications.
Checking for any issues or malfunctions
After testing the functionality of your baseboard heater, it is essential to perform a thorough check to identify any potential issues or malfunctions that may affect its performance or safety. Here are some key areas to inspect:
| Issues to look for | How to address them |
|---|---|
| Loose or damaged wiring | Tighten any loose connections and replace damaged wires. If unsure, consult a professional electrician. |
| Dusty or dirty heat vents | Clean the vents with a soft cloth or vacuum cleaner to ensure proper heat distribution. |
| Uneven heating | Check for any obstructions near the heater that may be blocking the airflow. Also, ensure the heater is installed level and straight. |
| Excessive noise | Tighten any loose components or covers. If the noise persists, contact a professional for further inspection. |
By addressing these potential issues early on, you can enhance the performance and longevity of your baseboard heater.
Troubleshooting common problems
Even with proper installation and maintenance, baseboard heaters can sometimes encounter common problems. Here are some troubleshooting steps you can take:
- No heat: Check if the thermostat is set correctly and the power supply is on. If both are fine, inspect the wiring and ensure it is not damaged or loose. If the problem persists, consider seeking professional assistance.
- Uneven heating: Make sure the heater is clear of any obstructions and that the airflow is not restricted. Adjust the thermostat to a slightly higher temperature to see if it resolves the issue.
- Thermostat not working: Replace the batteries in your thermostat and ensure the settings are accurate. If the problem persists, consider replacing the thermostat.
If you are uncertain about troubleshooting these problems or encounter issues not mentioned above, it is strongly recommended to consult a qualified electrician or heating specialist for assistance.
Safety Precautions
Tips for ensuring safety during installation
When it comes to installing a baseboard heater, safety should always be your top priority. By following a few key safety precautions, you can ensure a smooth and secure installation process. Here are some essential tips to keep in mind:
- Turn off power supply: Before beginning any electrical work, it is crucial to turn off the power supply to avoid any potential accidents or electric shock. Locate the circuit breaker connected to the heater and switch it off.
- Handle with care: Baseboard heaters can become very hot during operation. To prevent burns or injuries, always handle the heater with caution. Use protective gloves when necessary and avoid placing any flammable items near the unit.
- Use proper tools and equipment: To ensure a safe and effective installation, it is important to use the proper tools and equipment recommended by the manufacturer. This will ensure that you have all the necessary components and reduce the risk of accidents.
- Secure electrical connections: When connecting the baseboard heater to the electrical supply, it is important to check the wiring for any loose connections. Make sure all wires are properly insulated and secured to prevent electrical hazards.
- Consult a professional: If you are uncertain about any aspect of the installation process or if you need assistance, do not hesitate to seek help from a qualified professional. They can provide expert guidance and ensure a safe installation.
Proper ventilation and clearance requirements
Proper ventilation and clearance requirements are vital when installing a baseboard heater to ensure its effective operation and avoid potential hazards. Here are some important considerations:
- Clearance from combustible materials: It is crucial to maintain the recommended clearance from combustible materials such as furniture, curtains, and walls. This will prevent the risk of fire or damage to surrounding objects.
- Adequate airflow: Baseboard heaters require proper airflow to function efficiently. Ensure that there is sufficient space around the heater for proper air circulation. Restricting airflow can cause overheating and reduce the heater’s lifespan.
- Proper installation near windows and doors: When installing a baseboard heater near windows or doors, it is important to ensure that the airflow is not obstructed. Avoid placing curtains or blinds too close to the heater, as this can impede proper ventilation.
- Ventilation requirements: Check the manufacturer’s instructions for specific ventilation requirements for your baseboard heater. Some models may require additional ventilation in the room to maintain optimal performance and prevent overheating.
Adhering to local building codes and regulations
When installing a baseboard heater, it is essential to adhere to local building codes and regulations. These guidelines are in place to ensure the safety of occupants and prevent potential hazards. Here are some important factors to consider:
- Obtain necessary permits: Before starting the installation process, check with your local building authority to determine if any permits are required. This will help ensure that your installation complies with local regulations.
- Electrical requirements: Familiarize yourself with the electrical codes and regulations in your area. Ensure that the wiring, circuit breakers, and electrical connections are in accordance with these standards.
- Heater location restrictions: Some building codes specify restrictions on the placement of baseboard heaters, such as minimum and maximum heights from the floor. Be sure to adhere to these guidelines to maintain compliance.
- Inspections and certifications: In some cases, local authorities may require inspections or certifications after the installation is complete. Make sure to schedule any necessary inspections to confirm the safety and compliance of your installation.
By following these safety precautions and adhering to local building codes, you can ensure a safe and successful installation of your baseboard heater. Prioritizing safety will not only protect you and your home but also guarantee the optimal functionality of your heating system.

Maintenance And Care
Maintaining and taking proper care of your baseboard heater is crucial to ensure its optimal performance and longevity. Regular cleaning, checking for loose connections and damaged components, and timely replacement or repair of parts are essential tasks that should be performed to keep your baseboard heater in excellent condition. In this section, we will discuss each of these aspects in detail.
Regular cleaning to prevent dust buildup
Regular cleaning is one of the most important maintenance tasks for your baseboard heater. Dust and debris tend to accumulate on the surface and inside the unit over time, obstructing the airflow and reducing its efficiency. To prevent dust buildup, follow these steps:
- Switch off the power supply to your baseboard heater before starting the cleaning process.
- Use a soft brush or vacuum cleaner with a brush attachment to gently clean the exterior surface of the heater. Pay attention to the fins and the front grill.
- For thorough cleaning, remove the front grill carefully by unscrewing the screws. Clean the grill separately using mild soap and water. Allow it to dry completely before reattaching.
- Once the grill is removed, use the vacuum cleaner to clean the interior of the heater. Be careful not to damage any components.
- After cleaning the grill and interior, reattach the grill securely by tightening the screws. Ensure it is properly aligned.
- Switch on the power supply and test the heater to make sure it is functioning correctly.
Checking for any loose connections or damaged components
To maintain the safety and efficiency of your baseboard heater, it is crucial to regularly check for any loose connections or damaged components. Here is what you should do:
- Switch off the power supply to your baseboard heater.
- Inspect the power cord and plug for any signs of wear or damage. If any issues are found, replace them immediately.
- Check all electrical connections and ensure they are secure. Loose connections can lead to inefficiency or electrical hazards.
- Examine the heating element and fins for any visible damage or bending. Bent fins can restrict the airflow, affecting the heater’s performance.
- If any component is found to be damaged or faulty, contact a professional technician to repair or replace it.
- Switch on the power supply and test the heater after conducting the necessary repairs or replacements.
Replacing or repairing parts when necessary
Over time, certain parts of your baseboard heater may require replacement or repair. Ignoring these issues can lead to decreased efficiency and potentially dangerous situations. Here’s what you need to do:
- Identify the faulty or worn-out component that needs replacement.
- Refer to the manufacturer’s instructions or seek professional assistance to ensure you use the correct replacement part.
- Safely switch off the power supply to your baseboard heater.
- Remove the defective part according to the manufacturer’s instructions.
- Install the new part carefully, following the provided guidelines.
- Double-check the connections, screws, and any other fasteners to ensure everything is secure.
- Switch on the power supply and test the heater after replacing or repairing the necessary parts.
By regularly cleaning your baseboard heater, checking for loose connections, and promptly addressing any repairs or replacements, you can ensure its optimal performance and extend its lifespan. Invest some time and effort into maintaining your baseboard heater, and it will continue to provide reliable and efficient heating for years to come.
Frequently Asked Questions For How To Install A Baseboard Heater
Can I Install My Own Baseboard Heaters?
Yes, you can install your own baseboard heaters, but it’s important to follow instructions carefully. Make sure to have the necessary tools and knowledge. If in doubt, hiring a professional is recommended for safety.
Do You Need An Electrician To Install A Baseboard Heater?
Yes, an electrician is needed to install a baseboard heater.
How Do You Install A Baseboard Heater In A Finished Room?
To install a baseboard heater in a finished room, follow these steps:
1. Choose the right location near an existing power source.
2. Turn off power to the room.
3. Choose the heater and thermostat.
4. Mark the location for mounting brackets.
5. Drill holes and attach brackets.
6. Secure the heater.
7. Connect wiring according to the manufacturer’s instructions. 8. Install the thermostat.
9. Turn on power and test the heater.
How Much Does It Cost To Install A Baseboard Heater?
Baseboard heater installation costs vary depending on factors like the size of your space, the type of heater, and whether you need any electrical work done. However, on average, you can expect to spend around $600 to $1,500 for installation, including materials and labor.
Conclusion
Installing a baseboard heater is a straightforward and cost-effective way to add warmth to your home. By following these step-by-step instructions, you can enjoy the comfort and convenience of a baseboard heater in no time. Remember to always prioritize safety and consult the manufacturer’s guidelines.
With proper installation and maintenance, your baseboard heater will efficiently heat your living space for years to come. Stay warm and cozy!